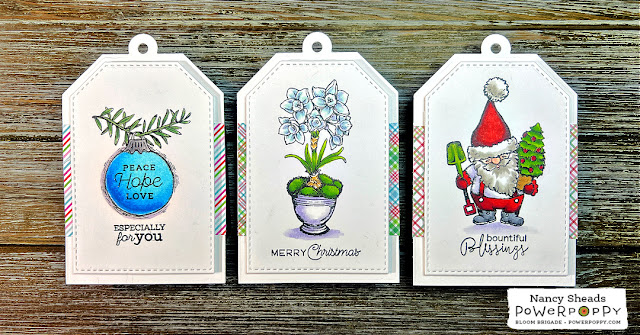
Hey friends! Welcome to another addition of Inspire Me Monday! The theme of this month's challenge is Christmas in July so I thought that I'd get a jump start on holiday gift tags. I love making tags because they are quick projects that I can pull together when I’m short on crafting time. And if you make too many, you can always use them as a focal point on a holiday card or just save them until next year. They never go out of style!
LET'S TAKE A LOOK AT TODAY'S PROJECT!
The basic design of all the tags is the same starting with the Easy Layer Tag Die by Avery Elle. I like using this die set for tags because which creates two layers -- a top layer for the image and a bottom layer for a background design. If you use Copic markers, this will nicely cover the bleed through on the back of the image layer and the base is large enough to add a greeting on the back.
TAG 1 - SIMPLE JOYS
For this tag, I used the ornament image from the Simple Joys stamp set. The image was colored with the following Copic markers:
- Ornament: B000, B00, B02, B05
- Ornament Cap: C1, C3, C5
- Sprig: G24, G46
TAG 2 - MOSSY POTS WITH PAPERWHITES
For this tag, I used the single Paperwhites image from the Mossy Pots with Paperwhites Stamp Set. The image is also available as Mossy Pots with Paperwhites: Accent Pieces Digital Stamp Set. The image was colored with the following Copic markers:
- Flowers: BV000, B000, BG10
- Moss & Foliage: YG03, YG17, YG67
- Bulb: E31, E33
- Bowl: BV0000, BV000, BV00
- Shadow: BV0000, BV000
TAG 3 - SEASON'S GREENINGS
For this tag, I use an image from the Season's Greenings stamp set. This image is also available as Season's Greenings: Planta Claus Digital Stamp Set. The image was colored with the following Copic markers:
- Skin: E00, R20
- Beard: W1, W3
- Hat, gloves & pants: R14, R24, R46, R59
- Shirt: BV0000, BV000
- Boots: N3, N5
- Tree: R46, YG03, YG17, YG67, E35
- Shovel: R46, YG03, YG67

FINISHING THE TAGS
Once the coloring was complete, I stamped the sentiments using a black pigment ink. For each tag, I cut a piece of design paper to 2.25" x 3.25" (the width of the tag) and adhered it to the bottom tag layer. I applied foam tape to the back of the image layer and assembled as shown.
Hope you enjoyed today's project! Thanks for stopping by!
Nancy


These are so sweet, Nancy!
ReplyDeleteThese are beautiful Nancy!
ReplyDeleteWhat a great idea to use two layers with on the first one
the little peep of design paper. I have to remember that for my own makes.
Sorry that I'm late with commenting but I didn't receive a mailing that
there was a new post and always forget to look on Monday's.
Thank you so much for sharing, stay safe and have a wonderful day.