Showing posts with label Vintage Easter Egg. Show all posts

Tuesday

Creative Confetti: Think Spring!


Hello creative people! How are things in your neck of the woods? Are April showers getting ready to bring May flowers? Is Spring in the air? We feel it too! And, that's why we're smitten with all the beautiful things getting ready to sprout around us! It's why I decided to put the season in the spotlight for today's Creative Confetti challenge! 


HOW TO PLAY: It's as simple as using a spring flower, creating a spring-themed project or honoring the season in some way! It couldn't be any easier folks! ;-) If you need a little inspiration, just take a trip over to Ms. Marcella's IG feed to see ALL the beauty and color that has been popping up in her yard lately. I tell you, it's divine!

ON TO MY CREATION! 

If you checked in yesterday for Inspire Me Monday, you saw my step-by-step tutorial on how to make this little Easter Basket with a bit of a digital stamping spin! (click HERE if you missed it!

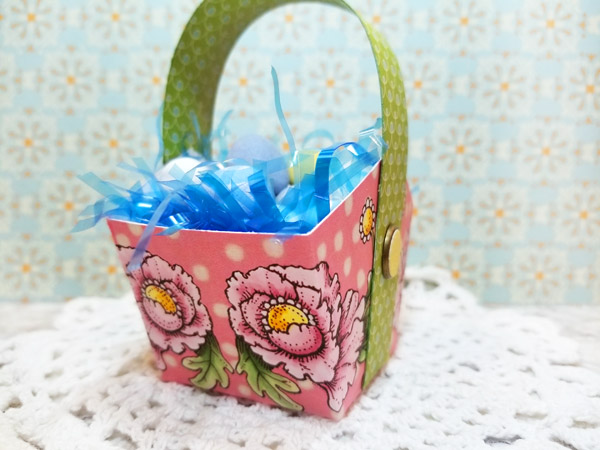
This little basket is small, perfect for a few pieces of candy, a handful of jelly beans or, what I am going to do, a gift card at the bottom with some grass and Robin Eggs on top -- got to be sneaky when you have teens and young adults! ;-) 


After making this little number, I thought, "Why not encourage everyone to have a little Spring in their heart when creating?" So, here you have it folks! Make something that showcases this season.

After you're finished, don't forget to link up your creation below! Every entry is one more chance at winning a $25 gift code to the Power Poppy Shop!  So, get those fingers inky and let's see where your creativity takes you!

Happy Creating!

~Julie
a.k.a. The Creative Confetti Thrower


You are invited to the Inlinkz link party!
Click here to enter

Monday

Inspire Me Monday: Sweet & Simple Basket!


Hello peeps! Before a holiday, I always search out ideas for fun little projects to deliver a little love to my kiddos. Yes, my son is 22 and my daughter is 15, but they still need a little handmade love from their mama, right? So, today, I am going to show you a super duper easy way to make an Easter treat basket! If you choose not to stamp on this little project, you can literally make this box in minutes. I chose to put my own spin on it and show you how to add a little digital design in the process!

Let's get started!


I started by creating a template for my box. I made it 6" wide and 6" tall and then added guides every two inches both horizontally and vertically around each edge in Photoshop Elements. Not sure how to "add a guide?" At the top navigation bar, click on "View" and then in the dropdown menu, click on New Guide. A window will pop up allowing you to choose vertical or horizontal as well as where you want your guide to land. I chose 2" and 4" both horizontally and vertically.


From there, I opened up the Vintage Easter Egg digital stamp and knew I wanted to use just the flower. So, I clicked on the background, chose that color and then, using the brush tool, started "erasing" parts of the image.


You can see when I was done, I used the flower to create a kind of border at the top and bottom of my soon to be basket!


I didn't want my basket to be white, so I ended up removing the white background and dropping in this fun pink polka dot design that I found online.


And here's my project all trimmed up, scored at 2" around and then cut at the flaps. 


I ended up only using a few colors to bring my scene to life! And, I sped colored, just scribbling in from dark to light some color. There are times when you really want to get lost in the coloring and make it a masterpiece. This is not one of those times. ;-) Here's a peek at the two greens I used. I went over the whole leaf with G20 afterward. 


Scribbled on these yellows, again going dark to light.... 


And lastly, the pinks -- from dark to light! I blended the whole flower with RV00. 


As you are assembling your basket, you want to bring the corner of the flap from one side to meet the corner of the flap from the other side. (I took this photo before I colored up those little tiny daisy-like leaves! ;-) )


I cut a piece of decorative paper to be 1" wide by 10" long and decided to use this as my handle!


Before I attached the handle, I lined it all up and then punched my hole so that my handle would be in perfect position. I just used a pencil to make a mark and show me where to punch.  The sparkly brad I made using one of those flat brads and a 1/2" circle punch and some sparkly yellow paper.


And here's what my little basket looks like when it is all colored and assembled! I think this is just such a fun and darling project! Add a little easter grass (sorry, blue is all I had -- might swap that out before I give this one away) and then, of course, some candy!


And, here's a peek at the basket from the end angle. I sure hope you give this little project a try! Like I said, it's super easy and with some fun digital stamps, you can really make this your own and personalize each basket too! You could even add the name of the person you plan to give it to! The options are endless!

Thanks so much for stopping by and sharing a little time with us here on the Power Poppy blog! Have a wonderful week and if I don't "see" you beforehand, have a Blessed Easter!

~Julie 

Friday

A Few (or Five) Good Vibes for your Weekend!


Hello Power Poppy Fans and..... HAPPY FRIDAY! We hope that your week is ending on a creative high note and we hope those creative juices of yours are already starting to bubble ahead of any cardmaking marathon you might have planned! But, if you are suffering from a bit of an inspirational draught, don't worry! We've scoured the world wide web for just the right bits of ingenuity to pique your interest and spark a little inspiration!

LET'S GET TO THE GOOD VIBE HIT LIST! 


1. A Cut Above! A couple of weeks ago for our Creative Confetti Challenge, we dug out an old tutorial from Dina Kowal with a quilted flair -- challenging you to simply stamp, color, cut and reassemble! Click HERE to see the challenge and then head HERE to see Barbara Campbell's amazing take on this challenge! With those lush cherry blossoms and BEAUTIFUL layout, definitely a good vibe!

2. Bit of Sunshine Today's the day my friends! Amy Shulke is at it again, coloring up some Power Poppy goodness and this time, she chose the Saucer Magnolia image to work her magic. She's giving her tips and tricks on really bringing out the best in the color pink! Oh my! Want in on the class? It starts at 11 EST today. But, don't worry! The class will be available for the next few months on her sight to cue up and learn as you go! Click HERE to check it all out!

3. Perky Poppies I'll admit it. Every now and then I get sucked into the social media wormhole, looking for inspiration. I stumbled upon this birthday beauty by Hannelie Bester. If you take a trip over to her Instagram, she has quite a Power Poppy creations that had me smitten!

4. Spring to Life! Well folks, you watched it HERE when the ground over at Ms. Marcella's place was being prepped for the world of a thousand bulbs. Winter came and they just sat there waiting to make their grand appearance and now HERE they are! You'll have to click on over to see this fine woman in her glory, watching these beautiful little petals make their way around her charming abode!

5. Coloring Up Easter With this beautiful holiday just nine days away, now is the time to get crack-a-lacking (with or without the egg) on some creative wishes! Check out this lovely by Sarah a.k.a. craftyratuk using Power Poppy's Vintage Easter Egg Digi. Love the bold color and the splash of sequins Sarah!


And.... if I could include a sixth good vibe, it would be to stay tuned because Ms. Marcella will be sharing the Power Poppy Spring Stamp Steal Who doesn't love a bargain on some beautiful polymer and digital blossoms? 


With that little taste of wonderful thrown before you, I have a little bit more! A few of the Bloomies are on standby, ready to share the beautiful things they've worked on this week to brighten your day!


Christine Okken
Kathy Jones


Thanks for stopping by to get a little jolt of creative inspiration. If you do create and want to share, just leave a link in the comments below or be sure to tag us on social media #powerpoppy!

Until next time...
~Julie 

Saturday

Digis on the 5s release: Vintage Easter Egg

Well hello! Fancy meeting you here. I’m just about to roll out a remixed illustration of mine that has to be one of my favorites. (Do I always say that?) It’s a sweet throwback in style, but also in attitude! You know, I find a lot of inspiration from vintage postcards and sweet old-timey illustrations. They seemed to capture such whimsy, such imagination! Flowers typically swept across the scene in some fashion or other. Interwoven with typography or image. Hand-lettering, sometimes gilded and embossed, was commonplace. And sometimes the scenes were downright quirky! (Note human baby poking out of egg in the montage below, hehe!)...


Well, I just love to look at all of that kind of stuff, and study each detail. Such a gentle time. I do think it’s quite special that nowadays it’s up to the cardmaking community to make the special cards that will be passed down for generations, adding the gilded touches and the special embossing. Hooray for all of YOU!!! I’m adding my newest addition to the Power Poppy’s downloadable stamp archive with Vintage Easter Egg.


If you like to make charming Easter cards, then this one is for you! Today’s set comes with the core illustration of a picotee-edged ribbon-wrapped egg, surrounded with simple flowers and leaves, plus a customizable tag. I’ve also included a tag with Happy Easter hand-lettered upon it, so you have a choice there. AND, there’s a sentiment that can be used on the inside... or, as you’ll see in Nancy Sheads’ card, on the outside! Wow, always so pleasantly surprised with what our wonderful designers come up with!


Let’s get on with the Vintage Easter egg show... our super-skilled Instant Gardeners came up with some adorable cards to inspire you!


Thank you for coming by today to check out the new image, and remember, you can be coloring it yourself within a few minutes with a quick order and download! :) Enjoy and have a wonderful day!