
Howdy all! Happy Monday to you all today! I'm Allison and I'm your hostess for today's Inspire Me Monday!
If you haven't already checked out our latest Power & Spark challenge for the month of September, you need to do that! It's all about gift giving! So I thought I'd share a really quick an easy tutorial on a fun way to package some handmade cards, gift certificate or something else you special you've made for a friend or loved one. This tutorial will teach you how to make a Fold Over Box that fits A2 sized cards.

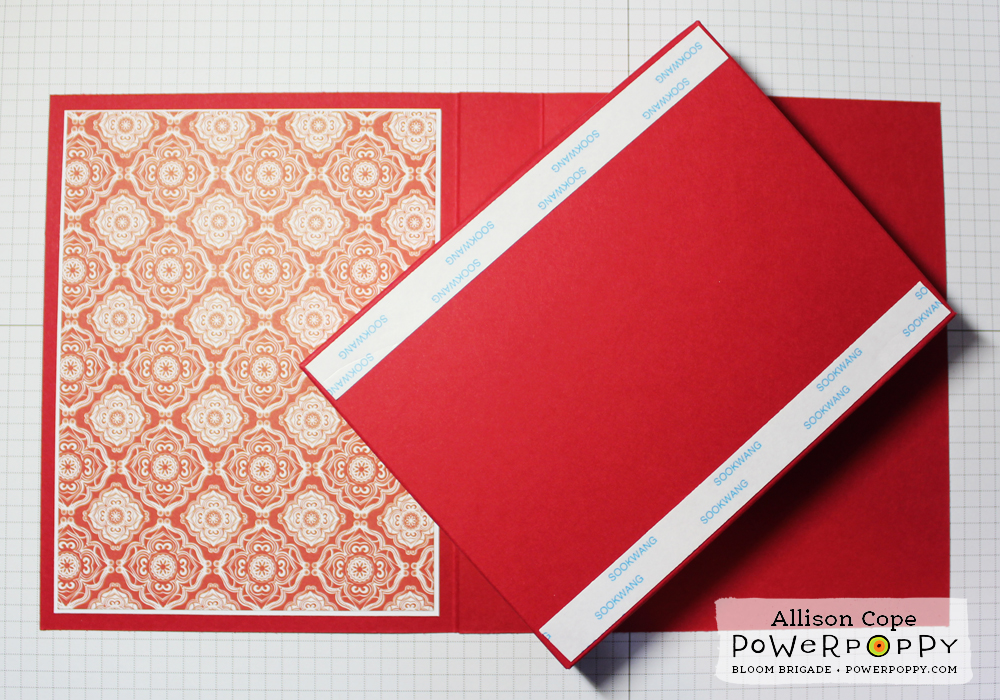
 Here are the measurements of the cardstock you will need:
- TWO - 6" x 6 1/2" (lid & bottom)
- ONE - 1" x 11" (belly band)
- ONE - 8" x 6 1/2" (3D box)
- ONE - 6 1/8" x 4 5/8" (box topper)
Using your 8" x 6 1/2" sized cardstock, SCORE all 4 sides at 1". Then cut V-shaped tabs like the image below.

STEP 2:
Add a strong adhesive to the outside of each tab and adhere the tabs to the inside of the box to create sides (see photo insert).

STEP 3:
Using the 6" x 6 1/2" pieces of cardstock (TWO), SCORE on one side of each piece at the 1" mark on the long side (6 1/2" side).

STEP 4:
Add strong adhesive to the inside of one of the 1" scored strips of the cardstock. Adhere the 1" strips together as shown to create a 3D card.

STEP 5:
Decorate the inside of your lid base using the desired patterned paper.
Adhere the box to the inside of your card using strong adhesive. The box is designed to have a 1/4" gap all the way around the edge of the box.
Decorate the inside of your box if desired. Make sure to trial the piece of paper before you adhere it to the bottom of your box.

STEP 6:
Create a box topper to fit your piece of 6 1/8" x 4 5/8". I used the festive "Bough Wow Wow" stamp set to decorate the top of my Fold Over Box. I kept the colors simple, using only warm greys and red to color my stamped image with so it matched my patterned paper. DO NOT adhere your topper to your cardstock until the after the next step.

STEP 7:
Take your box topper cardstock and make a mark indicating the center of your topper. Then carefully wrap your belly band around the box loosely and crease it to match the height of the box. If you wrap the belly band too tight, you won't be able to get it on and off easily.
Adhere your belly band ends either under or on top of your topper (it's your choice!). I ended up adhering mine underneath. The pencil line won't show because your going to adhere your topper right over top of it!

STEP 8:
Adhere your topper to your topper cardstock using a strong adhesive.
You can further decorate your box by adding decorative paper or ribbon to your belly band or even around the edge of the box.

At last, you have a little decorative box to send some fabulous cards or a gift...

And here it is with the topper and belly band off. As you can see, I added a little bit of patterned paper to the lid so it wasn't too bare when the topper was removed.

Thanks for joining me today! I hope you'll join me and the Bloom Brigade and play along with our Gifts from the Heart challenge this month! Remember, anything goes when it comes to gift giving!
Happy stamping and creating everyone!
~ Allison ~
Supplies:
stamps: Power Poppy (Bough Wow Wow)
cardstock: Stampin' Up! (Real Red), Neenah Solar White
inks: Memento (Grey Flannel), Stampin' Up! (Real Red)
patterned papers: Photo Play Paper Co. (Dear Santa 6x6)
pens: Sakura (Glaze), Copic Markers
dies: Cheery Lynn Designs (French Pastry Doily)
lace: Decollections (Lace Tape)
other: Stickles, thread.
11 comments:
I'm totally transfixed by this whole project — just a treasure in every way, Ally. I LOVE how you colored the stamp using only neutrals and then popped the berries with red and a glossy finish! All that specialness on top of a stupendous box design!! Girl, you rock-n-rolled this thing, YET AGAIN! Thank you! ~m
This is STUNNING!!! Love the card you created. What a fun gift this would be!!
Thanks for sharing this delightful creation, love it!!!
Oh, Miss Ally, this is one amazing tutorial (thanks for the step-by-step instructions and measurements), and what a gorgeous gift box! It's beautiful with the great DP, the lovely lace, and (of course) the fabulous image that you've shaded with warm tones with a touch of red for the berries. This would make a fabulous card too! I love it, and thanks so much for taking the time to share this with us all. Tutorials are a lot of work, and I love each photo...so clear! Hugs, sweet friend!
love this, I think I am going to size some Christmas crackers to put inside
WOW! Ally you never cease to inspire my card making. What a wonderful Gift from the Heart treasure. Adding the crochet lace trimming is a perfect embellishment to create an 'old world feel'. The tutorial is an extra special gift. Mwah!
Hello Allison,
Your card and gift box design here is stunning. I love all the embellishments and the color scheme. I was wondering, how do I make the box taller than one inch? This box would be wonderful to carry cookies and other gifts, but one inch might be too "short" for me. Thank you for responding!
Wow this is very cool and decorated just beautifully!!
Thanks for checking out my tutorial. To make your box a little deeper, let's say 2" deep...
Here are the NEW measurements of the cardstock you will need:
TWO - 7" x 6 1/2" (lid & bottom) - score at 2" down the 6 1/2" side
ONE - 1" x 12" (belly band) - you may need 2 of these - connected together
ONE - 10" x 8 1/2" (3D box) - scoring at 2" all the way around
ONE - 6 1/8" x 54 5/8" (box topper) - (may not be correct! Measure the top first!!!)
I hope that helps Bernadette!!! Make sure you use a heavy duty cardstock and good strong adhesive to hold your treats in the box. Happy creating!
Ally.
This is just awesome! Your colors, design, coloring, just beautiful.
Hi Alley! Thanks soooooo much for answering my question! I was busy at work all week preparing for a two-day conference and I didn't check your reply until today. Thank you again! I'm ready to try this out!
Post a Comment