
Hello all and happy Monday to you! I'm here to help you kick off your creative week and share a fun spin on the average, every day card. How often do we create and then our masterpiece is set on an A2-sized piece of folded card stock? For me, all too often! I very rarely step outside of that comfort zone or challenge myself to think of new ways to "present" my colored up images. So, I bring you.....

For this creation, it's simple, almost too simple! I cut a panel of double-sided decorative paper, and then, using my cutter, cut a 2" slit somewhere in the middle. I didn't measure a thing, just eyeballed it and then, folded back both sides of the slit. That's it! I adhered this piece to a piece of yellow decorative paper and then, stamped my sentiment in the void, embellishing it with a few faux brads for a little pop of color. See?

I knew that this wasn't where I wanted this card to end. I mean, for easy peasy cards, you could let the paper be the focus, but I wanted, needed, had to have a FLOWER! ;-) So, I stamped the main floral image from Power Poppy's Potted Primrose stamp set in Vivid! Taupe ink, fussy cut it, colored it up and attached it to my card front with foam tape to accent this twisty design. Here's a look at the finished card!


Be sure to save the strip that you cut off the front bottom. You'll need it! I trimmed off a bit from that strip and added a piece of embossed decorative paper. This gives you a hint of where we are going to go with this card....


Are you starting to see the pieces of the puzzle come together? This will be the area that you want to stamp your sentiment. I decided to even make my sentiment a bit of a surprise and used a couple of the sentiments from Power Poppy's set Bloomin' Wonderful. I will showcase how this comes to play in a second, but first, I needed something to connect the top and the bottom sections of my card front. So, enter this little flag die cut featuring Power Poppy's digital stamp set Asters Abuzz!


Then, peel back the tape and add the little bit for the bottom!

And here's the full sentiment that's revealed when you open up the card! Make sure you heat set the ink that you used for your sentiment to make sure it is really dry before trying to erase your pencil marks.

And then, a look at the finished card.....

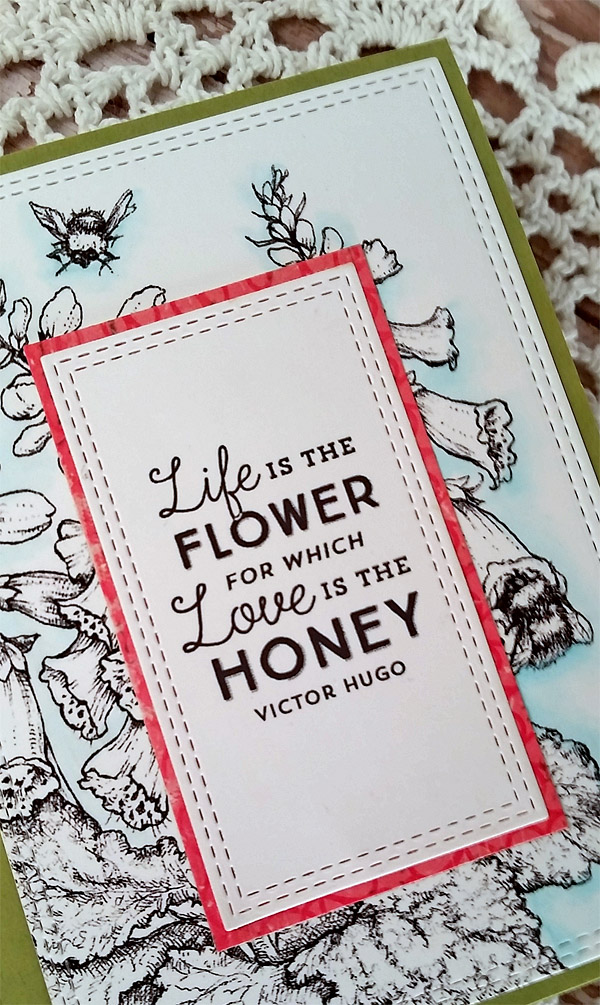
This last card started in one place and ended up in another place entirely! I had this image in my head that I wanted to have a fold where the front of the card featured a spotlight of my main image and the inside revealed the full black and white picture with a bit of a surprise sentiment. I thought I'd attach the spotlight piece with the help of a flap, so I started there using some die cut borders and decorative paper accents. See? This is my base....

From there, I took a printed out copy of Power Poppy's digital stamp Bees in Foxglove and cut it out using a stitched rectangle die. From there, I added it to the inside of my card.

From there, I took another Bees in Foxglove printed snippet and using a smaller stitched rectangle die, eyeballed a piece of the image and cut out that section so that, when cut, it could be layered on top for a spotlight effect, see?

To add to the element of surprise, I wanted to reveal a sentiment when the recipient opened the card.

So, I added a bit of pink decorative paper and lined it up so that the pink mat would look like it was the mat to my spotlight image. See?


And, from the inside.....
Thanks for stopping by everyone! Have a fabulous week!
~Julie
21 comments:
Goodness, what fantastic ideas!!! I love every one of them. Bookmarked!!
Super cute ideas, nothing boring about these. Will give them a try.
Wow, these are such great, creative and novel ideas in cardmaking! Thanks so much for sharing!
Beautiful cards, love the Foxglove card.
Fabulous ideas, love them all! Thanks for the inspiration.
Oh WOW! All so incredible!
Beautiful cards!! Love the folds!! Thanks for sharing!!
-Berina
Moxie Craftie
Oh, Julie, what a really fun Inspire Me Monday! I love each and every one of your beautiful cards and love how you've shown each step! Fabulous, and I'm definitely pinning these and plan to keep these as ideas. I LOVE them! It sounds like you really had fun with this too! Thanks, sweet friend! You made me smile!
Such interesting and unique way! All work is focused so well! Impressive and inspiring! Thanks for sharing your talent!
These are all so cool, love the highlighting in the last one, great designs and lovely coloring!
Beautiful, simply lovely cards, all three of them and amazing.
I love the image on the third card, those bees are so chubby and adorable. Off to Pinning!!!
Love the third. So beautiful.
Love the third. So beautiful.
Girlfriend...this is an awesome tutorial! Such great ideas and designs!
EEEP!!!! Love these sooooooo much Julie!!! Must try them myself!! :)
I'm so happy you did these! They are all wonderful. The last is just perfect as an anniversary card for my sister(also a cardmaker) and her husband. Thanks!!
Love your work. Especially the foxgloves and bees. Beautiful. Thanks for sharing you tips and directions.
Thank you all! Your super sweet comments brought a smile to my face! :-)
Thank you all! Your super sweet comments brought a smile to my face! :-)
Thank you so much for sharing!
XO Nana
Adorable creativities! Really very impressed to see all this. Thanks for the tutorial. I am going to attend a crafty party very soon at local party venues in Italy. I am eager for this event as will see my friends after a long time.
Post a Comment