Hello all! Who's ready for a new challenge? For some, this challenge might fire off different parts of their brain and get them learning a new skill! I have seen so many people during these times vow to try something and learn something new. My daughter's taking online guitar lessons through Fender. I am taking up sewing again. I just made THIS little caddy for my knitting and it turned out so cute!
So, if you haven't tried digital stamps yet and using them in different ways, now is your challenge and chance! A long while back I did THIS tutorial on getting used to manipulating digis. It's a great starting point. And, if you need a little ammunition to get started, Marcella has plenty HERE in the digital section of the Power Poppy Shop!
So, without further ado -- this week's challenge!
HOW TO PLAY: It's just as simple as the graphic suggests! Simply use a digital stamp for this week's creation! Want to learn something new or try something you haven't before using digital stamps? Keep reading! I am about to show you one way you can stretch your digis in new and different ways!
I've been really jonesing for some new images to color and I thought -- WAIT -- I can CREATE a new image just by digging into my digital stash! So, here we go!
I started by coming up with a concept in my head -- I wanted a frame for an uplifting sentiment so that I can spread some joy thanks to an envelope and a stamp. I know there are so many people right now that I can't see, can't hug and can't share time with. Our craft, dear friends, is the next best thing! It's a handmade creation, just from YOU made especially for that beloved friend!
So, I started by creating a 2" by 2" canvas in Photoshop Elements. This helped me to create just the right size circle. I used the Marquee tool, clicked on circle and then drug my cursor over the square to create this image. After I made my circle, I outlined it using the "Stroke" effect, adding a thin black line around my circle. (You can see the stroke tool off to the right of my image)
Then, I created a second file to measure the size of a card front - 4-1/4 by 5-1/2 and I centered my circle on top.
I knew I wanted my frame to be surrounded by loose florals and after scrolling through the digital section of the Power Poppy Shop, I knew this image below, Sweet Pea Show would be perfect! After opening it up, I used the eraser tool (you can see I clicked it off to the left of my image in the tool bar) and I removed my background.
From there, I erased everything but sections of the image, using each piece to create my floral frame.
Sometimes, this is how small my piece was!
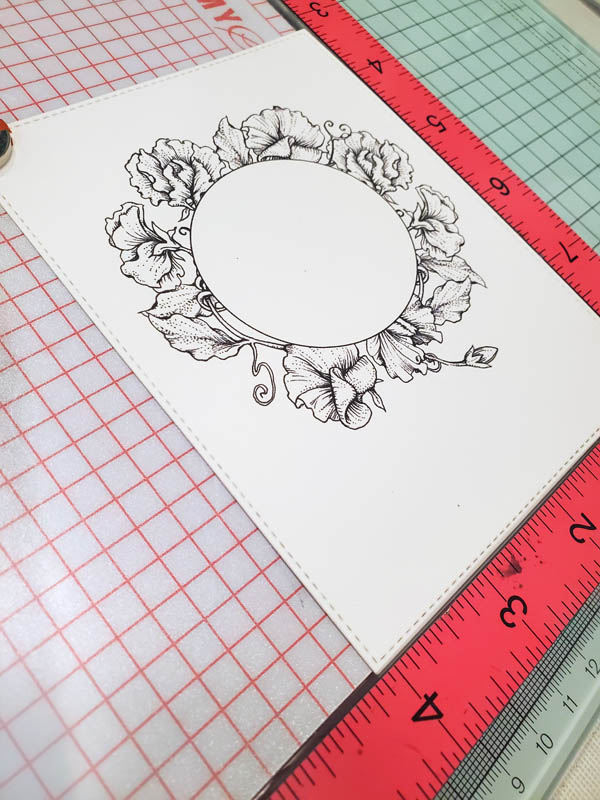
And after I moved an manipulated all of the pieces, this is what my frame looked like!
After printing and using a stitched rectangle die to cut out my image, I set my digi in my MISTI stamping tool.
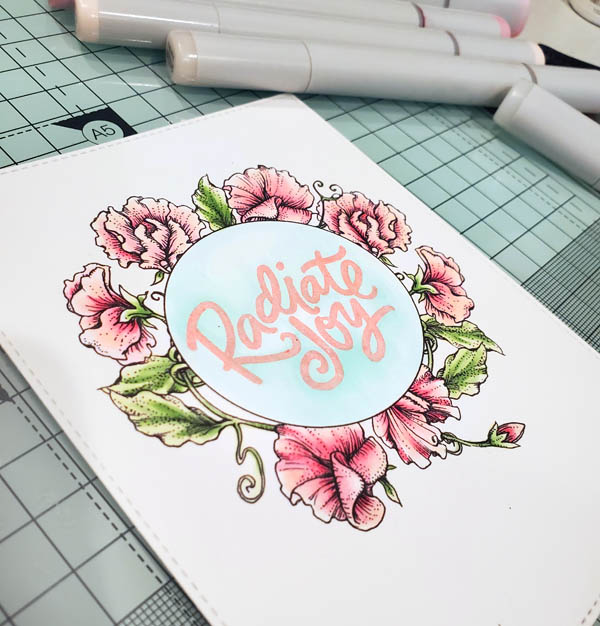
Here's another trick that I want to show you today! I set the "Radiate Joy" sentiment from Power Poppy's M-Powering Words stamp set to the left-center of my circle. (Can I just say that this stamp set is PERFECT for the times we are living in right now -- so much encouragement!) There's a reason for this! I knew by using the MISTI, I could create a shadow effect with my sentiment and I thought that would be a fun effect!
I stamped it with Tea Rose Vivid! ink -- funny, I have had this stamp pad for probably more than 15 years and it is still going strong. They don't even make this ink any longer. My reinker will probably keep it alive for another 15 years! ;-)
Now, here's the fun part. I cleaned off my stamp and as you can see, I offset the stamp, placing it down and to the right of the original image. You can tell when you see the "white space" around the stamp. Can you see it? I closed the door of my MISTI, setting that stamp in place and then set the MISTI aside for now. When the time comes, I will be ready for this knowing my next stamp layer will provide the perfect shadow effect!
Then, I went to town coloring! I used my Copic markers and used R81, R83, RVOO and R00 to color up my petals and G21, G24, G20 to color up my leaves. I highlighted around my sentiment using BG0000 and BG10. When you see my finished card, you'll see I added these highlights around the outside of my main panel as well.
Once I was finished coloring, I pulled out my Versamark ink pad and my silver detail embossing powder and using my MISTI, I stamped and heat embossed! Isn't that fun?
And here's a peek at my finished card! It is a super simple design -- decorative paper background, silver cording, pink button. That's it!
. . . . . . . . . . . . . . . . . . . . .
So, since a new month is upon us, it's time to see who won our March challenge! Random.org put all the numbers in its virtual hat, drawing this lucky number!
* * * * MARIA RODRIGUEZ! * * * *
Maria crafted this beautiful creation above and on the inside it says, "Be the Rainbow to someone else's cloud." Love that. Maria uses Power Poppy's Poppies stamp set which is on sale as we speak! I love this image done up in soft pinks -- so pretty and just as the icon suggests -- springlike!
Thanks for stopping by folks! I hope you play along with me this week and for the rest of the month! We'll have some guest hostesses joining me in the coming weeks, so that will be fun! Since we are using digis this week, I can't tell you to get those fingers inky but I hope you join me! Remember, each entry is one shot at winning a $25 gift code to the Power Poppy Shop. You just need to link up your creation below to enter! Just that simple!


9 comments:
Jules this is awesome! I love it! You are so good with digis.
And....I want to see the caddy now too!
Hello Julie: I'm so happy to be the lucky winner for the past challenge, this is fabulous!!
Can you please tell me what I need to do to claim my gift card?
Thank you so much for all the fantastic challenges you share for us to have fun with.
Stay safe and healthy.
I'm sending lots of virtual hugs and love.
Maria Rodriguez.
I love how you manipulate the digis into wonderful designs and show us how.
Maria, I am so sorry! All you need to do is email us at bloom@powerpoppy.com and Marcy will get your gift code to you! So sorry I forgot that! :-) Congrats!
Hi there Julie: Oh, no worries my dear, I'll email Marcy right away, I'm so darn excited for this gift card, that will take care of a couple of sets I've been eyeing for a while.
Thank you for replying, stay safe and healthy.
Sending lots of virtual hugs.
Maria.
so creative and just gorgeous!
Great to see Julie how you manipulated the digi. Your card is awesome, I love the colours and the bold sentiment.
Thank you so much for sharing, stay safe and have a great week.
This a wonderful tutorial, Julie! And stunning coloring!
Pinworthy tute, thank you, Julie! Great challenge and awesome sample makes too. XOX
Post a Comment