Showing posts with label Digital Stamps. Show all posts

Monday

Inspire Me Monday: Some Tips to Create in a Jiffy!


Hello everyone and happy Monday! It's time for another Inspire Me Monday and today, I have some fun, easy and relatively quick cards that I made to slip into the mail to send to my daughter at college. But, these little numbers are really all occasion cards that you could have on standby to send in a jiffy!

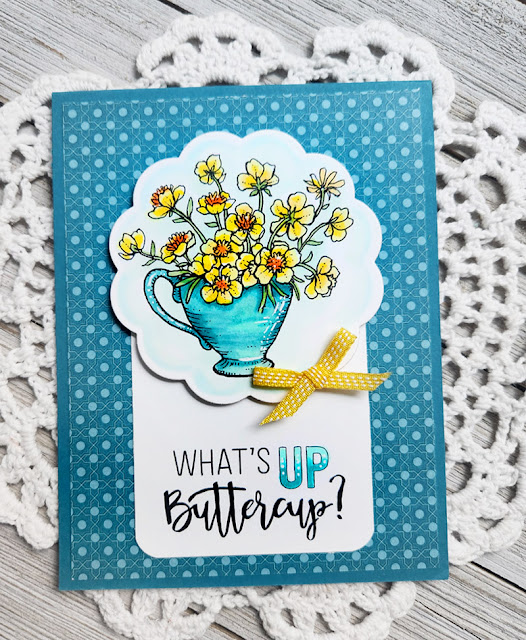
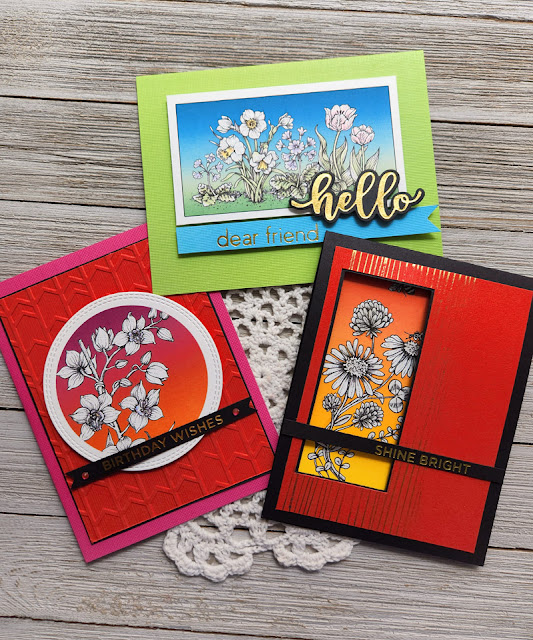
I started by going through some of my favorite digital stamps from Power Poppy and narrowing them down to images that would be "pick me ups" and happy illustrations. I decided on Wish You Luck, Asters Abuzz and Cuppa Buttercups

So how are these creations quick? I'll share some of the tips & tricks I used to keep it simple! 

First, I started by opening all of them up in my Photoshop Elements and putting them on a printable page just for ease and then, second, while they were all on the same page, I used different dies to cut out each image. 


Once I had my images die cut, I decided to make my card in reverse for ease. I call it backward but maybe this is how you create all the time? Let me know if you do because, honestly, it cut down on the time I normally take picking up and putting down so many different decorative card stocks until I settle on "just the right one!" For some reason, when the image isn't colored, it's easier to choose? Hhhhmmm.... maybe!

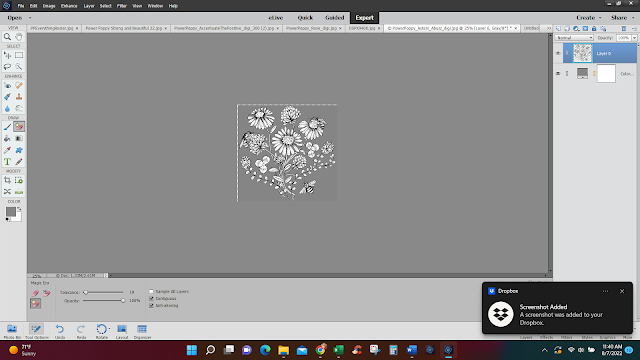
Oops! I almost forgot! With the Wish You Luck image, you'll notice the original has the stems included in the image and I wanted to create just a circle of clover -- so I opened up the image and then used the magic eraser to erase the tied stems! 

Here's a peek at the original illustration! 


Okay, back to my tips and tricks! I went about creating my card bases before I even put marker to paper....


I created these three layouts in less than a half hour (and honestly, probably less time than that). I simply picked papers that looked appealing to me instead of trying to perfectly match them to the vibe or the color of the Copic markers that I used. 

Now, the reason why I wanted to do it this way was because my daughter plays college softball and since we can't always make the away games, we sit in front of our TV and watch her for doubleheaders on Saturday and Sunday afternoons. That's perfect coloring time in between innings! ;-) 


WISH YOU LUCK - Card #1

With midterms and finals always looming, I decided to use this image to pop in the mail when she needs a little encouragement. As a nursing major, it seems like every test is "do or die" and so a little love from mom can't hurt, can it?


While this card might seem a little "loud"-- I think it's happy and the patterns are fresh and fun! Color up the image with Copic markers, add a sentiment strip and some bling and.... done! 

Here's a closeup for you! 


ASTERS ABUZZ - Card #2

This creation is just a little reminder to stay positive and when life gets you down, re-write the script and make your own happy. It's an important lesson, right? 


And, here's a little closeup! You can see that I did add a little sparkle to the bee's wings! 


CUPPA BUTTERCUPS - Card #3

I love this last card because you can pop a card like this in the mail any time for any reason! 


And so, after some coloring while watching softball, here's all three together! It was funny, after coloring an image, I'd run to my craft room and assemble and take a photo then run back to the couch to do it again! I have to say it was a fun way to create -- no stress or fussing at all like I normally do! :-)


I hope you had fun sharing a little time with me today and maybe you'll give these little tricks a try -- picking a handful of digital images and putting them on a page, die-cutting them in one fell swoop and then creating each card's layout before you color! It sure helped me! 

Thanks for stopping by! Have a fabulous and creative week! 


Inspire Me Monday: Valentine's Day Inspiration!


Hello all! And welcome to another edition of Inspire Me Monday.... albeit a little late today! ;-) Given that tomorrow is a day surrounded by love with Valentine's Day, I thought I'd share some old and new projects designed to help you share in the holiday in a jiffy! All of these projects are quick to create but not at all less heartfelt! So, let's get to it! Shall we? 

This first project is one I created a few years ago and is still one of my all-time faves. If you click the link, it will take you right to the tutorial! 

Sweets for your Sweetie! Create this darling box out of just a few strips of paper! Make it as large as you like or downsize it for some smaller goodies! The digital image is one of the best bangs for your Valentine buck with Va-Va-Valentines. This set features six different darling images and some small senties in one digital stamp set! What? Seriously? Yep. Seriously.  


Just Take 10! These two creations from Tosha Leyendekker only take ten minutes but don't look like they did! Since we are less than 24 hours away from this sweet holiday, why not try one of these? While this was stamped using a sentiment no longer available from Power Poppy, you could easily swap something in your Power Poppy stash like LaVie En Rose.


Speaking of La Vie En Rose, the last little digital delight I am going to show you a new creation that takes almost ZERO stamping! The only thing I stamped was the sentiment. I have to say this card was CASED from a kit that I subscribe to -- when I saw it, I immediately knew I could repeat the vibe using Power Poppy stamps. Whoop whoop! 

I started by downloading LaVie En Rose and removing the background with some of the tools in Photoshop Elements. I also found some royalty-free watercolor backgrounds that I knew would be fun to lay this rose over top. 


I added a stamped sentiment from an old Power Poppy set, add some silver cording, some sequins and Ta-Dah!! Fini! This is truly a 10-minute card! 

Well folks, since we are down to the last hours before Valentine's Day -- if you haven't gotten a card for your honey, try one of these 10-minute creations! 

Until next time,


Inspire Me Monday: A Little Halloween Flair


Hello all! Since we are three weeks away from 'The Night of Fright', I thought I'd share a little something I came up with on how to transform Marcella's super fun Halloween illustrations into home decor! 

I was at Michaels the other day and they have two rows full of wood pieces that you can use to create your own signs. That's where my idea was ignited! When I saw the options along with some of the fun wooden Halloween messages, I knew I had the start of something fun! 

Want to see what we are creating today? Here's a peek. 


Isn't that super fun? And, while I thought this might take me quite a bit of time to put together, I was done in a little less than 3 hours. I started by printing the digital stamp "Boo Cat & Pumpkins" at 81/2 by 11 inches. Basically, I opened it and printed it so that it would cover an entire sheet of card stock. My wooden base was 91/2 by 14 inches, so I thought this would work perfectly. Then, I continued with some loosey-goosey coloring. No need for super intricate coloring here! I used super large strokes and just colored with strokes instead of constant color. 

So this.....


Grew into this....


And, ultimately, this...


Now it was time to turn my attention to my sign! This is what I started with: a few bottles of acrylic paint, some foam brushes, the natural wooden sign, a natural Halloween sentiment and some decoupage glue. 


You can see I started painting the base of my sign black. I started wanting to cover only those cracks but quickly decided it would be better to give the entire sign a coat of black. You can see, I wasn't too careful to provide an even coat. I already knew I was going to cover this up a bit! 


From there, I took and dry brushed some purple paint over top to create a kind of weathered look. I also painted my Happy Halloween words --- although please ignore this color. After I painted this black I decided I needed a pop of color here and painted over top with a lime green shade of acrylic paint! 


And now, it's time to add my boo cat to this backdrop! I just fussy cut around my image cutting a jagged edge around the kitty so that I didn't have to cut all the little pieces of fur! After it was cut out, I attached it to the wooden base by putting some decoupage glue on the back side with one of the foam brushes. Make sure the edges of your paper don't curl. The key is to apply a super light coat, press down and then weigh the image down by covering it with a book or a few magazines to hold it all in place. 

From there, I added some layered ribbon at the top, securing with a little hot glue. I adhered the Happy Halloween wooden piece with some foam tape so that it would have some dimension. After everything was dry, it was time to add it to the hearth for a little home Halloween flair! What do you think?


And that, my friends, is it! A fun little way to use a digital stamp to create some home decor that's both frightful and fun!

Hope you had fun spending a little time with me today! And, I hope you have a fabulous and creative week ahead!

Until next time, 


Inspire Me Monday: Digital Mash Up!


Hello all and Happy Monday! I have to admit, I didn't have a ton of time to craft this week so I thought of a way to share a little creative tidbit this week, in a bite-sized post! So, here we go!

Have you ever looked at two stamps or images and wished you could combine them to make a completely new image? Well, the beauty of digital stamps is.... you CAN! 

I'd been looking at the Glittering Glass Santa ornament and that lovely branch....


And, I wondered, what can I perch on that branch instead of an ornament? Well, I'd always been a fan of the little birds in the digital set Cardinal Couple! 


So, why not mash up the two images?

I started by opening up the cardinal image and then, I knew I needed to start "erasing" the cups and berries in the image...


If you have a photo editing software, most of them have an "eraser" tool, allowing you to take out pieces and parts in one fell swoop! I use Photoshop Elements and the tool is actually... an eraser! On this image, I was careful to erase everything but the bird and her little feet and made the tool rather small to get into all those nooks and crannies. 


Next, I opened up the Glittering Glass Santa image and then erased dear Ole Santa! Sorry, Santa! 


After he was erased, I clicked on the layer and duplicated it so that I could arrange the two branch images just how I wanted it in a way that a bird might perch on it. (To do this, you right click on the layer to the right and "duplicate" will be an option. 


But you can see above.... wow... that's a lot of foliage. I decided to get rid of the lower portion of the branches on both and then just arrange the top portions by tilting, dragging and dropping. 

I should mention, I used the magic eraser tool and with one click completely erased the background so that I could "see" the top branch over the bottom.  

And, I also shortened the lower branch erasing up to a portion that looked natural. See? I know this seems complicated but... trust me... it's not. If you erase too much? Pushing Control Z is your friend! :-) 


Then, all that is left to do is perch my little cute birdie! Below is a look at my finished digital image, just ready and waiting to be printed. While I don't have a picture of it, I also printed off the male cardinal. I wasn't sure I'd use him but wanted him on "standby!"


And here's a look at how it all came together! Some die cuts, a wee bit of layering, some sparkle, ribbon and a little bling! I now officially have my first Christmas card ready to send! I should mention that the sentiment is from a Power Poppy clear set called Simple Joys! 


Here's a little closeup! 


Now, after I finished my card, I thought, "Wow, that little birdie looks a little lonely!" So, remember that male cardinal I said I printed? I ended up coloring him up and tucking him into my layer so that they would be looking lovingly at each other. 


Truth be told, however, I honestly can't decide if they are looking lovingly or if the lady birdie is just looking at the gent saying, "Hey, quit being such a creeper cardinal!" I might have to look at this card just a wee bit more before the jury comes back on that one! Long story short, this was a tutorial on digital mash-ups, not creeper cardinals so... my work here is done! ;-)

Hope you took something fun away from all of this and... I hope you have a beautiful and creative week! See y'all next month! 


Inspire Me Monday: Digital Ink!


Hello all and welcome to another edition of Inspire Me Monday! Since I love working with and fiddling with digital stamps, today I thought I'd share a few 10-minute cards that involve -- no coloring! That's right, no coloring! That is, unless you want to! Today, we'll be dabbling in a little "digital ink!"

I love bright, bold colors on my cards and this technique lets your printer do all the work so that you could make a bright and cheery card in a jiffy! 

Let's take a peek at what we'll be making today!


I used these digital stamps: Orchid Cascade, Spring Border One and Asters Abuzz

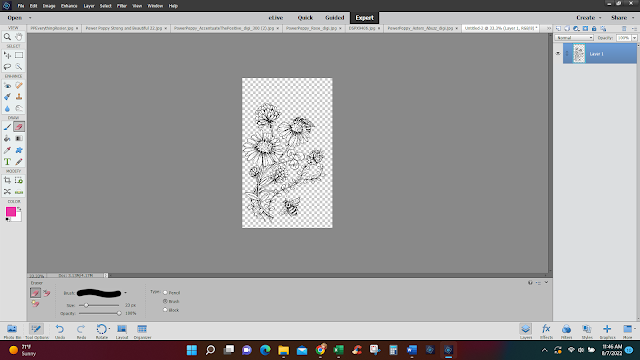
So, how did I do this? Well, you'll need photo editing software that allows you to add some effects. My tutorial today will share tips using Photoshop Elements. It's a budget version of Photoshop and I really love it for digital stamps! 

I started by opening up the digital stamp Aster's Abuzz and erasing the background behind the image. I used the Magic Eraser tool and just clicked around until the background was gone. 


From there, I cropped it down into more of a rectangle and erased the part of the image that hung over the cut line. 


I also cropped the bee out and then, by dragging and dropping, managed to arrange him more at the top of the image instead. 


Now it's time for our digital ink! I created a canvas that was the same size as a card front. Using the rectangle marquee tool, I created by rectangle, clicked on "layer" and then clicked on "new fill layer" and "gradient." I chose this red to orange gradient to serve as the backdrop for my aster cluster! 


From here, I just dragged the rectangle over to my aster image and situated it right behind. 


And, here's a look at how this card shaped up! I created a little window because I wanted the inside to be a kind of "surprise!" You can see that I also added a bit of sparkle thanks to some foil accents and a foiled sentiment. TIP: When you print your image, make sure that you are on "best detail" for printing. I know every printer has this type of version. It just ensures that the color is laid down on the paper in the highest saturation. 


Here's a peek at the inside! 

And, you can see that I did try to create a little razzle-dazzle by coloring the image with Wink of Stella clear glitter brush pen. It really sparkles in real life - just adding that little bit of interest! 


See that bit of sparkle? 


And, here are some more ideas! 


For this image, I created the rectangle and then used the "stoke" accent around my gradient box just for a little extra pop. I also splashed some color on the flowers and stems. This is still a 10-minute creation because I literally scribbled on the color, for just a soft effect. The sentiment was created by some of my foil dies. 


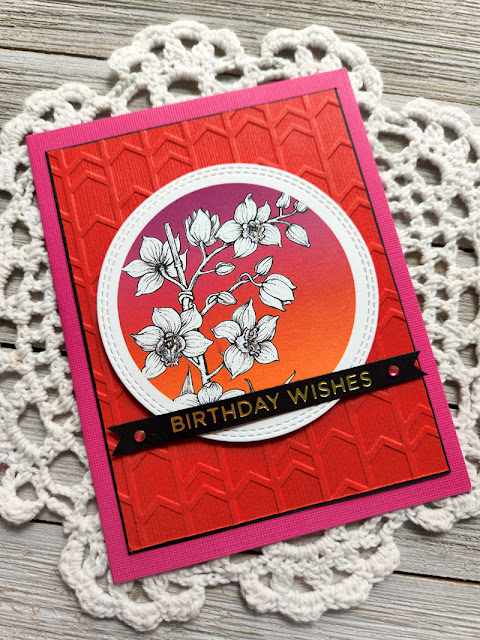
For my last card, I did want to explain how I got my image in a circular shape. You simply open up the image, remove the background and then, using the circular marquee tool, you can cut out a portion of the digital stamp in a circular shape. From there, I created a circle using my marquee tool and then using the same steps as the rectangle shape I created, I added a new fill layer in gradient color. 


And here's a look at how my finished card ended up!


For this creation, I added some pizazz with an embossed background, some rhinestones, a foiled sentiment and then, I added some stickles to portions of my orchid just to make it pop a bit! See? 


And, here's one last look at all three cards together!


I hope you enjoyed today's tutorial and maybe learn a new technique that you hadn't even considered before -- digital ink! Learning little tips and tricks like this sure helps to give your digital stamps a little more longevity. You never really get bored of them! Why? Because they can be used in so many different ways, they can evolve to serve so many different "styles!"

Thanks, everyone for stopping by! I hope you have a fabulous and creative week!