Showing posts with label Feeling Fall. Show all posts

Friday

It's Power Poppy Friday!


Hello all! Hope your harvest hearts are overflowing these days! We can see that Mr. Tibbs, the Power Poppy mascot is loving this gourd-geous season!  ;-) Sorry, couldn't resist!

Mr. Tibbs is heading up the household these days while this fine lady -- our Power Poppy Peep-in-Chief-- is running the streets of New Orleans with her old high school bud Laurie. I don't think they are having ANY fun at all! Aren't they just the cutest? I thought I'd share because if you place an order, it will be a few days until it gets shipped your way.


Some of you have asked about Christmas and what Power Poppy's plans are for the holidays! I have some good news for digi lovers! Sometime in the next two weeks, look for a new crop of digis, perfect for the season! Marcy's sketchbook is overflowing with concepts for clear sets but those sets won't be ready until late winter, early spring. Yes, it's a wait but as with all things Power Poppy, it's totally worth it! Stay tuned for news on our digi release and some incredibly fun things Marcy plans to unveil!

Did you catch last week's Inspire Me Monday? Oh, my goodness, it is a veritable spring of tidbits thanks to the oh-so-talented Amy Shulke of vanillaarts.com. She invites us into her Artist Sketchbook to break down color and show us how there are more ways to color a pumpkin than just to reach for an orange marker. It's a must-read!  Just click HERE if you haven't read it yet! And, if you didn't sign up for Amy's Silvered Pumpkins Vanilla Livestream, there's still a little bit of time!

Just click HERE to learn more. Remember, if you miss the LIVE class, Amy does allow you to watch the taped version if you become a Livestream Member! I've taken a few of her classes and she is an amazing teacher. I thought there was no way I could get similar results but she takes you step by step in such an incredible way and explains the "why" behind her coloring. She makes it all look so easy even though it is anything but!

And, last but not least, it's Friday so.... you know what that means!


Thanks so much for stopping by! We hope you have a beautiful and creative weekend ahead! We'll see you back here soon with new bits of inspiration that you can hopefully take with you next time you step into your stamping spaces!

Until next time!
Julie 

Tuesday

Creative Confetti: Make it Spooktacular!!!


Hello Power Poppy Fans! If you are anything like me, you are counting down the days to Halloween! I absolutely love this holiday -- not because we get dressed up and have an excuse to eat mondo amounts of candy (although that rocks) but because I absolutely LOVE handing out candy and seeing all the kiddos get so excited about their costumes. It's the best ever!! So, because I am in Halloween mode, I thought why not make some SPOOKTACULAR creations? And that, my friends, is taking center stage in this week's Creative Confetti Challenge!  


HOW TO PLAY: This one is sweet and simple! Just make a Halloween creation! Make it cute! Make it spooky! Make it one that gives us all a chuckle! Anything goes as long as the theme... is HALLOWEEN! Use Power Poppy stamps if you have them but, if not, this might be your chance to win some! Linky closes at the end of the month, letting you play along each week for... extra chances!

Let's get on to my creation! 


If you missed yesterday's Inspire Me Monday, you should click HERE for a step-by-step tutorial on how to make this little treat bag! Its perfect for fun-sized candy bars and oh-so-fun to create! And, on top of it, I linked up to a video tutorial by the fabulous Nancy Sheads where she shows us step-by-step how to color up this darling image that you can get in a clear stamp with Feeling Fall or a digital stamp in Power Poppy's new digi set called Boo Cat and Pumpkins! 


So, that's all there is to it this week! Let's get ready for the Night of Fright by whipping up a creation with a spooktacular design! ;-) Power Poppy has a few images if you'd like to pop on over to the shop and see not only the illustrations but the gallery of cards on that page!


So, why don't you whip up something with a Halloween flair and join me this week? Remember, each and every link up with our linky below is one more chance at a $25 gift certificate to the Power Poppy Shop! So, let's see what you've got!

Until next time!
~Julie

You are invited to the Inlinkz link party!
Click here to enter

Monday

Inspire Me Monday: Treats Not Tricks!


Hi all! Julie here with another edition of Inspire Me Monday! I figured with the 'Night of Fright' upon us, I would bring you a SUPER EASY, SUPER CUTE project that you can literally whip up in a jiffy! The folding portion of this project takes less than a minute -- no joke -- allowing you to just take your time and enjoy dolling up this little treat bag for the little ghosts and goblins in your life! 

Here's a peek at the finished project before I 
take you though the step by step! 


Now that you know where we are headed, let's get right to creating! I started with an 8" by 8" square piece of paper and folded it from corner to corner. It really helps to have a bone folder handy to make sure that you fold and crease cleanly. 


From there, you take the corner on the right side of the triangle and fold it so that it creates a straight line across when you fold it and the tip of the paper lines up with the edge of the other side of the paper... like so!


Fold the other side in the same manner so that both of your tips of the triangle criss-cross each other. See?


Once you have your folds all lined up, you can glue each flap in place. From here, you'll take the top of the triangle and fold it down, creating a flap over the area you just folded. This creates your treat pocket. You'll flip over the paper and fold down the second flap on the other side.


This creates the perfect little pocket for fun-sized candy bars!


It's just the right size! 


Because I didn't really like the white flaps, I chose to take an orange decorative paper and create a mat for each flap to add a little extra pop of color! This is where a two-sided paper would work perfectly! I just didn't have any in a color that worked for Halloween..... 


I wanted to show you just how big or small you could go with this treat bag! I started with a 6" by 6" piece of paper and honestly, this is small enough for a few Hershey's kisses, a Ghiradelli square, or one fun-size candy bar. Maybe this one would be best for dollar bills? ;-) As you go up in size, the more you can fit! I actually started with a 12" by 12" piece of paper but when I was done, I thought, wow -- that's pretty big! That might actually make a nice little gift bag in a jiffy for smaller gifts? So easy! 


After seeing Instant Gardener Nancy Sheads color up this cute kitty from Power Poppy's Feeling Fall stamp set, I knew I wanted to give her video coloring tutorial a try - so I stamped with Memento Ink Tuxedo Black and cued up the video and colored away following all her cues! If you missed this tutorial, you need to check it out HERE. It was so fun to follow along! Just a little note, if you want instant gratification, Power Poppy just released this cat image in a Halloween digital stamp set called Boo Cat and Pumpkins.  So many fun images in this digital set!


So, when I was done, this is what my treat bag looked like! I ended up sponging Stormy Sky Distress Ink around my image and then, to get a little extra dimension, I sprinkled on some water to get those drops around my image. I was hoping it might look like storm clouds or stars. Not sure if I achieved my goal but I still like the effect! :-) I also added a punched bat with some orange rhinestones for eyes and some fun Halloween ribbon to serve as my treat bag handles. Oh, I almost forgot, on my die cut mat for my main image, I did sponge some white ink around the edges to help it to pop a bit on my darker paper.


And, here's a look at the back of the project. You can see that all I did to secure the treat bag handle was knot the ribbon a few times. 


And, when all is done, you can stuff it with candy -- I chose mini Ghiradelli squares -- and even hang this little treat on a doorknob as a sweet surprise!


Thanks so much for stopping by this Monday! I hope you like this little tutorial and I hope you give it a try yourself! It can be used for so many different occasions --- Christmas (maybe you use these instead of an Advent calendar?), Easter, Valentine's Day, May Day! So many opportunities!

As always, if you give this tutorial a try, I would love to see YOUR take on it! Just leave me a link in the comments! ;-)

Enjoy your week and I will see you back here real soon for our weekly Creative Confetti Challenge!

~Julie 

Inspire Me Monday: Pretty in Plaid!

Howdy all!  Happy Monday and welcome to another Inspire Me Monday!  I’m your hostess today, Allison Cope.

I do have to first apologize for my post being late.  Today is Thanksgiving Day here in Canada and I’ve had family here visiting all week so my crafty time was limited and I left my creative time until last minute.

Today we’re going to take about adding PLAID to all your creations! I don't’ know about you, but I LOVE plaid!  I could use it on my cards everyday!  I can be seasonally coloured, it can be bright and bold and subtle and soft.

For my first use of plaid, I have used my Copic Markers and have coloured in my rubber boot from the “Feeling Fall” stamp set using different shades of red, green and yellow.  Marcy’s image already indicates that these cute little fall wellies are covered with a plaid pattern so I went with it!  The grand sentiment on this card is from the “Chrysanthemum XL” stamp set.


Secondly, for your card creations try adding a fun plaid patterned paper.  Since my Mom, Mary, was visiting I persuaded her to accompany me in colouring and creating a card with me.  She chose the Autumn rubber boots image so I used the same stamp in my card too (above). She chose a sentiment from the “Under Glass” stamp set for her card.


And lastly, I wanted to create my very own plaid so I chose to work with the “Snuggle Down” stamp set which has 4 plaid making stamp images in it!  Brilliant right?!?!


I used a 1” wide masking tape and taped off stripes and inked them with Distress Oxide Inks first and then I added some of the striped stamped images over top to create that final plaid detail!  So cool!  I used the “Cabbage and Kale” stamp set to finish off my card.

So the next time you need some inspiration for your cards, think about using some PLAID!

Now go forth and create!  Happy Thanksgiving to all my fellow Canadians!

~ Ally ~

Tuesday

Creative Confetti: Feeling Fall


Hello all and happiest of Tuesdays to you! Well, yesterday we ushered in the first day of Fall. So now, we can officially love all things pumpkin spice, spicy scented candles and, of course, sweater weather! In honor of this change of seasons, I thought there was no better time than now to have a kick-off celebration and use Creative Confetti to really ramp up our use of fall-themed stamps or color schemes! So, without further ado, check out this week's challenge!


HOW TO PLAY: It's just as simple as the graphic suggests, create with Fall in mind! It could be an image. It could be a color scheme. It could be using fall themed embellishments! It's just as easy as that!

On to our creations for the week!


Because this season is so beautiful, I thought I would share some fall-themed creations, not just from me but from some of the Bloomies to show you just how far you can take the challenge this week!


I absolutely love this creation from Ally Cope using Power Poppy's Fortunes of Fall  stamp set! For those digi lovers, this beautiful-for-fall stamp also comes in a digital format and it's called Maize for Days! This card is a perfect reminder to not only celebrate the season but to show some love to the shades of colored pencils that might not get a ton of use! 


Check out this masterpiece by Christine Okken, using Power Poppy's Olive and Oak digital stamp set.  I love how Christine can make any Copic creation almost have that dreamy watercolor feel. Sigh.... just too pretty!


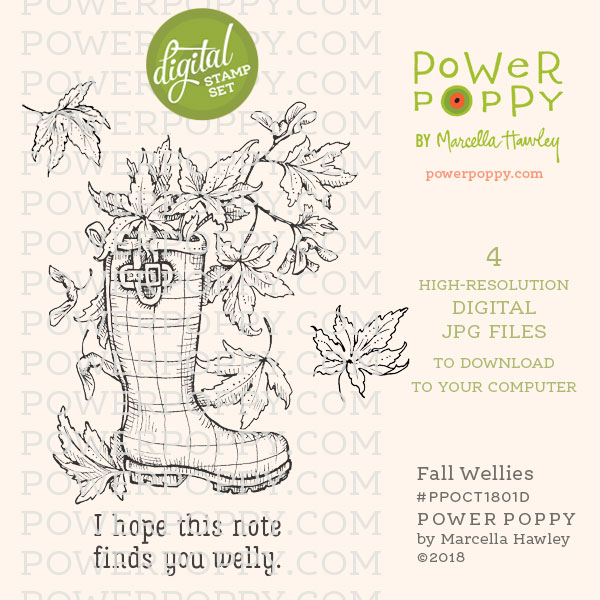
This image above that Stacy Morgan captured so well called Fall Wellies is a heart-warming homage to autumn -- a time when we kick up our rain boots, taking a few fallen leaves with them! I adore how she not only colored up the fall leaves on the image perfectly but added a few as embellishments to boot! (pun intended).


For my creation, (which is one I actually did a while back), I chose to use just some bits of the Olive and Oak expanded stamp set.  I kept the design rather simple, letting the mix of patterns work their magic. I let the sentiment be the focal point and then adorned the die-cut and sponged panel with the cluster of leaves and acorns in this set. The Bible verse in this set is one of my absolute favorites!

Okay folks,  now it's your turn to enjoy "Feeling Fall!" Remember, after you create and play along, link up your project using the linky below so we can all see. Every entry is one more shot at a $25 gift code to the Power Poppy Shop! Woo hoo!

AND... a little teaser for you! You're going to want to check in on October 1st! Marcy will have a digital extravaganza -- releasing more fall-themed images for you to enjoy!

Also, I mentioned this last week! DO YOU HAVE AN IDEA FOR AN UPCOMING CHALLENGE? Email me at juliekoerber@gmail.com and fill me in! If your idea is used, we'll honor you on our blog for the week! Now don't be shy! I can't wait to hear your ideas! We already got a couple of emails and we can't wait to share!


Until next time,
~Julie 


You are invited to the Inlinkz link party!
Click here to enter

Friday

Digis on the 5s: Fall Wellies


Hello friends! We have a wonderful new image to share with you today — and the Instant Gardeners have created inspiring cards to help show off the possibilities ...


Our newest digital download has been a fan favorite in clear — there are just so many ways to color it up! Introducing Fall Wellies.


Fall Wellies is my illustration of a plaid “welly” boot, laden with falling Japanese Maple leaves. You’ll get two extra leaves to place wherever you want to bring a bit of colorful zing. Includes one sentiment, too!


This image is available right now in the Power Poppy shop HERE.

Come see what our wonderful designers have concocted with this new stamp set!


So happy we could spend a quite bit of time together this morning!! Be sure to scroll down for even more wonderful cards and news. PLUS: Join us for a surprise on World Cardmaking Day on October 6. Oh boy, that’s tomorrow!

Nothin' But Good Vibes!


Hello Power Poppy Peeps! It’s been a few weeks since we've shared good vibes from the tribe! Of course, every single word written here on this place we call home is filled with good vibes for all of you. But this post is extra special since we hand-pick all of these delicious items to share with YOU — some of our favorite people of all time! So, let’s get right to this little bit of show and tell...

GOOD VIBE 1. 


We know some of you remember our official mascot like THIS, when he was just a newcomer at the Power Poppy residence. But this, my friends, is what happens when time moves on. You get a pup who ditches the babyface for a more dapper look. Just look at this handsome man at 5 months, will you? We thought Mr. Tibbs (the Official Power Puppy) was posing in such a debonair way, we couldn’t help but share!

GOOD VIBE 2. 


The night of fright is upon us..... and Patti Wiley is helping us get in the spirit with this "boo-ti-ful" creation using Power Poppy's clear stamp set Feeling Fall. Isn’t her coloring and color palette divine? I love all the extras she added like the embossed base, all the fussy cut images and that fabulous die cut backdrop. If you click on Patti's name above, you'll see ALL of the fall-themed creations she's put up on Instagram that are equally as crisp, creative and colorful!

GOOD VIBE 3. 


Would you take a look at that? Do you even know what's in that picture? Well, this is what happens when the UPS man finally delivers freshly produced polymer for our Happiest Holiday 2017 release. You get towering stacks of stamps! Marcella admits she is going to be one happy picker and packer, fulfilling the multitudes of orders that have been rolling in! As the graphic says... time to stalk the mailman!

Just a heads up, if you have yet to place your order for this oh-so-fab collection, you have a few more days to take advantage of this beauty of a sale!


GOOD VIBE 4. 


What do you get when a professional illustrator and artist picks up a little bit of Power Poppy goodness? You get EVEN MORE GOODNESS! Amy Shulke of Vanilla Arts just let the cat out of the bag on one of her upcoming classes, and we couldn't be more overjoyed that she chose Power Poppy's Olive and Oak digital stamp set to share her coloring tips and tricks! The class is called Amy’s Color Kissing and it's a priceless live tutorial to help you tint your Copic Markers with colored pencils. When you sign up, not only will you gain admittance to her online class planned for November 18th but you get a discount on the digi as well! To learn more, just click on over to her site on Patreon HERE! You'll want to stay tuned, Amy will have some little tips to share as we get closer to class time. We can't wait...

GOOD VIBE 5. 

Speaking of digital stamps, in case you missed it (I.C.Y.M.I.), Power Poppy has a freshly baked digi with some darling holiday characters just ready for your creative juices to get a hold of them! Click HERE to check out Power Poppy's new Gingerbread Family, and then head on over to my blog HERE to see for yourself why this digi is so darn fun to play around with!

And here's I.C.Y.M.I. Part 2! We have a fabulous guest designer this week for Hues to Use! Berina Febin is showing us all what happens when a little apple crumble cake inspires your latest round of card making! Check her card out below and then click HERE to join her in this week's bit of color-coded fun!


There’s been a lot to absorb over the past 10 days here at Power Poppy. We not only released 8 new clear Holiday stamps and all... but be sure to soak up a few more cards from the Bloomies:


THINK SMALL: Have you made a card for our Mini and Mighty October Power & Spark Challenge, hosted by our rocking Bloomie, Stacy Morgan? There’s a $50 Shopping Code on the line, peeps. You have until Tuesday night at 10pm to enter your creation:


Thanks so much for stopping by and picking up the good vibes we’re putting down!

Be sure to tune back for a fresh edition of Inspire Me Monday, coming your way in just a few days. Elizabeth Zaffarano will be in the house with a beautiful tutorial featuring vellum.

Take care & have a great weekend!
~Julie
Tuesday

Autumn Inspired Hues...


Hello peeps! Today's most pressing question for all of you ⇒ Have you had your first Pumpkin Spice Latte of the season yet?  HA! I just finished mine so that I could get in the mood for fall as I wrote up today's fabulous fall inspired post! So, scroll down and take a gander at those absolutely yummy shades that we'll work with this week! While the color scheme pays homage to autumn, the subject matter is still all summer! Marcy snapped this photo showcasing peaches grabbed from a friend's backyard peach tree. She said, 'Each bite is the sweetest summer candy! With Zinnias from my garden in a zany bouquet -- you can never plant too many Zinnias and you must always pick bouquets for indoors to brighten up life!" I personally love not only the flowers but that gorgeous plate to just make it all POP!  So, how about we use this color scheme for Hues to Use  and do a little brightening up of life! 


This is how I put these colors into play....


As you can see, I used Power Poppy's clear stamp set Fall Haul. I absolutely adore this set for it's whimsical fall illustrations, all of which are perfect for those autumn inspired thinking of you cards and creations! And, here's a look at this in progress, a close-up if you will as I was coloring this harvest bounty up! 


From there, it really was just matting up my finished card. I used a mix of autumn-hued decorative papers and added that fun large copper button with some gingham ribbon. I did manage to stamp something on the inside of my creation as well. Check it out peeps -- I even used this week's color scheme for the inside of my card as well! 


And that, my friends, is it! So dig into these shades and get crack-a-lackin' with your craftin'! Once you're done, don't forget to link up your creation below. And, like we've been sharing in week's past, if you play along, you might grab our attention so much that we ask you to take center stage here as the guest hostess with the mostess! So get those fingers inky and join us in the fun!

Until next week!
~Julie