Showing posts with label M-Powering Words. Show all posts

Monday

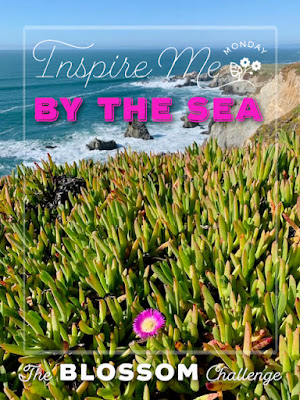
The Blossom Challenge: Inspired by the Sea

Welcome Power Poppy friends!  Today it’s Christine back with you, kicking off a brand new theme for The Blossom Challenge at Power Poppy!  

This month we have an Inspiration Challenge based on a photo from my recent trip to Northern California for work.  At a local friend’s recommendation we took a day off to head to the coast, driving through the Sonoma Valley wine country to a spot called Bodega Beach.  Its a sweet little coastal town with miles of beaches along the coastline.  It was such a stunning surprise with high cliffs, bluffs and pounding surf; you could believe you’re in Cornwall, England rather than the Cali coast.  The spot I took this picture was at Bodega Head where you are high on the bluffs looking down at the rugged coast above.  In the foreground you can see the vegetation with the pop of pink.  These plants are succulents called Sea Fig, and the flowers bloom a number of different colours.  Its an invasive plant in California, so they’re trying to control it, but it made for a beautiful picture!  

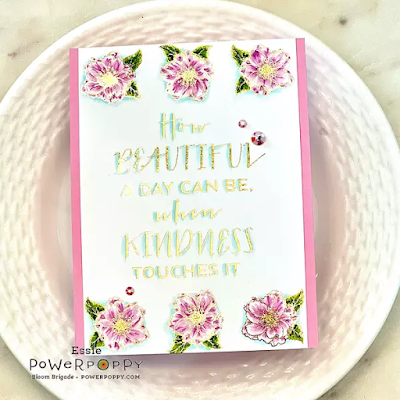
I’ve created two cards with this inspiration:  First up, a design inspired by the colours and plants in the photo.  


It’s a mini-slimline design using Power Poppy’s Gerbera Daisies Stamp set to mimic the flowers of the Sea Fig, colouring them in vivid pinks with my Copic Markers.  They are fussy cut and placed on a layered background with a die cut that I think imitates the sea fig vegetation.  A very FUN new find for me is the Lindy’s Magical Powders that I picked up which bring all the colour to that die cut!  These powders are dye based and activated in water, and result in gorgeous vibrant saturated colour and shimmer.  I think they really give the feel of the succulent vegetation and the colours of the sea.  


Here’s a view that helps you see how shimmery and shiny they are, and what awesome colour you are left with.  I’m going to be using them a lot in my future!  I’m using watercolour paper because it holds the moisture you need to activate the powders.  


The pretty little sentiment is from Power Poppy’s sentiment set, Nice Things to Say (in stock in polymer).  

Now I have a card that is very ocean forward.  


For this design I really took inspiration from the layout and colours in the picture.  I started with the background and used the same Lindy’s Magical Powders on watercolour paper to create sky, sea and ground with different powder colours, activited them with water and let them dry fully.  then I ran the background through an embossing folder I have that has the feel of the vegetation.  Next I brayered watered down white acrylic paint over the embossing to give the feeling of foamy waves and bring some highlight to the dimension of the embossing.  


For this beautiful sentiment I used one of my favourite Power Poppy sentiments M-Powering Words embossed it with a metallic embossing powder in teal, trimmed it out and placed it on teal glitter paper and a layer of vellum.  Then, I accented the card with pretty dies from The Greetery Curio Summer Findings. 


Now I’ll leave you with the photo without graphics, and I hope this inspiration has taken you on a lovely journey to the sea!  

Join us in The Blossom Challenge this month to create something based on any part of this photo that inspires you.  Be as creative as you’d like!  You could win a $20 Gift Code for the Power Poppy store!  
I’ve added the picture without the graphics so you can visualize all of it for your inspiration.   Link up your creation below!

The only requirements are that you need to use one Power Poppy image or sentiment, and can enter as often as you like.  This Challenge runs until March 18th!  

Want to know who won our Clean Slate Challenge last month? We had some really fun entries!  This month,  Almeslee with her gorgeous Birthday rose was our winner!  Almeslee please contact Marcy at bloom@powerpoppy.com to claim your winners code! 

             You are invited to the Inlinkz link party!

The Blossom Challenge Goes Sentimental


Hello Friends and Welcome to the August edition of the The Blossom Challenge.  I’m Christine bringing you this month’s The Blossom Challenge, and we’re Going Sentimental, focussing on Power Poppy’s beautiful selection of sentiments.  

Today I’m bringing you two inspiration cards with Sentiments as the focus.  

First up is a design I made for a recent wedding.  


For a lot of years my husband and I were youth pastors and it’s been fun to see our former students get married over the years.  This wedding was a delightful one with the bride from Indian-Canadian descent and the groom from British-Canadian descent, the mix of cultures and colours at the wedding was gorgeous.  This palette reflects the colours in the wedding of orange, pink, coral and red.  I’ve utilized two beautiful Power Poppy sets,  Hummingbird Paradise as the beautiful floral frame, and then one of my ALL TIME favourite polymer sets from Power Poppy Big Scripts.  Did you know that this set features hand drawn sentiments by Marcy?  I just love her scripty writing.  

To highlight the sentiment I embossed it on white cardstock, then sponged warm shades of Distress Oxide Ink, Seedless Preserves and Abandoned Coral around it, wiping the ink off the sentiment once it was done.  The floral frame is fussy cut out in a windowed design.  

Next up is a Clean and Simple design.  


Dear friends of ours move away today to another city in the province.  We are going to miss them terribly.  Over the years we’ve watched them grow from a newly married couple to a family of four.  We’ve shared a love of creativity and the mountains, so this design is a bit of a nod to our friendship, and the fact that they are moving closer to the Rockies.  Similar to the first card, I created a background of a sunset sky using Distres Oxide Inks: Tumbled Glass, Wilted Violet, Abandoned Coral and Seedless Preserves, spashed some water on the background, then embossed this awsome encouraging sentiment from Power Poppy M-Powering Words (currently sold out in polymer) onto the beautiful colour of the background.  I used a framed arch die to accent the sentiment, and then hand drew in a silhouette of our favourite mountain range in Canmore, Alberta, the Three Sisters, filling it in with a black Sharpie, and added a punch-cut sparkly paper moon.  

Now how about some phenomenal Sentimental inspiration from The Bloom Brigade?  


and Me, Christine!

Now it’s your turn Power Poppy friends!  Your challenge this month is to create something Sentimental  where the focus is on the sentiment.  Were inviting you to think about creative backgrounds, stencilling, framing the sentiment with other sets, or creative uses of patterned paper and dies.  You can use any Power Poppy set as part of your design to be in the running for our monthly prize!  

To sweeten the deal Marcy has discounted a number of her Fall themed Sentiment sets (and a few extras) for you HERE.  Did you know there are also two sets in the sentimental family that are FREE?!  I Can Do All Things and Let It Be.  Were making it easy for you to play along!  

Add your link at the bottom of the post for your chance to win a $20 Gift Code to the Power Poppy Store!

Would you like to know who last month’s The Blossom Challenge: Christmas In July winner is?    Random.org picked Amanda!  Congratulations Amanda!   Please email Marcy at bloom@powerpoppy.com to collect your gift code!  

Looking forward to seeeing all of your Sentimental Creations!

You are invited to the Inlinkz link party!

Click here to enter

Inspire Me Monday - Distress Ink Resist

Happy Monday! I'm Nancy Sheads and I'm here with this week's edition of Inspire Me Monday!

I usually bring you Copic tutorials, but to be honest my markers and I are not on speaking terms right now. I get like this sometimes - I'm my own worst critic and nothing I color seems to turn out the way I want. So I decided to set my markers aside for awhile and spend some time playing with other coloring techniques.

Today's project features the Big Sexy Blooms and the M-Powering Words clear stamp sets. I love playing with background stamps since the image layout is already done for you. I don't have the patience for masking and fussing over positioning lots of images so background stamps are perfect for me.


Although I could color the flowers individually, I decided to go with an ink blended background in bright colors for extra punch. I used embossing powder and Distress Oxide Inks to create a resist embossed ink blended background.


Want to know the details? Well, here we go with directions and lots of pictures!


  • Cut a piece of white card stock to 4.25 inches x 5.5 inches.
  • Place Big Sexy Blooms stamp face up on your craft sheet. Apply embossing ink to the entire stamp, making sure that it is evenly covered with ink.

  • Place card stock on onto the stamp, rubbing firmly across the entire piece to ensure that the ink transfers evenly.
  • You should see a light impression from the embossing ink on the card stock.

  • Cover the card stock with white embossing powder. 
  • Heat set the embossing powder. Be careful that you do not scorch the paper.
  • Allow the embossing powder to cool and set. 

  • Using an ink blender or brush, apply Distress Oxide ink in Mustard Seed in a circular motion to a portion of the paper. 
  • Do not worry if the ink covers the white embossing. We'll take care of that after the ink blending is complete.

  • Apply Distress Oxide ink in Picked Raspberry. 
  • Slightly overlap the color onto the Mustard Seed to blend the two colors where they meet. This overlap will create a warm orange color that will create a seamless transition between the colors.

  • Apply Distress Oxide ink in Seedless Preserves to the remainder of the image. 
  • Slightly overlap the color onto the Picked Raspberry to transition between the two colors. 
  • Repeat application of the three colors as needed until the ink is blended and you achieve the color saturation that you want.

  • Lightly wipe the excess ink off the embossed image with a paper towel. You will see that the white embossing resisted the ink and will be visible again.

  • Apply a very light coat of Distress Micro Glaze to the image. You only need a very small amount. Rub in, wipe off, and buff lightly with a paper towel. This will enhance blend and brighten the colors. 
  • NOTE: The remaining steps work best if you use a set of nesting dies.
  • Select a medium sided rectangular die and place in the center of your image. 
  • Run die and image through your die cutting machine.
  • You now have a frame and a small background piece. Set both pieces aside.

  • Use one of the smaller nesting dies to cut a piece of white cardstock.
  • Stamp sentiment with a pigment ink such as Versamark.
  • Cover sentiment with clear embossing powder and heat set.
  • At this point, all of the card elements are ready to assemble.

  • On the back of the frame, you can either apply foam tape or foam squares. I like to use craft foam so I cut a piece to size and then used one of the large dies to cut a window in the center. Then I glued it to the back of the card frame.

  • You can either cut a small piece of craft foam and adhere to the back of the sentiment (as shown here) or apply foam tape or foam squares.

  • Glue the card frame to your card base.
  • Apply glue to the back of the smaller background. Make sure that it is right side up. Line it up inside the card frame and adhere to the card base.
  • You now have a raised frame and the center background is set back.

  • Glue sentiment to center of card.
  • Add embellishments as desired. 
  • Stand back and admire your work!


Whew! That's a LOT of photos, but it's really not very complicated and you could easily make these cards in bulk.

Be sure you check out my Power Poppy coloring videos on YouTube.

Thanks for joining me today! See you again soon!

** Nancy **

Tuesday

Creative Confetti: Let's Go DIgital!


Hello all! Who's ready for a new challenge? For some, this challenge might fire off different parts of their brain and get them learning a new skill! I have seen so many people during these times vow to try something and learn something new. My daughter's taking online guitar lessons through Fender. I am taking up sewing again. I just made THIS little caddy for my knitting and it turned out so cute!

So, if you haven't tried digital stamps yet and using them in different ways, now is your challenge and chance! A long while back I did THIS tutorial on getting used to manipulating digis. It's a great starting point. And, if you need a little ammunition to get started, Marcella has plenty HERE in the digital section of the Power Poppy Shop! 

So, without further ado -- this week's challenge! 


HOW TO PLAY: It's just as simple as the graphic suggests! Simply use a digital stamp for this week's creation! Want to learn something new or try something you haven't before using digital stamps? Keep reading! I am about to show you one way you can stretch your digis in new and different ways!

I've been really jonesing for some new images to color and I thought -- WAIT -- I can CREATE a new image just by digging into my digital stash! So, here we go!

I started by coming up with a concept in my head -- I wanted a frame for an uplifting sentiment so that I can spread some joy thanks to an envelope and a stamp. I know there are so many people right now that I can't see, can't hug and can't share time with. Our craft, dear friends, is the next best thing! It's a handmade creation, just from YOU made especially for that beloved friend!

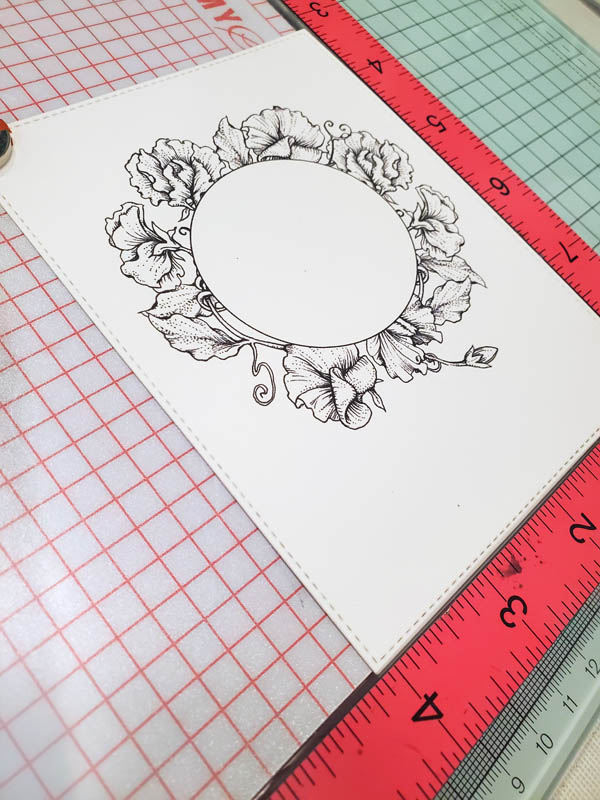
So, I started by creating a 2" by 2" canvas in Photoshop Elements. This helped me to create just the right size circle. I used the Marquee tool, clicked on circle and then drug my cursor over the square to create this image. After I made my circle, I outlined it using the "Stroke" effect, adding a thin black line around my circle. (You can see the stroke tool off to the right of my image)


Then, I created a second file to measure the size of a card front - 4-1/4 by 5-1/2 and I centered my circle on top.


I knew I wanted my frame to be surrounded by loose florals and after scrolling through the digital section of the Power Poppy Shop, I knew this image below, Sweet Pea Show would be perfect! After opening it up, I used the eraser tool (you can see I clicked it off to the left of my image in the tool bar) and I removed my background.


From there, I erased everything but sections of the image, using each piece to create my floral frame.


Sometimes, this is how small my piece was!


And after I moved an manipulated all of the pieces, this is what my frame looked like!


After printing and using a stitched rectangle die to cut out my image, I set my digi in my MISTI stamping tool.


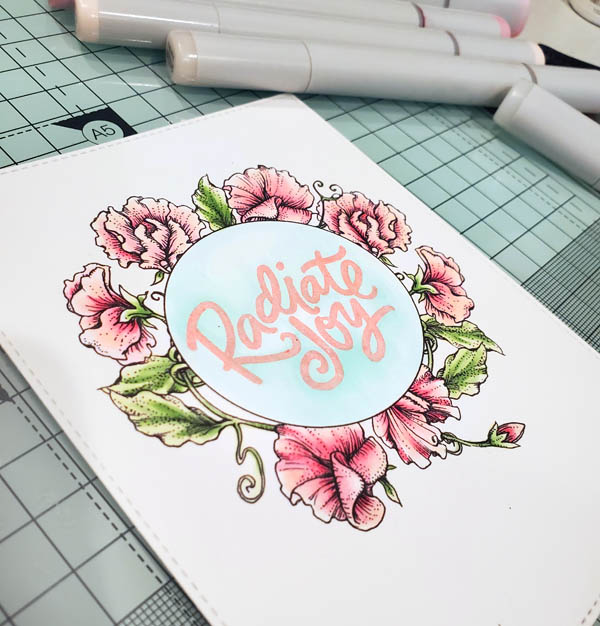
Here's another trick that I want to show you today! I set the "Radiate Joy" sentiment from Power Poppy's M-Powering Words stamp set to the left-center of my circle. (Can I just say that this stamp set is PERFECT for the times we are living in right now -- so much encouragement!) There's a reason for this! I knew by using the MISTI, I could create a shadow effect with my sentiment and I thought that would be a fun effect!  


I stamped it with Tea Rose Vivid! ink -- funny, I have had this stamp pad for probably more than 15 years and it is still going strong. They don't even make this ink any longer. My reinker will probably keep it alive for another 15 years! ;-) 


Now, here's the fun part. I cleaned off my stamp and as you can see, I offset the stamp, placing it down and to the right of the original image. You can tell when you see the "white space" around the stamp. Can you see it? I closed the door of my MISTI, setting that stamp in place and then set the MISTI aside for now. When the time comes, I will be ready for this knowing my next stamp layer will provide the perfect shadow effect! 


Then, I went to town coloring! I used my Copic markers and used R81, R83, RVOO and R00 to color up my petals and G21, G24, G20 to color up my leaves. I highlighted around my sentiment using BG0000 and BG10. When you see my finished card, you'll see I added these highlights around the outside of my main panel as well. 

Once I was finished coloring, I pulled out my Versamark ink pad and my silver detail embossing powder and using my MISTI, I stamped and heat embossed! Isn't that fun?


And here's a peek at my finished card! It is a super simple design -- decorative paper background, silver cording, pink button. That's it! 


Now all I have to do is pop a stamp on an envelope to get this in the mail! I have a few people who could really use a note. I think my next challenge will be to make a list and take an afternoon or two to get those notes in the mail!

. . . . . . . . . . . . . . . . . . . . . 

So, since a new month is upon us, it's time to see who won our March challenge! Random.org put all the numbers in its virtual hat, drawing this lucky number!


Which means, our lucky stamper is......

* * * * MARIA RODRIGUEZ! * * * * 


Maria crafted this beautiful creation above and on the inside it says, "Be the Rainbow to someone else's cloud." Love that. Maria uses Power Poppy's Poppies stamp set which is on sale as we speak! I love this image done up in soft pinks -- so pretty and just as the icon suggests -- springlike!

Thanks for stopping by folks! I hope you play along with me this week and for the rest of the month! We'll have some guest hostesses joining me in the coming weeks, so that will be fun! Since we are using digis this week, I can't tell you to get those fingers inky but I hope you join me! Remember, each entry is one shot at winning a $25 gift code to the Power Poppy Shop. You just need to link up your creation below to enter! Just that simple!


Happy Creating & Stay Well My Friends!


You are invited to the Inlinkz link party!
Click here to enter