Showing posts with label Folk Heart. Show all posts

Monday

Inspire Me Monday: Make it like Batik!

Hi all and welcome to another Inspire Me Monday with yours truly.... Julie! I have a fun and quick little tutorial today that was sparked by a freebie I got! Not too long ago, I replaced my inkjet printer. Well, in the box was a stack of 4 by 6" photo paper. I set it aside not really knowing what I would do with it and then, I remembered a fun technique I learned FOREVER ago. I'll use that paper to give it a try again! I call it the Batik Background technique but I just made that name up. I know there has to be an official name for it. 

What got me thinking about this technique is this fabric....

I had it pulled out because I was on a mask-making frenzy, sewing to outfit my family and my friends. I was basically throwing masks and whoever might want/need one! ;-) I love, love, love Batik fabric. Okay, now that' you've seen my inspiration, let's get to what I created using that freebie photo paper! 


Aren't these colors so vibrant and fun? I love how the photo paper really soaks in the ink and never seems to dull! 

So, I started by stamping my image onto the photo paper using Versamark ink. You can use any clear pigment ink. Way back when, they taught you to use clear embossing ink. For my samples, I did hit my paper with an embossing fun to make sure the ink was set and dry. 

For this first card, I used the Power Poppy clear stamp set called Poppies! 

Now comes the fun part. Since batik isn't a blended fabric that moves easily from one color to the next, I had to remind myself of this and just go for a more rough, less blended look. So, this is what I did....


I literally did an old school direct to paper technique and rubbed my ink pad over my paper. As you can see below, the results look rough, but that's the beauty of it! 


When you are done adding color, just wipe off the paper with a dry and clean paper towel to remove any excess ink that might just be sitting on the surface. As you can see, the Versamark ink resisted the ink perfectly and beautifully! Look at that rich color! 

And here's a peek at the ink pads I used for this version...


And here's a peek at the finished card! The sentiment was heat embossed and I used the stamp set Loving Tulips. 


And, since I was having so much fun, I decided to make two more cards! This next one, I used these colors, and the stamp set Folk Heart.


And here's a peek at the final card! Bling had to be added... of course! ;-)

And, here's a look at the third one! For this card, I used the same colors of ink as my first card, I just didn't use that much of the barn red ink. The stamp set here was In Praise of Sunflowers. 


And... here's the finished card! For the sentiment, I used the "hello" from the Loving Tulips set and then accented by cutting it out using the coordinating die.  And, loved adding a little bling to the exclamation point! 


So friends, if you have some Versamark, photo paper and fun inks, you can do this! I hope you give it a try because it creates very, very vivid creations in a jiffy! I had fun making these and I didn't even get my fingers TOO inky! ;-)

Thanks for stopping by!

Inspire Me Monday ~ Rainbow Accessories!


Hello everyone and happy Monday!  Welcome to Inspire Me Monday. I'm your hostess this week, Allison Cope. I hope you all had a wonderful weekend.

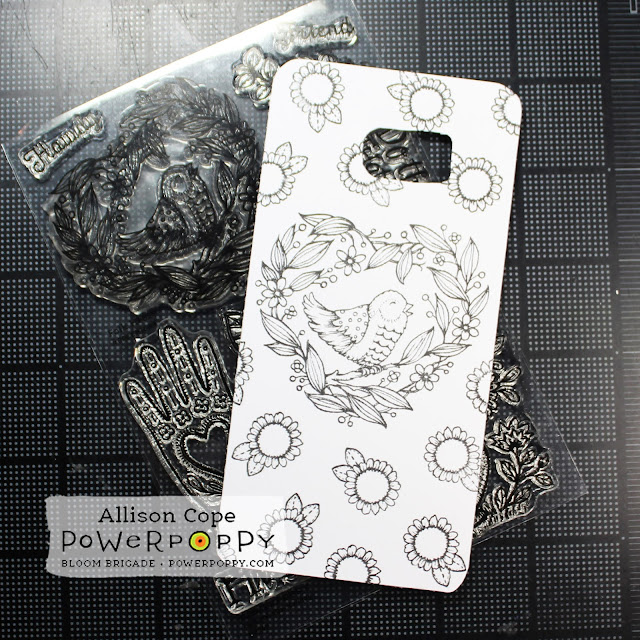
I'm here with you to share a fun project that isn't a card!  Oh my!  You heard me right!  Today I'm going to stamp and color a panel for my clear cell phone case.

First I used my paper template that I keep in my desk and I cut out a new thin cardstock panel to stamp and color.  Of course, every phone is different so you're going to have to create your own.  It's about trial and error until you get a good fit for your panel in your case.


Then I stamped my panel with Copic safe ink using the "Folk Heart" stamp set.  Now, be aware!  This stamp set is retiring but there are still a few left.  PLUS it's on SALE!!!!


I colored in my back ground first.  I used a rainbow of delicious Copic colors.


To finish of my cell phone panel I then coloured in my main image and all the adorable sunflowers.  I even added a little bit of black paint splatter to the surface just for a little more interest.


I have done project before and if you missed that tutorial, you can CLICK HERE.

Thanks for stopping by!  What do you think of this project?  Would you make one for your phone?
~ Ally ~


stamps: Power Poppy (Folk Heart)
cardstock: Recollections (#65 White cardstock)
inks: Kraftin' Kimmie Stamps (Wicked Black), Copic Markers
paint: DecoArt (Ebony Black)

Backgrounds and Borders ~ Using Power Poppy images in unexpected ways


Hello Power Poppy friends!! Tosh here today to inspire you to use Power Poppy images in unexpected ways.  I have 4 projects to share with you, so make yourself comfortable and follow along.

My first includes a stamp from the Play Ball set that really got me thinking.  When I saw the baseball stitches stamp, I thought...why can't I just use one side of the stamp and make it look like a blanket stitch?  I was explaining to my dear friend Katie (who just happens to be a Power Poppy Bloomie) that I wanted to use the flowers in the heart vase from the Folk Heart set with the blanket stitch, and that I wanted it to look like a quilt panel.  She asked if I'd ever seen Redwork quilts.  Well, I hadn't, so I checked out Pinterest, and found some fabulous examples.  And yes...that was exactly the look I was going for.  Here are a couple of links to some beautiful Redwork quilts that I used for inspiration:  Rosalie Quinlan Designs, Rosalie Quinlan Designs 2


I started by diecutting a square and stamping only half of the "baseball stitches" onto the edges using Love Letter Memento Ink.  Doesn't that look just like a blanket stitch?  I got giddy after seeing how it turned out.


I then decided I wanted a scalloped border.  So I traced the square die onto cardstock, and stamped the small heart, from Power Poppy's Good Thinking Love Notes set, around the entire square, just leaving to two top "bumps" from the heart showing.


Don't they look awesome together?  I was so happy with how it turned out.  I added a few extras to really give it the "quilt panel" feel too:  I scored and burnished the Folk Heart image to make it pop.  I also burnished the whole back side of the panel to give it texture like it was fabric.

I then embossed the background to give the feel of quilt stitching, and actually sewed around some of the edges and panels.


Next up is my tulip card.  I had some fun creating a "shabby elegant" border using the tire treads from the Power Poppy Move The Soul set.  I started by stamping the tulips from the Dynamic Duos: Peonies and Tulips set with Tuxedo Black Memento ink onto X-Press It cardstock and coloring it with Copics.  I then embossed an oval shape around them using an oval die and a diecutting machine.  Then I took the tire treads and stamped them randomly around the oval using Versamark ink.  Lastly, I rubbed the Versamark pad over the edges to give a frame to the whole image and embossed it all with gold embossing powder.  I really love the "shabby elegance" that the tire treads gave the frame.


Now, you've probably seen many variations of this next card.  I just took 3 different sentiments from the Power Poppy Nice Things to Say stamp set, and stamped them onto a precut rectangle that I taped off the edges of, so I could maintain the border.  


After stamping the sentiments, I photocopied it onto black cardstock so I could Minc it with gold foil.  (For some background information on how I use the Minc Machine, click HERE.)  I love how clean and crisp it turned out.  To finish it off, I added a "So Happy For You" sentiment from the Dream Wedding set, as well as a couple of gold cardsock punched flowers.

Below is a look at how I taped off and stamped the panel before Stamping it.


And finally, my last card.  This one was just plain fun!!  I took the "smoke" image from the Power Poppy Move the Soul set and randomly stamped it with three different Ranger Distress Ink colors:  Peacock Feathers, Twisted Citron and Squeezed Lemonade.  After I had my background, I splattered some diluted black acrylic paint over it and stamped the "hello" sentiment from Power Poppy's Big Scripts set.  Aren't those "splotches" fun?!?!?


Whew...right!?!?!  That is finally it.  I had some fun using these stamps in unique ways, and I hope I've inspired you to look at some of your images in different ways!

Thanks for sticking with this long post!

   Happy Stamping!!

Inspire Me Monday: Inspiration is Everywhere!

Happy Monday everyone!  I’m Allison Cope, your hostess for Inspire Me Monday this week!

This week I’m going to share some pieces of inspiration with you and how I turned them into creative and fun card ideas.

If you are like most crafters, you browse the web, other crafters blogs and especially investigate Pinterest for things to give us a creative awakening.  Not only do I look at other crafters cards on Pinterest but I look at design, fashion, food and all kinds of different areas looking for images to spark that creative endeavour.

So I went through my Pinterest board entitled “Inspiration” and I came up with 3 very different pins to get inspiration from, to begin the card making process.

Teal Floral Cake


https://www.pinterest.com/pin/25332816628358934/

One of the first images I came across was this stunning teal coloured cake with bright yellow, white and soft grey blooms.  I just couldn’t resist drawing inspiration from not only the teal colour but also from the motion of the blooms laid out across the layers of cake.

So I began my card by stamping the larger cluster of Hens & Chicks from the “Sassy Succulents” stamp set.  I added in a few single succulents too. I tried to mimic the movement created by the blooms on the cake.


I created a bold teal back ground of Copic Marker for my succulents but decided to only highlight a single, large hen & chick.  I pulled some yellow from the inspirational cake florals but decided to add some hues of purples, pink and even some lime greens into the plant using Prismacolor Pencils.

I just love the flow and movement created by the succulents on this card!

Floral & Striped Lap Top Bag


https://www.pinterest.com/pin/25332816629275781/

Next I found an image of this vivid handmade lap top bag.  The orange striped fabric just drew me in and I love the little simple yet colourful blooms on the white back ground of the top fabric.

To begin this card, I knew I wanted to use the basic design of the bag; stripes on the bottom and little blooms on the top.  So I found a fun striped paper and then pulled the teal from the strip into the colour of the blooms.

Instead of using a vertical strip like the bag, I chose to add some more whimsy to the card and put my stripes on an angle and then also make my blooms from the “Folk Heart” stamp set work the same angle.


To finish it off, I added a bold embossed sentiment from the “Big Scripts” stamp set at the bottom.

I just love how those lines of amusing little blooms just sprout from the stripes at the bottom!

Floral Skirt


https://www.pinterest.com/pin/25332816629001196/

Fashion is another way to be inspired to create!  I found this fun skirt pinned in my board and knew that the front panels would make a cool design for the front of a card.

I began by cutting two identical rectangular panels of water colour paper and stamping the single rose from the “My English Rose” stamp set randomly all over both panels. I chose to pull 4 different colours of ink from the skirt; a lighter dusty blue, a darker sky blue, a fuchsia purple and rich, dark purple.  I used all 4 colours randomly when stamping and filled them in with the same watered down inks.

I trimmed my panels to create 2 overlapping pieces with peek-a-boo points sort of like the skirt, added them to a purple card base and added a simple bow to finish it off.


Fashion inspiration has a great way of sneaking itself into our crafting lives too!

So I hope I’ve inspired you to think outside the box today and view not only the net but the sources around you.  The oddest things may spark your creative mind; a bill board, a magazine ad, a logo or even a painting hanging on a shop's wall!  Inspiration is everywhere!  Keep those eyes open!

Happy stamping & creating everyone!

~ Allison Cope ~


Supplies:

You’re Special Succulents 
Stamps: Power Poppy (Sassy Succulents)
Cardstock: Recollections (110lb White), MFT (Ripe Raspberry)
Inks: Memento (Tuxedo Black), Copic Markers, Copic Blending Solution, Prismacolor Pencils, Versamark
Embossing Powder: Stampendous! (White Detail)
Patterned Paper: MFT (Tranquil Textures 6x6)
Copics: BG32, BG13 
Prismacolors: Canary Yellow, Chartreuse, Grass Green, Carmine Red, Parma Violet, Mulberry

Sunflower Hello
Stamps: Power Poppy (Folk Heart, Big Scripts)
Cardstock: Recollections (110lb White)
Patterned Paper: MFT (Painted Prints Smitten 6x6)
Inks: Memento (Tuxedo Black), Copic Markers, Versamark
Embossing Powder: Stampendous! (White Detail)
Dies: Pretty Pink Posh (Scallop Frames)
Twine: Darice
Copics: BG10, BG09, Y15, Y17, YG01, YG17

Lavender Roses
Stamps: Power Poppy (My English Rose)
Cardstock: Arches (140lb Cold Pressed Water Color Paper), Bazzill (Sour Grape)
Inks: Simon Says Stamp (Surf Blue, Steel Blue, Wisteria, Hot Mama)
Tool: Tim Holtz (Piercing Tool)
Ribbon: Offray

Inspire Me Monday: Color Theory

Happy Monday everyone!  Welcome to Inspire Me Monday!  I'm your hostess Allison Cope and we're going to talk a little bit about COLOR THEORY!

Come and find out a little bit more about the fabulous color wheel...


Here's a quick look at the cards I used as my examples today...
Featuring Folk Heart and Short Stacks

Featuring Folk Heart

Featuring Peony Love and Potted Primroses 


Featuring Folk Heart


Featuring Orchids Rock

Thanks for joining me today!  So the next time you begin to color your latest and greatest Power Poppy image, think about how you're going to use color to the fullest!

Happy coloring everyone!

~ Ally

Wednesday

What goes in to an illustration? Find out, and peek at my new Folk Heart stamps

When you start breaking down what really inspires one to create a certain work, it can be difficult to pinpoint. When somebody says, “I ‘CASE’d so-and-so’s card for my design,” do they just copy down to the last sequin and marker stroke what the other person created? No way, man, they bring their own spin to it. They bring their surroundings to it. They bring whatever music they may have been listening to at the time. They might bring in the colors of the sweater they happen to be wearing that day that perhaps inspired the color scheme or the decision to add fibers or texture. They bring a lifetime of acquired memories and visual references, from childhood coloring books, a first visit to an Art Museum to see Monet’s Waterlilies, a torn-out magazine page with that darling fabric that would really be perfect for the living room curtains. All of this random stuff can have an impact. Isn’t that cool?

We all bring so much to every work that we do. We just don’t stop to think that we’re storing all that info up there, just waiting to use it in a creative way! Thank you, Brain, for allowing me to stuff you so full with visual inspiration and information, that when I’m ready to go to town creating new things, I can draw from your vast archives!

Why am I going in to all of this? Well, when I started culling the images I wanted to share with you today about how I got from point A to point B with my newest stamp set, Folk Heart, I realized that my sets might be primarily influenced by one thing or another... but many of them are the culmination of years of looking, years of gathering, years of appreciating beauty. Then that trusty brain churns it all around and allows me to put pencil to paper, and bring the images and words to life.

So, it all might have started with seeing images like this:

Scandanavian designer Josef Frank’s “Aralia” linen fabric, designed in 1928
Josef Frank “Vegetable Tree” fabric, designed mid-1940s
“La Plata” by Josef Frank screenprinted on linen, designed mid-1940s
Vintage Mexican Milagros. Source, Susanne Duda
Vintage Advertising. Source, sheaff-ephemera.com
Jacobean Crewel Embroidery by Elsa Williams, 1974. Source, www.austintatiousofferings.com
Crewel Embroidery found on Pinterest ... I'm so sorry I cannot place the source! Will update when I do.
Modern Crewel Embroidery by Bucilla / Bernhard Ulman. Source, www.austintatiousofferings.com

My OH My, that is a lot of stuff to look at!! Are you still with me?? These shapes and sinewy lines and vines got me going in all kinds of directions. And while what I came up with for my final sets (which I split into TWO sets - one is the new digital offering, Flowers, Always and one is the new clear set, Folk Heart... also, I shared some of the inspiration from wool hooked rugs in my post about Flowers, Always, and you can see that HERE) was a bit more folksy and cute than some of my influences, I couldn’t help but bring it back to my own design style, which puts my Marcella stamp on it! :)

I got to sketching out my potted plants, because even though you can look at visual references all the live long day, you are going to have an idea of what it is you want to draw. Y’all know I cannot resist a potted plant!


And that drawing turned into this, the Flowers, Always digital stamp, shown here expertly colored and made into a card by Cheryl Scrivens!

http://cherylquilts.blogspot.com/2016/02/flowers-always.html

Isn’t that fantastic? I hope you will run around to be sure you see all the cards created with that set by the Instant Gardeners, they are ALL so different!!! I love those ladies.

I drew so many various images, I couldn’t fit them all into the clear set version. So this one really is packed with a LOT of cute stuff to use, inspired by all of the above Scandinavian fabrics, milagros, primitive folk art and rug hooking, crewel embroidery, and my overall love of curious-looking plants. Let’s take a look at Folk Heart! It will be available for purchase in the Power Poppy Shop on Sunday as part of the Grow Everyday collection.

http://powerpoppy.com/products/folk-heart

Oh wait, did I forget to show you photos of all the little birdies that I have admired? Do you think I aim to keep you here all day? Maybe we’ll save birdies for next time, eh? Because right now I really think you should go see what the Bloom Brigade has created to share with you today.

Get ready for some exuberant color and fun... go Bloomies!


Thank you so much for sticking with me through this long post! Too much to share, and posted a little bit late due to inability to stop talking. I come by it honestly. Love to all and see you back here tomorrow!! We have MORE new sets to come...