Showing posts with label video. Show all posts

Monday

Inspire Me Monday: Spring Meadow Bouquet


HEY FRIENDS! Inspire Me Monday is back and so am I with a new Copic coloring video. Since we have a new monthly challenge, I decided to feature one of the Spring themed digital image sets currently discounted so that you can play along with the challenge. Check out Christine's post for the challenge details as well as the 4-1-1 on the discounted stamp sets.

For this week's inspiration, I decided to feature the Spring Meadow Bouquet digital stamp set which has always been one of my favorites. 


It's been a while since I featured a digital stamp, so I decided to start today's video with a quick refresher to help get you started. I have a fuller tutorial on my channel, but for this video, I'll just give you the shorter version.

So with no further ado - here's the video!

If the video isn’t visible below, click HERE to view it. Enjoy!


That's it for me today! Hope you found some coloring inspiration!

STAMP: Spring Meadow Bouquet
COPICS: RV55, RV63, RV66, RV69 (Bleeding Hearts); BV31, BV34 (Summer Snowflake); BV31, B63, B66 (Lilacs); G20, G24, G46 (foliage); Y15, Y19, YR04, N3, N5, B000, BG10, BV31 (bee)

Nancy

Inspire Me Monday - Party Essentials


HELLO POWER POPPY FANS! I'm back today with another Inspire Me Monday post. Hope you are keeping safe and warm during this blast of cold winter weather. Please keep our friends in Texas and the surrounding area in your prayers as they recover from the record storm that swept the state. 

Let's take a look at today's project! With the cold weather, I was tempted to pull out my holiday stamps and get a head start on my end of year cards, but opted instead to take a look at some of the digital stamps appropriate for any time of the year. So today's project features the Party Essentials Digital Stamp Set, which includes three images and four celebratory sentiments. 


So here's my take on the pile of packages! I intended this as a birthday card, but with a change of colors the image also work for weddings, anniversaries or even Christmas!


If I had paid more attention, I would have remembered that Gloria also recently colored this image as part of her fabulous Inspire Me Monday post a few weeks ago. Be sure that you take a look at what she did! 

Want to know how I colored the image? Get comfy because I've got a coloring video for you


And here are the Copic markers that I used.


Thanks for joining me today! Full supply list for my card can be found on my blogBe sure you check out my Power Poppy coloring videos on YouTube.

Stay safe and warm and keep on crafting!

Nancy

SUPPLIES

Inspire Me Monday: Experimenting with a Copic Airbrush & Blender Solution


Happy Monday everyone!  I’m Allison Cope your hostess for today’s Inspire Me Monday!

Today I thought I’d do a little experimenting with you with some Copic related tools.  So I pulled out my Copic Airbrush System and some Copic Blender solution and had a go at it!  I also grabbed the fabulous “Cabbage and Kale” clear stamp set (Which is a STEAL right now in the Power Poppy Shop!!).

Come and join me at my desk as I use these tools to create a unique card front panel…

https://www.youtube.com/watch?v=r5szXoz4ydU&feature=youtu.be

Here’s a look at the final card…

I used the “Burst of Kindness” stamp set for my "Thank You" sentiment.

Thanks for joining me today!  I’d love to what you can make using these ideas today! 

Happy creating!

~ Ally ~


stamps: Power Poppy (Cabbage and Kale, Burst of Kindness)
cardstock: Recollections (110# White & 65# Black)
inks: Memento (Pistachio), Kraftin’ Kimmie Stamps (Wicked Black), Copic Markers, Copic Blender Solution, Polychromos Pencils
dots: Kraftin’ Kimmie Stamps (Party Time Dots)
tools: Copic Airbrush System

Inspire Me Monday - Zinnia Parade


Hello Power Poppy Fans! Nancy here with this week's edition of Inspire Me Monday. I have a new card with a few flourishes (literally) as well as a new coloring video so let's get to it!

For today's project, I'm featuring one of the images from the Zinnia Parade Digital Stamp Set. This set is so versatile. It includes the full parade of six different flowers, a trio, and a large single stem, all presented in special vintage cups and vases.


I selected the image of the single large stem and I colored it with Copic markers. I picked the colors based on a design paper that I was going to use in the card layout. The markers are shown on the color map below.


However, when it came time to put the card together, I decided that the design paper was too busy. I substituted a solid card stock out of my stash, but then the card was too plain. So in the end, I rummaged through my ever-growing collection of stencils. Using texture paste, I added a few flourishes to the background. And then it was just right! 


As promised, I have a new coloring video so grab the popcorn and get comfortable. Let's roll the video!


STAMPS

Zinnia Parade Digital Stamp Set

COPICS

R24, YR04, Y15 (petals); G20, G24, G46 (stem); BV31, BV34, BG11, BG23, BG15, E41, E42 (vase); BV34, E41, E42 (shadow)

Be sure you check out my Power Poppy coloring videos on YouTube.

Thanks for joining me today! See you again soon!

Inspire Me Monday ~ Fluttering Butterflies

Welcome to Inspire Me Monday!  I’m your host Allison Cope today.

Today we’re going to color up some clear stamp images and create a fun interactive card (my favorite!).

For today’s project, I used:
  • stamps, ink and corresponding dies
  • coloring utensils (Copics)
  • a few pennies
  • 110# white cardstock
  • large & small circle dies
  • small plastic spin & slide discs
  • foam adhesive
  • cloud stencil (optional)
Join me in my crafty space while I color in the 3 clear stamps set images including “Natural Beauties”, “Soothing Sympathy” and “Pure Prairie Spirit”.

https://www.youtube.com/watch?v=s3PM9nddvco

Here’s a look at the final card.  As said before, the yellow is so light it’s very hard to photograph.


And here you can see the shimmer pen I put all on the groovin’ butterflies…

Thanks for stopping by today!  I hope this inspires you to make a fun and whimsical interactive card!  Now go get INKY!

~ Ally ~


stamps: Power Poppy (Natural Beauties, Soothing Sympathy, Pure Prairie Spirit)
cardstock: Recollections (110# White)
dies: Power Poppy (Natural Beauties Dies), Simon Says Stamps (Circle Thin Frames), Catherine Pooler (Circles Dies)
inks: Kraftin’ Kimmie Stamps (Wicked Black), Range Distress Oxide Inks (Mustard Seed, Wild Honey, Scattered Straw), Stickles (Star Dust), Copic Markers, Sharpie (Fine), Spectrum Noir (Sparkle Pen)
interactive card elements: MFT (Spin & Slide Discs)
stencils: MFT (Mini Cloud Edges Stencil)
sequins: Studio Katia (Summer Fusion)

Sunday

Inspire Me Monday: YouTube LIVE Watercolor Painting

Howdy everyone!  Allison Cope here!

Today we're going to do something a little different!  Later today I'm going to go LIVE on YouTube (HERE) with a watercoloring project for a last minute Valentine's Day card.

You will also be able to see it after the live as well on the same link above.

Please join me at 2:00pm EST on YouTube and we'll have some fun together!

https://www.youtube.com/watch?v=eNQ7ocOYn3o&t=40s

See you then!

~ Ally ~

Monday

Inspire Me Monday ~ Free Standing Pop-Up Card

Happy Monday!  Allison Cope here for Inspire Me Monday.  Today we’re going to make a fun Free Standing Pop-Up birthday card using a whole bunch of fun stamps!

Here’s your supply list for today’s card:
  • 4 1/4” x 11” card base cardstock
  • 2 3/4” x 5 1/4” tag matting cardstock
  • 2 1/2” x 5” tag patterned paper (You may want 2 pieces)
  • paper trimmer, craft knife, stamps, ink, double sided tape, dies (optional)
  • SCORING LINES: 1”, 2 3/4”, 3 3/4”, 5 1/2”, 7 1/4”, 8 1/4”, 10”

Join me in at my crafty desk today and let’s make this fun card!  Grab your favorite beverage and away we go…

https://www.youtube.com/watch?v=Djdys3GW8nc&feature=youtu.be

For our card today I used the cups & cupcake image from the Under Glass stamp set.  Our birthday sentiment on the back of the tag came from the Floribunda stamp set.

To decorate the card base we used the cake on a plate from the Party Time stamp set, the forget-me-not flowers and the butterfly from the Soothing Sympathy stamp set, the potted Primroses and the single Primrose bloom from the Potted Primroses, the tea cup and saucer and the little daisy and the strawberry from the Tea in the Garden set and finally the champagne glasses from the Dream Wedding stamp collection.

Here’s a photo of the front of the card…

This is the back of the card again…

This is the card from the side showing how it stands up…

And finally, this is the card folded flat to fit inside an envelope!  Hooray!


Thanks for joining me!  See you again soon!  Happy stamping!

~ Ally ~


stampsPower Poppy (Under Glass, Floribunda, Party Time, Soothing Sympathy, Potted Primroses, Tea in the Garden, Dream Wedding)
cardstock: Recollections (Teal Collection 110#, 65# White)
patterned paper: Catherine Pooler Designs (Prickly 6x6)
dies: Spellbinders (Long Classic Scalloped Rectangles, Long Classic Rectangles), Catherine Pooler Designs (Circles Dies)
ink: Memento (Tuxedo Black), Catherine Pooler Designs (Fiesta Blue), Copic Markers 

Inspire Me Monday - Let's Chill!


Hello Power Poppy Fans! I'm Nancy Sheads from the Bloom Brigade here with this week's edition of Inspire Me Monday.

Two days until Christmas! If you're like me (and I suspect many of you are), you are scrambling madly to get everything done before the holiday. And although I vow every year that I'll start earlier, I'm still making holiday cards so I'm looking for images that I can color quickly.

So today's video features this adorable snowman from the Let's Chill Digital Stamp Set and a simplified color palette to get the job done.  


Although this card will probably go out in my Christmas mailing, I often use a snowman image for a variety of occasions such as a winter birthday, get well or thinking of you cards. So don't tuck away your snowman images on December 26th! Pull them out and enjoy them until the snow melts.

Ready to color? Let's get started!


STAMP

Let's Chill Digital Stamp Set

COPICS USED

BG000, B91, BV000 (snowman)
B91, B93, B95, B97, C1, C3, C5 (scarf)
Y35, YR04 (carrot)
C1, C3, C5 (buttons)

Be sure you check out my Power Poppy coloring videos on YouTube.

Thanks for joining me today! Happy holidays!

~ Nancy 

Inspire Me Monday - Change Up Your Holiday Color Palette!


Hello Power Poppy Fans! I'm Nancy Sheads from the Bloom Brigade here with this week's edition of Inspire Me Monday.


For today's project, I have a holiday card featuring Power Poppy's Bough Wow Wow clear stamp set.  If digital images are your thing, Power Poppy has you covered! This image is also available in digital format as Mittens and Merriment

What's your favorite holiday color combination? I like non-traditional color schemes for holiday cards, although the combination of teal blue with red and/or pink has become so popular that it's become a common holiday palette as well. But the color combination is one of my favorites and I've been using it a lot for this season's holiday cards.

I started by stamping the image with Amalgam Ink in Obsidian by Gina K. Designs on Hammermill Color Copy Digital Cover. Although this ink is Copic compatible, make sure that it is completely dry before you start coloring so that it doesn't smear on your page or rub off on your marker nib.

This image is really easy to color and the finish results pack a lot of punch. I've added a coloring video to show just how simple it can be. The markers I used are listed at the bottom of the page.

After coloring the image, I rummaged through my stash of dies to come up with a pair of oval dies that would layer together. I always have a hard time mixing and matching different colors and patterns of design paper, but it happened that I found a doubled sided design paper in my stash where both sides worked together to give me the final result that I wanted.


COPICS USED:

G24, G46 (leaves)
G20, G21 (pom poms)
R24, R37, R59 (heart)
BG11, BG32, BG72, BG75 (ribbon)
BV000, BV00, R37 (snowflake mitten)
BV000, BV00, BG11, BG32, BG72, BG75 (striped mitten)

Thanks for joining me today! See you back here soon!

~ Nancy 


Inspire Me Monday ~ Holiday Advent Calendar

Happy Monday everyone!  Today is Remembrance Day here in Canada so I want to send a heartfelt thank you to all the men and women who have served our country in the past, in the present and the future!  Thank you for defending our freedom.

I’m Allison Cope and today I’m going to share how I made a cute little holiday advent calendar with you.

I have used our adorable, and very handy stamp set, the “Merry Littles” stamp collection!

Join me at my crafty desk today with a warm cuppa your favorite beverage…

https://www.youtube.com/watch?v=KiJ9ZOdWuws&feature=youtu.be

Here’s another quick look at all the boxes for my calendar…


Thanks for joining me today!  I hope I’ve inspired you to create something fun!

Happy stamping!

~ Ally ~

Inspire Me Monday: Brusho & Copic Markers

Howdy and welcome to another Inspire Me Monday!  I’m Allison Cope and I’m your hostess this week.

Today I’m going to share a fun Fall card featuring the “Chrysanthemum XL” stamp set and some Brusho and Copic Marker coloring.

So grab a mug of your favorite warm drink and join me in my craftroom!
https://youtu.be/z4Laigrkm3A

For my sentiment, I used the “Giving Thanks” from the “Fortunes of Fall” stamp set.  Here’s a look at the final card…

Thanks for stopping by today!  I hope you get inspired and go and create something fun this week!

~ Ally ~


stamps: Power Poppy (Chrysanthemum XL, Fortunes of Fall)
cardstock: Strathmore (Cold Press Watercolor), Recollections (110# White)
ink: Versamark, Catherine Pooler (Peppermint Scrub), Copic Markers
dies: MFT (Stitched Rectangles), Elizabeth Crafts (Happy Birthday)
dots: Kraftin’ Kimmie (Lovey Dots)

Inspire Me Monday: Let's Add Some Shimmer!

Hey everyone!  Happy Monday!  I’m Allison Cope and for today’s Inspire Me Monday, I’m not only going to share a fun coloring tutorial but also how to add some cool shimmer to your crafty projects.

For today I’ll be using the awesome “Poppy XL” stamp and it’s coordinating die, found here.  I’m going to be coloring this stamp set’s image using ZIG Markers plus adding some cool shimmer details using some Fine Tec metallic paints.

Come and join me in my studio…
https://www.youtube.com/watch?v=XXcihKhLcBc&feature=youtu.be

Here is another look at my lean card creation…

And here’s a little closer image of that fabulous glitz…

Thanks for stopping by today!  I hope I’ve inspired you to pull out something glitzy from your stash!

~ Ally ~


stamps: Power Poppy (Poppy XL)
cardstock: Bristol (Smooth), Recollections (110# White)
inks: Versafine (Black Onyx), ZIG Markers, Polychromos Pencils, Fine Tec (Metallic Paints), Versamark, Ranger Distress Oxide Inks (Dusty Concord, Wilted Violet, Candied Apple)
dies: Power Poppy (Poppy XL Dies)
other: Nuvo Crystal Drops (Ebony Black)

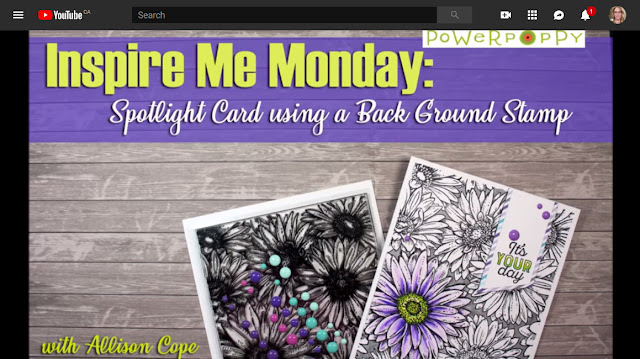
Inspire Me Monday: Spotlight Card Using a Back Ground Stamp

Howdy all!  Welcome to Inspire Me Monday here at Power Poppy!  I’m Allison Cope and I’m your hostess this week!

Today I thought I’d using the spotlight technique to create a card with.  All the spotlight technique is, is highlighting one spot on your card… this can be done by cutting a shape from your image and only colouring in that shape… or just colouring one object within your image… and that’s what I’m going to do today!

I’ve chosen the glorious “Big Sexy Blooms” back ground stamp to use. Since I am using a water based medium, ZIG Clean Colour Real Brush Markers, I have chosen to stamp with my Versafine “Black Onyx” ink.

I chose the one large bloom to highlight along the bottom left edge, so that the image I coloured and and popped up using foam adhesive.


I also chose to use the lovely “It’s Your Day” sentiment from the “Strong and Beautiful” stamp set to accompany my blooms.

Come and check out this really easy way to create a card…
https://www.youtube.com/watch?v=Krho9jsuAFg&feature=youtu.be

Thanks for joining me today!  I hope this inspires you to pull out your back ground stamps and create a spotlight area of colour!

~ Ally ~


stamps: Power Poppy (Big Sexy Blooms, Strong and Beautiful)
cardstock: Strathmore (Smooth Bristol White)
ink: Versafine (Black Onyx), ZIG Clean Colour Real Brush Markers
patterned paper: Pink & Main (Frosty 6x6)
dots: Kraftin' Kimmie Stamps (Underwater Dots)

Inspire Me Monday: Partial Die Cutting

Howdy and Happy Monday!  I’m Allison Cope, your hostess for today’s Inspire Me Monday!

Today I’m going to pulling out the glorious “Natural Beauties” stamp set and it's coordinating dies to play with.

I decided to make my cards very clean and simple today.  Just black and beauties!

So grab a cup of your favorite cool beverage and join me at my desk…

https://www.youtube.com/watch?v=aemj3U8MAzQ

So here is the card I created on the video…

Plus I created two more cards using the exact same technique but different shapes for the window.

This card I used a semi-circle die and the second one I used a heart shaped die…

Thanks for joining me today!  I hope you’ll get a chance to make a few of these partial die cut cards for yourself!

JUST A REMINDER... the Power Poppy shop will re-open this coming Thursday!  Happy browsing!

Happy creating!

~ Ally ~


stamps: Power Poppy (Natural Beauties)
dies: Power Poppy (Natural Beauties Dies), MFT (Stitched Arch), Simon Says Stamp (Stitched Rectangles), Hero Arts (Hearts Infinity Dies)
patterned papers: My Favorite Things (Black and White Stripes 6x6)
ink: Kraftin’ Kimmie Stamps (Wicked Black)
rhinestones: Studio Katia (Star Foil Crystals)
cardstock: Recollections (White 100#)