Showing posts with label Twinkling-Eyed Snowman. Show all posts

Monday

Inspire Me Monday - Combining Digital Images


Hello! This is Gloria Stengel, one of the NEW Instant Gardeners! I have the privilege of bringing you the Inspire Me Monday project this week! I hope you had fun during our Christmas Remix Hop! I sure had fun coloring the new images! And, congratulations to all the prize winners! 

Now that you have lots of new digital images to play with, I wanted to show you a few ideas for combining them to make "new" stamps! To learn how to work with digital images, please review Julie's amazing post HERE. (I have used Photoshop Elements to create my new images.)


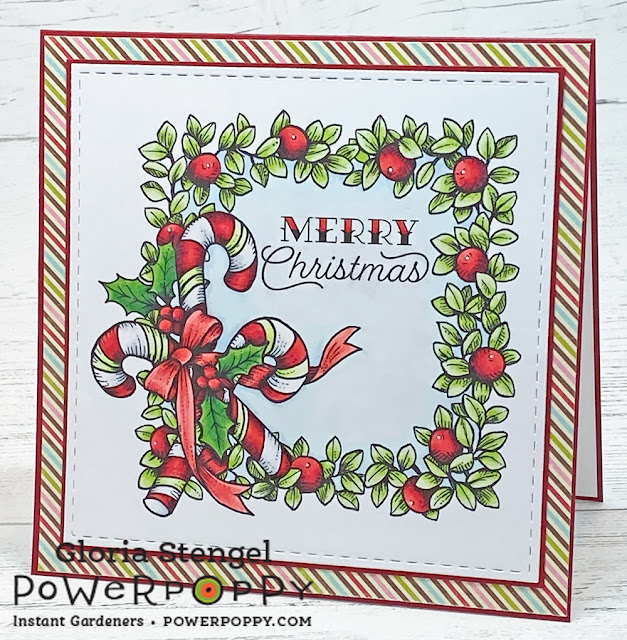
To create this lovely combination stamp you will need three images. I used the wreath from Wreath: Boxwood and CranberryCandy Cane Classic (which is only $1), and a sentiment from Twinkling-Eyed Snowman (any sentiment will do).

Open all three images in Photoshop Elements (or a similar program). Follow the directions HERE to erase the white backgrounds. Save each transparent image as a new file name.


Place the new, transparent wreath onto the work space, then size and crop as desired. 


Drag the new, transparent candy cane image onto the page (or use the FILE, PLACE feature). The candy canes will overlap the wreath as shown. 


Drag the sentiment into place. Save your NEW creation and print!


Color your image and create a card or tag! I printed my image at 5" x 5" and created a simple 6" x 6" card. I colored the image with Copic markers, which made it color up quickly! 

Once you get the hang of working with digital images, you can create lots of new images. Like this one...


To create this wonderful coloring page, I combined the watering can and branches from Country Home Christmas with several other images and a sentiment to create this lovely decorated branch.


Open the image and delete the white background by following the process HERE. Size the image as desired. (Some images are already on a transparent background, but many image files are JPG files with a white background.)


Open the Glittering Glass Santa image, then remove the white background. Use the eraser tool to erase the tree branch.


Place the altered Santa image onto your branch image, size and position as shown above. If your altered Santa image is in the Photo Bin at the bottom of the screen, you can simply drag him into position, then size him accordingly.


Continue to add elements until you are happy with your NEW image! I added the pinecone bauble and the tiny pumpkin bauble from the Forest Finds stamp set. (To see the Forest Finds image colored, check my blog HERE.)

I also added the ornaments from the Acorn Ornaments stamp set to the branches. After I erased the white background, I rotated and resized the ornaments to fit my tree branch.

The final touch was adding the sentiment from the Winter Flora digital stamp set to the bottom of the new image.


I printed the NEW image at slightly smaller than 8 1/2" x 11" to make a full-sized coloring page! It would be tons of fun to pass out coloring pages to all the little ones during Christmas events, or to have a coloring challenge with adults! You could print this in a smaller size to make greeting cards. The sky is the limit!

An easy way to alter digital stamps is to add your own text to the image.


I personalized a stocking image by adding my name to the stocking from the Joyeux Noel Stocking digital stamp set. You simply open the digital stamp with Photoshop Elements, click the text tool and add your text! Text can be sized and rotated. You are only limited by the fonts on your computer!


You can make a cute set of tags with this technique!

Thank you so much for joining me on this digi stamp adventure! If you'd like to see more of my work, please visit my blog, Scraps of Life

Until next time, have a Merry Christmas and a most Blessed New Year!
Gloria Stengel

Friday

It's Friday! Ready for some Good Vibes?


Hello Power Poppy Peeps! It's been a while since we've ushered in a Friday with some Good Vibes but since we are officially 12 days until Christmas, isn't today a grand day to share some heart-warming tidbits?  We think so! So... grab a cuppa joe (or your favorite warm winter beverage), settle in and take a gander at some goodness!


First Up.... The Bloomies and Instant Gardeners have been prolific with their Christmas creations lately! You can almost see the paper fly and those fingers get inky! There were some goodies shared this past week that I thought I'd re-cue, just in case you missed them!

Broni created this delightful snow guy in soft and sweet colors using Power Poppy's Twinkling-Eyed Snowman, a new digital stamp set.


Barb went a little dreamy with these darling chickadees and that super fun backdrop that looks like snow. I just love that! She used Power Poppy's new digital stamp set My Little Chickadee and worked some digital magic to flip the orientation a bit.


And Gloria packed a visual punch with this vibrant coloring using Power Poppy's Forest Finds digital stamp set! 


So, if you still need to make a few cards as Christmas creeps closer, I hope this trio gives you just the right kind of inspiration to get creating!

So, if those are three good vibes, this fourth vibe might just make you squeal! Did you read about the new addition on Marcella's IG or Facebook? Okay, wait for it....

MEET RUDY! The Power Poppy Vice Pup in Chief! 


Can you even stand it? I mean, look at that face? He is so freakin' adorable!Marce inherited this little bundle after one of Doug's uncles couldn't care for the little guy. So, they stepped in and adopted him.

And, we all know you know Mr. Tibbs. Wait until you see the two Power Pups together! Sigh... it's just too much!


With those eyes looking back at me, I honestly have no idea how Marcy gets anything done during the day. I would just want to play with those guys day in and day out! They say looking at pictures of puppies increases your endorphins -- you know, those super hormones that deliver happiness? So.... you're welcome! ;-)

And moving on to our last good vibe for the day! I thought, if you still needed a great recipe for that cookie exchange you still need to bake for, never fear! I just might have one for you! Check out this little bit of delish!


These Spritz Cookies are my go-to! they are kind of like a little shortbread base with cream cheese frosting and a bit of crushed candy canes. They are delish! So, I thought I'd share the recipe!


SPRITZ COOKIES
~makes 42 cookies

1 c. butter
¾ c. sugar
1 egg
2 t. almond extract
2-1/4 c. sifted all-purpose flour
¼ t. salt
½ t. baking powder

DIRECTIONS:
Cream butter until soft. Add sugar gradually, continuing to cream until light and fluffy. Add egg and almond extract; beat. Sift flour, salt, and baking powder together, add gradually in three stages, beating well after each addition. Chill dough 10 minutes. Make into rolled balls, then pat into the desired shape. Bake 8 to 10 minutes in an oven preheated at 400 degrees F. Add cream cheese or sour cream frosting and top with crushed candy canes.

So, with all that sweetness....


It's time to hop on over to these fine ladies to see what they've whipped up for you this week!


On that creative high note, we hope you have an amazing, creative and festive weekend! Be sure to tune back in to the Power Poppy blog on Monday when Gloria Stengel will be in the house sharing some tidbits on how to combine digital images. I saw some snippets of her work in progress and my jaw dropped. I actually said, "Now, why didn't I think of that??" This is one Inspire Me Monday you won't want to miss!

Until then, happy stamping!
~Julie