Showing posts with label Glistening Paperwhites. Show all posts

Tuesday

Creative Confetti - Change it up!


Hello and welcome to another weekly boost of creative ideas for your cardmaking skills! My routine hasn't changed much for the last four months. My daily routine, after I stumble out of bed, is to get a cup of coffee. Then I carry that cup to my computer and check my email. By then, it's been an hour. I look at that cup of coffee, and it's gone! I must have finished it, but I am not sure! Then, I go for my daily walk. So I decided to change it up. I went for that walk first and enjoyed the scenery and the quiet and the cool morning, and planned my day. Then I had my coffee outside on the patio. I sure enjoyed that cup. Still, plenty of time to get to those emails! It was a good change for me.

You may want to make a change in your routine like I did or why not try something new in your crafting space? Knowing how rare these kinds of cards are, here's my challenge for this week!


HOW TO PLAY: I challenge you to do a slimline card. I know that you have seen them out there, so let's do one here. This style is long and skinny and can fit in a business-sized envelope. So, get creating and once you are done, don't forget to link it up using the linky below. Every entry is one shot at winning a $25 code to the Power Poppy Shop!

On to my creation!


My card measures 3-3/4" by 7".  This isn't the standard size, you can make yours larger if you wish. Just make sure the finished card appears long and skinny. I used Power Poppy's stamp set Glistening Paperwhites  -- both the clear stamp set and the digi (called Paperwhites & Juniper) are on sale! My image is colored with Copic markers and Prismacolor pencils and I did a pointillism design around the image to bring it forward. The card base is Gina K Designs in Wild Wisteria and a panel of silver and then the image panel. I added some Glossy Accents to the berries as well. 


This card fits easily into a regular business envelope after cutting off one inch on both sides. Then I used 1/4 score tape to seal it off the sides that I cut. I kind of like the blue inside of the envelope. 


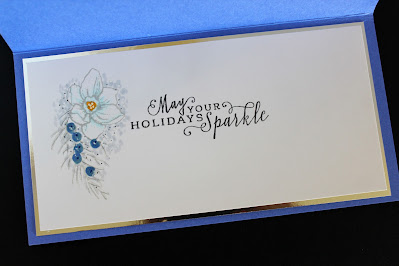
Don't forget to complete the inside! Here, I just repeated the layering panels and stamped a sentiment from the same stamp set. Added the flower, masked it off, and stamped the branches with berries. 
You don't have to finish off the inside to qualify in the challenge.  It's just a fun idea!

So, let's see you take it "slim" and make a slimline card this week. They are fun and just like those money cards you can find at Hallmark, a creation like this might come in handy for gift giving. Speaking of gift-giving, if you are the lucky name drawn at the end of the month like I said, you could win a $25 gift code to the Power Poppy Shop!   What a fun way to win a shopping trip. 

Until next time!
~Barbara


You are invited to the Inlinkz link party!
Click here to enter

Givers Gonna Give!

Hello my sweet stamping friends! Today's bit of Creative Confetti is all about the cheer and more importantly... sharing it! It's why we love this craft --- to give a little bit of our (he)art with another human being! So, to capitalize on this, this week's challenge is all about throwing up the love, watching you grab it and give it to someone else! ;-) 


Just that simple! We also hope that as you are making it or after you make it you create some plans to actually give it to someone special!

On to my creation! 

If you checked in for yesterday's Inspire Me Monday, you saw this little guy dancing and prancing already! If not, you can click HERE for the full tutorial that showcases a little digital manipulation and masking to get the job done!


Like I mentioned yesterday, I made this little corgi bookmark for my darling daughter who needed one while she read her latest book for AP English. She adores Corgis and we always love on our neighbor dog Zeth. Isn't he the cutest??? This was him as a pup having a major war with some natural grass! Hehe!!


Here's a little closeup of my project to show off some the sparkle I added!


And that, my friends, is it! Like I mentioned, if you want details on this project just click over to yesterday's post and see all the little tips and tricks molded and folded into this project! ;-)

Now, since it's the first Tuesday of the month, that means we get to throw all the entries from last month's challenges into a virtual hat to see who will win our $25 shopping trip to the Power Poppy Shop! So, without further ado...


That means this month's lucky winner is.....


***  HEIDI JAKOBS!!  ***

And here's a glance at her beautiful work of art using Power Poppy's Glistening Paperwhites stamp set! Be still my heart! Love all the fussy cutting and the beautiful work with watercolor markers! We should mention, if you want to see the full project, simply visit her blog HERE! 


Heidi, to claim your prize, simply email us at bloom@powerpoppy.com and we will get you your code to shop right away! Congrats and thank you so much for playing along and sharing this GORGEOUS work of art!

And that, my friends, is it!  We can't wait to see what you create to gift!  Once you're done, of course, be sure to link up your creation so that everyone can see your awesomeness! And, if you do, you'll be in the running for a $25 gift code to the Power Poppy Shop! One random winner is chosen every month. We could all use a little extra Power Poppy goodness, right? So dig out your favorite stamps create with a little random kindness in your heart and get those fingers inky! ;-)

Happy Stamping! 

~Julie
Creative Confetti Thrower


Sunday

Day 10: Wooden Ornaments


Hello Everyone! Jessie here today with Day 10 of our 12 Days of Christmas extravaganza! If you are just joining us, you have some catching up to do! There are nine other inspiring projects made by the talented Bloom Brigade that you won't want to miss! Keep in mind, if you play along with us during any one of the 12 days and try our project at hand, link up your creation HERE and you’ll be in the running for our Power & Spark 12 Days of Christmas Challenge. You read that right: you’ll have 12 ways to enter. Play along once or try all 12 days for more chances to win a $50 shopping spree to the Power Poppy Shop! 

For the 10th Day of Christmas.... I have always wanted to make some of those little wooden round ornaments! I figured what better time then for this project! I pulled out my Heaven and Nature Sing and Glistening Paperwhites stamp sets! I stamped the images and sentiments on the discs using Versafine Black Onyx. 


I coloured them up with my Polychromos coloured pencils, best part is that on the wood I didn't do a ton of layering, just one layer blending a few colours together. These all came together rather quickly!


Once I finished all my colouring, I took the black pencil and retraced my stamp lines.


All that is left to do is add a bit of string and hang them on a tree. These were super fun to make I may have to cut myself some more discs next year and do some more!


And, it's just that simple! Want to join in on the fun and give any one of the 12 days of projects a try? Just get creating and link your creation up HERE! Whether you make wooden ornaments or any one of the other amazing projects that the Bloomies have created over the last nine days you can play along and are in with a chance to WIN!

I hope you've enjoyed these super easy and very quick Christmas projects and don't forget to pop back in tomorrow! Ally Cope is in the house with a fun way to add a little stamped love to your gift giving this holiday season!

Thanks for stopping by,
Hugz,
Jessie


Monday

Inspire Me Monday: One Panel, Six Cards!


Howdy all! Welcome to Inspire Me Monday here at Power Poppy! I’m Allison Cope and I’m your hostess this week.

This week I’m going to talk a little bit about making multiple cards using one panel of creative awesomeness. PLUS — Power Poppy is offering a special offer on all of the stamp sets I’ve used today. Read through to the end for details...

Typically I am the type of card maker that makes one card at time.  Each one is individual and different and traditionally has not connection to the next card I make.  Today I challenged myself to create one single panel and then create multiple cards using that panel.

So here it goes…

To begin, I first chose some single blossoms and foliage from the the Simply Camellias and Glistening Paperwhites stamp sets. Who says you can't use Christmas stamps in February?!?!  I knew I wanted to create a watercolored back ground piece so I grabbed some Arches 140lb Cold Press Water Color paper and some fun ZIG Real Brush Clean Color Markers to use.


First I embossed the blossoms and branches all over the water color paper (4 1/2” x 11”) using Versamark ink, white detail embossing powder and my heat tool. I used my anti-static powder to wipe the entire panel down before I began this process as to inhibit any stray pieces of embossing powder from sticking where I didn’t want them.


Once all the heat embossing was done, I used my pink and purple shades of my ZIG Clean Color Markers and coloured the entire surface of the water color paper.  I used my water brush to blend and push the color around the surface.
ZIG Markers: English Lavender, Lilac, Light Violet, Violet, Light Pink, Pink

Next I took some Picked Raspberry, Dusty Concord, Seedless Preserves and Black Soot Distress inks and blended them at random over top of the entire panel leaving some open areas of color showing through.


Once the panel was dry, I mixed up a small amount of white acrylic paint and water and I used an old toothbrush and added some mini splatters all over the panel.  Too get really small splatters, I ran my thumb nail through the toothbrush right over top of the paper.


Next I chose some fun colours of cardstock that would coordinate with the colours of my water color panel.  I chose some fun Razzle Berry, Grapesicle and Grape Jelly cardstock from MFT.


Then I cut my long panel down into 3 main pieces;
Two panels of 4 1/2” x 4 1/4” and the remaining panel measured 2 1/2” x 4 1/4”.


I cut one large panel with a circle die cut from the middle.
The second large panel I cut using a V-shaped scalloped edge die about two-thirds down from the top.
And the small panel, I die cut a partial heart shape from.

And here what I did with all 6 pieces…
With the large, almost square panel, I added some stitching, a hot pink mat and lots of fun scalloped vellum circles plus a popped up white greeting from the “Nice Things to Say” stamp set.  I even have a little bit of fun hot pink string peeking out!


Next I took the scalloped panel, wrapped it with pink string, popped it up on a white card base and added a pink sentiment.


Then I took the bottom of the scalloped panel, adhered to the bottom of a card base and created a white panel using the same die cut for the top with a simple greeting.


Then I took the heart negative panel, matted it with purple cardstock and die cut a white heart to fit the space with an added simple sentiment.  I added the whole thing on an embossed card base for some added texture.


With the heart die cut water color piece, I created a whimsical word panel with grey, black and hot pink inks.  I added a few pink hearts and sequins and added it to a white card base.


And finally, I die cut a light purple cardstock panel and die cut and inlaid multiple sizes of stitched circles, popping the water colored circle into the center with a simple greeting at the bottom.


Voila… six simple cards using one panel and minimal supplies! 

I hope you get a chance to give this technique a try.  Try a rainbow of different colors for your panel and have a ball seeing how many cards you can create using just one piece of inspiration!

• • • SPECIAL STAMP DEAL • • • 
Pick up any of the clear stamp sets used in today’s tutorial for 20% off! Offer lasts through Friday at midnight central time. 

Happy creating everyone!!

~ Allison Cope ~


All the cards created used the same supplies:
stampsPower Poppy (Simply Camellias, Glistening Paperwhites, Nice Things to Say)
cardstock:  Arches (140lb Cold Press Watercolor Paper), Recollections (110lb White, Black), My Favorite Things (Razzle Berry, Grapesicle, Grape Jelly, Vellum)
inks: Versamark (Tsukineko), Memento (London Fog), Versafine (Black Onyx), Ranger Distress (Picked Raspberry, Dusty Concord, Seedless Preserves, Black Soot), Catherine Pooler Designs (Party Dress), ZIG (Clean Color Real Brush Markers)
dies: My Favorite Things (Stitched Circles, Stitched Scalloped Basic Edges), Spellbinders (Scalloped Circles), Simon Says Stamp (Small Heart Doily)
embossing folder: Provo Craft (Cuttlebug – Hugs & Kisses)
embossing powder: Stampendous! (White Detail)
sequins: Multi-Craft Imports (Princess, Rouge)
corner rounder: EK Success
paint: Delta (White Acrylic
other: pink thread.

Friday

February Challenge: Say YES to NO Lines

Hello Peeps and welcome to another wildly creative and wonderful Friday here on the Power Poppy Blog. Not only do we have fun things to share, we have a brand new challenge to kick off the month, hosted by the lovely, and warm-hearted Cindy Lawrence. So, let's share those details first!


HOW TO PLAY: If you've ever reached for your coloring medium of choice in the hope that the stamped lines below would fade into the background, then this little challenge is just for YOU! No Lines coloring allows your stamped image to appear more like an original drawing or watercolor, and it’s all about stamping or printing the image in a light ink and avoiding dark lines.

Here’s what Ms. Cindy had to share about her challenge “Say YES to NO Lines!” She was even sweet enough to offer a few tips if you've never tried this fabulous technique before!

To color an image using the ‘No Lines Coloring’ technique, stamp or print your image in a light color.  I try to choose a color that makes sense with my image.  For example, if I’m coloring an image of a person, I’ll use a light skin tone or tan ink. For floral images, I often use a pale green, particularly if they have a lot of leaves. I find it also helps to stamp the image again in a black ink on another piece of paper. You can use this image as your reference while you're coloring the lightly stamped image.
When I color up the image, I will often use my lightest ink color to lay out where I’m going to put my shadows and highlights first. This allows you to plan your image without fully committing right away. Next, I color dark to light from the shadows out towards the highlight areas. I find this easier when doing the ‘No Lines Coloring’ technique. You may find the light to dark technique works best for you.

Keep in mind, as you color it is going to look pretty bad before it looks good. It will have an ugly stage for sure. Don't give up on it! I promise it will get better!

Not being able to see the lines of the image presents a little more of a challenge than usual, but it is so worth it for the beautiful painterly look you get in the end. I hope you have fun with it!

Thanks, Cindy! I have to admit, I have never used this technique, so the challenge is ON in my own stamp room as well.

THE OFFICIAL RULES:

  • Use Power Poppy stamps if you have them. If not, it is a great way to win some! 
  • Link your creation below using our Linky (please use the exact URL from your post instead of a generic blog address.)
  • Please mention Power Poppy in YOUR blog or gallery post with a link back to THIS challenge
  • Winner will receive a free clear or three digital stamp sets of their choice from the Power Poppy Shop
  • Enter as many cards as you’d like, as long as they fit the theme of the challenge!
  • Deadline to enter is February 28 @ 8:00 PM EST. At that point, we’ll draw the winner randomly and make the announcement right here on the first Friday in March.

Here’s the full peek at Cindy’s full-of-blue hues creation:


Goodness gracious, that is a feast for the eyes, isn't it? If you want to read up on “how” Cindy created this look, just hop on over to her blog using the link list below! Cindy used Power Poppy's digital stamp set Tulips in Hobnail Pitcher to create this look. If you'd like a few tips on how to change the color of digital stamps after you've snatched them up, just click HERE to one of our tutorials on the topic!

Moving right along! Now that you have all this inspiration and insight, it's time to reach into our bag of tricks to see who won our Power & Spark Winter Blooms Challenge from January! 

We had 49 players last month submitting 56 beautiful entries -- Wowza! There were so many lovely ones, I swear I might have had to pick my jaw up off the floor more than a few times! Random.org threw all those entries into its little random generator and the winner it drew was.....


That means the lucky stamper is....

***BARBARA CAMPBELL*** 

And here's a peek at her absolutely fabulous creation using Power Poppy's Glistening Paperwhites!  


Congrats, Barbara! Your card is so very clever, lively, and well executed. Just a wintertime dream, really! Simply email us at bloom@powerpoppy.com and let us know which clear stamp set or three digital stamp sets you'd like us to send your way.

Before we hand things over to our Bloomies, there were a few Power & Spark entries that deserve a major SHOUT OUT. First up, Nancy Kirk shared an amazing way to get a watercolor look with Copic markers using at least one material most of us have around the house! Here's a peek at her cards and you can catch her video tutorial HERE!


And second, Laine Webb made a gorgeous ribbon-accented box using Power Poppy's Dynamic Duos: Peonies & Tulips. Click HERE for a step-by-step tutorial on how to create this beautiful little gift in and of itself. Just delightful, Laine, we enjoy your work immensely.


Now it’s time to turn things over to our classy and sassy members of the Bloom Brigade to see what they’ve whipped up today for your viewing pleasure! I am 100% sure you'll see even more inspiration for this month's Say YES to No Lines Power & Spark Challenge...


Thanks for stopping by and spending a little bit of your day with us!

We’ll see you here on Sunday with a freshly remixed digi from Marcella’s archives... it’s sure to put some joy in your day with flowers that have a sunshiney personality all their own.

THEN: Tune in on Inspire Me Monday when Guest Designer Corinne Jones joins us to share insights into how she gets all that depth in her Copic Coloring. See you soon!

~Julie

P.S. We know some of you have been having troubles linking up your creations for the past Power & Spark Challenges, especially if you live an ocean away from the U.S. Please try again. We think have figured out the problem, so please see the notes below about how you enter in your link information, it is a bit picky about how the web address is entered -- allowing everyone to share with JOY!

If you continue to have issues, please drop an email to bloom@powerpoppy.com and we will help you get your entry posted! We LOVE seeing your beautiful work, peeps!


Thursday

Holiday Preview Day 5: Glistening Paperwhites

Hello there! Once again, you all amaze me with your kindness and your cool comments and observations — what a ball to read the reactions to our Fully Stocked stamp preview yesterday. Thanks for letting us know what you think. xoxo!!

A few quick notes before we get to Day 5, our final day of Holiday previews before our FULL BLOG HOP on Friday — check this out:


Oh yes! On release day, we will share a sale promotion throughout the store. Come join me for the announcement here on the blog Friday morning.... eeeee!!

And if I may share a note of excitement. I stopped at the grocery store last night and was rolling by the magazine aisle, and lookee lookee at what I found:


Might be a little hard to make out here, but I am holding the brand new issue of CardMaker magazine with Power Poppy featured on the COVER!!! The work of our very own Bloomie, Stacy Morgan, is highlighted on the FULL cover. Inside, you’ll find a very special feature and Q&A with ANOTHER of our Bloomies, Christine Okken. Can you believe this? But wait, there’s more. Power Poppy stamps are featured in a number of cards and tags throughout the magazine. And one of our fave customers and recent winner of the entire Holiday release, Donna Phelan, has a card featured, too! Go pick up a copy and you will have enough inspiration to last you through the Holidays! (Be sure to grab some new stamps, they used so many from our Happiest Holiday Collection.)

And now, back to today’s stamp set preview... what do you think of these refreshing winter colors?


Aren’t they a pleasant addition, if not a detour, from the traditional red-and-green holiday palette? I sure think so, because I don’t like anything too traditional, I always want to make things a little more unique and special. With this new stamp set, you can showcase the winter-wonderland tones of chalky blue-green and frosty white, crisp green and bronze or silver... really, there are so many directions you can take this beautiful bough, composed of Seeded Eucalyptus, Paperwhites (Narcissus jonquil) and Juniper! Presenting the next must-have set from Power Poppy: Glistening Paperwhites.


With our newest Holiday botanical, you get four large images with which you can create the most magical wintertime cards. Scripty sentiments range from Christmas through New Years, and will work for you all season long. I’m very proud of this one, I don’t think you’ve seen anything like it before!

Just wait until you see what the Bloom Brigade has done with this one, you are gonna FLIP OUT!! Seriously. Flip. Out. These cards are breathtaking, and I hope they inspire YOU to sit down in your craft space and rock out some fresh new card designs....


So grateful for this wonderful week, for friends coming around to say hello, for a fun surprise on the newsstand, and now... I have to race up to school for my kid’s conferences! Time for more coffee!

Be sure to come back tomorrow for ONE MORE CREATIVE PROJECT by the Bloomies, plus I will announce the big savings we’ll have storewide — a gift from me to you!

Thank you, dear ones!