Showing posts with label Glittering Glass Santa. Show all posts

Monday

Inspire Me Monday: Digital Mash Up!


Hello all and Happy Monday! I have to admit, I didn't have a ton of time to craft this week so I thought of a way to share a little creative tidbit this week, in a bite-sized post! So, here we go!

Have you ever looked at two stamps or images and wished you could combine them to make a completely new image? Well, the beauty of digital stamps is.... you CAN! 

I'd been looking at the Glittering Glass Santa ornament and that lovely branch....


And, I wondered, what can I perch on that branch instead of an ornament? Well, I'd always been a fan of the little birds in the digital set Cardinal Couple! 


So, why not mash up the two images?

I started by opening up the cardinal image and then, I knew I needed to start "erasing" the cups and berries in the image...


If you have a photo editing software, most of them have an "eraser" tool, allowing you to take out pieces and parts in one fell swoop! I use Photoshop Elements and the tool is actually... an eraser! On this image, I was careful to erase everything but the bird and her little feet and made the tool rather small to get into all those nooks and crannies. 


Next, I opened up the Glittering Glass Santa image and then erased dear Ole Santa! Sorry, Santa! 


After he was erased, I clicked on the layer and duplicated it so that I could arrange the two branch images just how I wanted it in a way that a bird might perch on it. (To do this, you right click on the layer to the right and "duplicate" will be an option. 


But you can see above.... wow... that's a lot of foliage. I decided to get rid of the lower portion of the branches on both and then just arrange the top portions by tilting, dragging and dropping. 

I should mention, I used the magic eraser tool and with one click completely erased the background so that I could "see" the top branch over the bottom.  

And, I also shortened the lower branch erasing up to a portion that looked natural. See? I know this seems complicated but... trust me... it's not. If you erase too much? Pushing Control Z is your friend! :-) 


Then, all that is left to do is perch my little cute birdie! Below is a look at my finished digital image, just ready and waiting to be printed. While I don't have a picture of it, I also printed off the male cardinal. I wasn't sure I'd use him but wanted him on "standby!"


And here's a look at how it all came together! Some die cuts, a wee bit of layering, some sparkle, ribbon and a little bling! I now officially have my first Christmas card ready to send! I should mention that the sentiment is from a Power Poppy clear set called Simple Joys! 


Here's a little closeup! 


Now, after I finished my card, I thought, "Wow, that little birdie looks a little lonely!" So, remember that male cardinal I said I printed? I ended up coloring him up and tucking him into my layer so that they would be looking lovingly at each other. 


Truth be told, however, I honestly can't decide if they are looking lovingly or if the lady birdie is just looking at the gent saying, "Hey, quit being such a creeper cardinal!" I might have to look at this card just a wee bit more before the jury comes back on that one! Long story short, this was a tutorial on digital mash-ups, not creeper cardinals so... my work here is done! ;-)

Hope you took something fun away from all of this and... I hope you have a beautiful and creative week! See y'all next month! 


Inspire Me Monday - Combining Digital Images


Hello! This is Gloria Stengel, one of the NEW Instant Gardeners! I have the privilege of bringing you the Inspire Me Monday project this week! I hope you had fun during our Christmas Remix Hop! I sure had fun coloring the new images! And, congratulations to all the prize winners! 

Now that you have lots of new digital images to play with, I wanted to show you a few ideas for combining them to make "new" stamps! To learn how to work with digital images, please review Julie's amazing post HERE. (I have used Photoshop Elements to create my new images.)


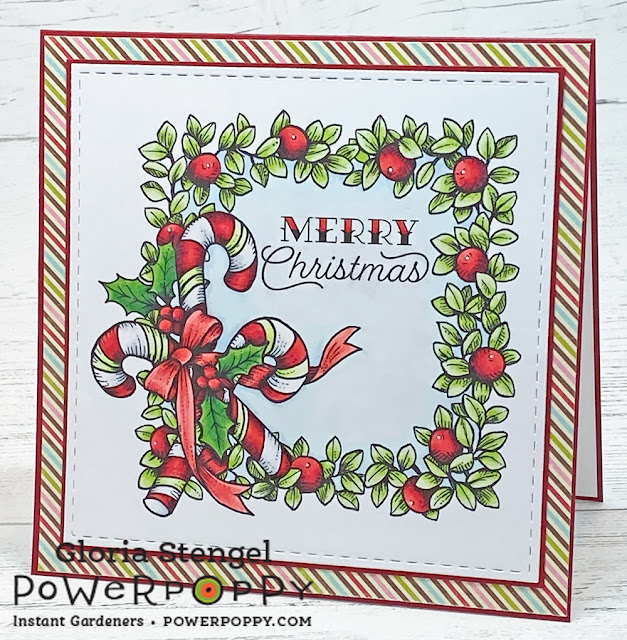
To create this lovely combination stamp you will need three images. I used the wreath from Wreath: Boxwood and CranberryCandy Cane Classic (which is only $1), and a sentiment from Twinkling-Eyed Snowman (any sentiment will do).

Open all three images in Photoshop Elements (or a similar program). Follow the directions HERE to erase the white backgrounds. Save each transparent image as a new file name.


Place the new, transparent wreath onto the work space, then size and crop as desired. 


Drag the new, transparent candy cane image onto the page (or use the FILE, PLACE feature). The candy canes will overlap the wreath as shown. 


Drag the sentiment into place. Save your NEW creation and print!


Color your image and create a card or tag! I printed my image at 5" x 5" and created a simple 6" x 6" card. I colored the image with Copic markers, which made it color up quickly! 

Once you get the hang of working with digital images, you can create lots of new images. Like this one...


To create this wonderful coloring page, I combined the watering can and branches from Country Home Christmas with several other images and a sentiment to create this lovely decorated branch.


Open the image and delete the white background by following the process HERE. Size the image as desired. (Some images are already on a transparent background, but many image files are JPG files with a white background.)


Open the Glittering Glass Santa image, then remove the white background. Use the eraser tool to erase the tree branch.


Place the altered Santa image onto your branch image, size and position as shown above. If your altered Santa image is in the Photo Bin at the bottom of the screen, you can simply drag him into position, then size him accordingly.


Continue to add elements until you are happy with your NEW image! I added the pinecone bauble and the tiny pumpkin bauble from the Forest Finds stamp set. (To see the Forest Finds image colored, check my blog HERE.)

I also added the ornaments from the Acorn Ornaments stamp set to the branches. After I erased the white background, I rotated and resized the ornaments to fit my tree branch.

The final touch was adding the sentiment from the Winter Flora digital stamp set to the bottom of the new image.


I printed the NEW image at slightly smaller than 8 1/2" x 11" to make a full-sized coloring page! It would be tons of fun to pass out coloring pages to all the little ones during Christmas events, or to have a coloring challenge with adults! You could print this in a smaller size to make greeting cards. The sky is the limit!

An easy way to alter digital stamps is to add your own text to the image.


I personalized a stocking image by adding my name to the stocking from the Joyeux Noel Stocking digital stamp set. You simply open the digital stamp with Photoshop Elements, click the text tool and add your text! Text can be sized and rotated. You are only limited by the fonts on your computer!


You can make a cute set of tags with this technique!

Thank you so much for joining me on this digi stamp adventure! If you'd like to see more of my work, please visit my blog, Scraps of Life

Until next time, have a Merry Christmas and a most Blessed New Year!
Gloria Stengel

Tuesday

Hues with Flower Power!

Hello all and welcome to another color-infused edition of Hues to Use! It's a time when we spin the color wheel and see what sticks -- trying to help inspire a little creativity the next time you decide to let the paper fly in your stamp rooms!

I don't know what the weather is like in your neck of the woods, but in mine, the snow is falling in large flakes. It looks like I am living in a virtual snow globe! So, when this color challenge popped up on my screen, it was a welcome color combo indeed!


When Marcella shared this little snapshot on her IG, she simply stated, "Coleus and Zinnia being all awesome and no-filtery!" Ahhh, the beautiful colors alive in nature, what a joy! So today, we recue that joy and we have a fabulous guest designer to share a little inspiration when it comes to putting this trio of colors into play! Will you all give a super warm welcome to.....


"Hello everyone, my name is Esther and I live in the beautiful state of Virginia! I'm a home-school mom to one teenage daughter (she took this picture of me above), wife of a small town pastor, and the owner of two spoiled Labs! I enjoy working in my flower beds, baking, decorating, crocheting, knitting, and playing the piano --- but at the end of the day the hobby I come back to the most is card making. I belong to a card ministry that sends happy mail to hurting people all over the USA. I love that I can use my (favorite) hobby to bring cheer and encouragement to adults and children who are going through a difficult time.  Thanks Julie for asking me to guest design on Hues to Use this week -- I'm honored!

ESTHER'S CREATION


After printing my Glittering Glass Santa on cream cardstock, I used a mixture of Prismacolor Pencils and Crayola Markers to add color. For some extra “pop," I applied pink glitter to the bulbs on the evergreen branch, and a bit of white flower soft to the fur on Santa's suit. I die cut my image with the Beaded Ovals Spellbinders Die, and created a 3-D frame for it by layering 3 more die cuts (with the center cut out) over the top.


The front card panel is a combination of embossed cardstock, old sheet music, three layers of ribbon/lace, and some tiny pearls. To add the finishing touch, I created a 3-D poinsettia die cut shape with embossed leaves. The completed ensemble is mounted on a kraft card base.


Inside my 5-1/2" square card, I added some paper lace using a deep edge border punch. The distressed and matted sentiment is also from the Glittering Glass Santa digital set and has just a hint of sparkly glitter accenting the berries across the bottom.

Well Esther, I am not sure I would have seen a holiday card with this color combo, but you used these hues beautifully for this card that puts Santa at center stage! What fun additions, like the texture with those embossed accents and the three-dimensional die cut shapes! Well done! 

Power Peeps, if you'd like to check out more of Esther's work, she does have a blog where she shares her latest and greatest works from the heart. Just click on over to Esther's Blog  HERE, titled Shore Girl Creations! And Esther, thanks again for sharing your talents with all of us! It was a true treat!

Now it's your turn to take this color challenge by storm! Let's see you get those fingers inky and when you're done with your creation, simply link it up below so that we can all take peek and see your take on these Hues to Use! There are two fun facts about this challenge! First, it's a never-ending challenge! You can always go back to visit and play along with ANY of the past challenges - it is a never-ending linky! And second, we love pulling guest designers from those who enter into the fun and play along with the week's Hues to Use! So, join us! We can't wait to see what you create!

~ Julie

Friday

Here Comes... Santa Claus!

Hello all and Happy Friday! We have an extra special affair for you today. Not only do we have your Friday Bloom Brigade Parade, but we have something sprouting in our Instant Garden that is so stinkin’ cute, you will just HAVE to have it in your digi collection! It sparkles. It glitters. It’s FULL of Christmas cheer! 

Let’s get right to it and give you a little sneaky peek at Glittering Glass Santa

http://powerpoppy.com/products/glittering-glass-santa


Here is Marcy’s inspiration for her sweet-as-can-be Ol’ St. Nick...
My little Santa was inspired by the antique German glass ornaments we always had on our tree growing up. My mother would hunt down these delicate glass jewels in estate sales and antiques shops, and hang them right alongside our popsicle-stick-and-glue preschool creations on the tree. Often Mom’s trees were faux-snow flocked! So the whole tree had an appearance of glittering snow, and if the ornaments were dusted with glitter, zillions of strands of vintage glass beads sparkling, lots of lights... it made the whole look that much more magical. Check this out, 1970s represent! (Here is my Daddy and brother Andy, photo by the tree decorator herself...)

If our remixed Glittering Glass Santa himself isnt enough to steal your heart, he’s paired with a cheery sentiment adorned with festively fun berries. It’s a perfect addition to our already chocked full holiday collection. Sure, it might be a wee bit early to think Christmas, but we have lots of cards to dole out during the holiday season! It’s a list you’ll be adding to and definitely checking twice... so, why not get a jump start? ;-) You can find all of our Instant Garden Digital Stamps RIGHT HERE! Adding Santa to your stamp room is as easy as clicking a download link from the email that’s sent to you after purchase, then printing, coloring, creating, and (most importantly) enjoying! 

Our design teams, the Bloom Brigade and the Instant Gardeners, have been busy bringing this little Santa to life! You’ll have to stop by and see their takes on this sweet and whimsical image!

Katie Sims
Cheryl Scrivens

Then you’ve gotta pop over to Kathy Jones’ blog to see a rockin’ card that’s truly Well Played. Plus!! Tosha Leyendekker has an absolutely divine card that will have you clamoring for Climbing Clematis!

Before we go, we do have an important announcement for all those in Power Poppy Land! If you haven’t taken part in this month’s Power & Spark Challenge, there’s still time! There are only six days left on this challenge and it too is somewhat holiday themed! We just want to see how you put your spin on gift giving. Share a handmade creation that you plan to gift. Share a gift tag you’ve made. Or, show us how you dress up a box thanks to a stamp or two or three! Then once you’re finished, click on over to THIS CHALLENGE POST and link up your creation on the linky! The winner will get a choice of a free or digital stamp set from the Power Poppy Shop! Woo hoo! Contest runs through September 30th at 8PM EST. 

Thanks for popping in to say “hi!” We hope you have a fabulous weekend ahead and have a little down time to get crafty! ;-) See you back here soon!

~Julie