Showing posts with label Botanical Tree. Show all posts

Monday

Inspire Me Monday: Turnaround Stamping

Howdy and happy Monday everyone!  I'm Allison Cope and I'm your hostess this week for Inspire Me Monday. I hope you had a great weekend and took some time to create.

One my favorite parts of stamping is finding fun uses for all the smaller images surrounding the large and glorious images on a stamp set.  Sometimes I think these images are forgotten about.  So today we’re going to get lots of littles inky!

Today’s tutorial is all based around the a new stamping trend in the market, a turnabout stamp. These are large format stamps that include a variety of stamps all attached to one another and are designed to be inked up and  rotated to produce a fun back ground image.

I wanted to show you that you can create your very own version of a turnabout stamp by using a grid system and multiple smaller stamp images.

So come and join me at my crafty desk and learn about how to recreate this fun technique!  Grab a cup of your favorite warm beverage and I’ll meet you there!


This is the first turnaround back ground I stamped in my video.  I stamped all of my images with Memento Tuxedo Black ink and then colored everything in using Copic Markers.

Stamps Used: Fully Stocked (bell), Bough Wow Wow (knit snowflake), Merry Littles (Peace, mug, tree), Wreaths Plain & Fancy (reindeer), Botanical Tree (poinsettia), Artful Display (plate)

I split my large 6x6 panel into two equal sides and created these 2 cards…

Added Sentiment Used: Holly Golightly (Love * Joy * Peace to You)


Here is the second panel I stamped on the video using a variety of fun colored inks. I chose to only color in the odd item on the panel and I also added some fun Stickles for some holiday shimmer and shine.

Stamps Used: Merry Littles (bow, candy canes), Wreaths Plain & Fancy (church, Joy, Warm Thoughts), Action Santa (hillside, snowflakes), Fully Stocked (mistletoe), Bough Wow Wow (heart)

I managed to create 3 cards using this 6x6 panel as I decided to die cut some of the elements or at least use smaller pieces of the back ground on my cards.


Off camera I created this fun sentiment stamp only back ground using my grid technique.  I had a ball finding fun sentiments that fit like puzzle pieces together and using some bright festive holiday colored inks.

Stamps Used: Wreaths Plain & Fancy (Happy Holidays), Heaven & Nature Sing (Be Joyful), Botanical Tree (Peace, Merry Christmas), Action Santa (Sending a Flurry), Bottlebrush Holiday (Falalala, Warm Wishes), Cozy Cupfuls (Good Tidings), Holly Golightly (Love * Joy * Peace to You) 

I created two fun holiday cards using this sentiment panel.  I die cut some the edges into fun shapes.

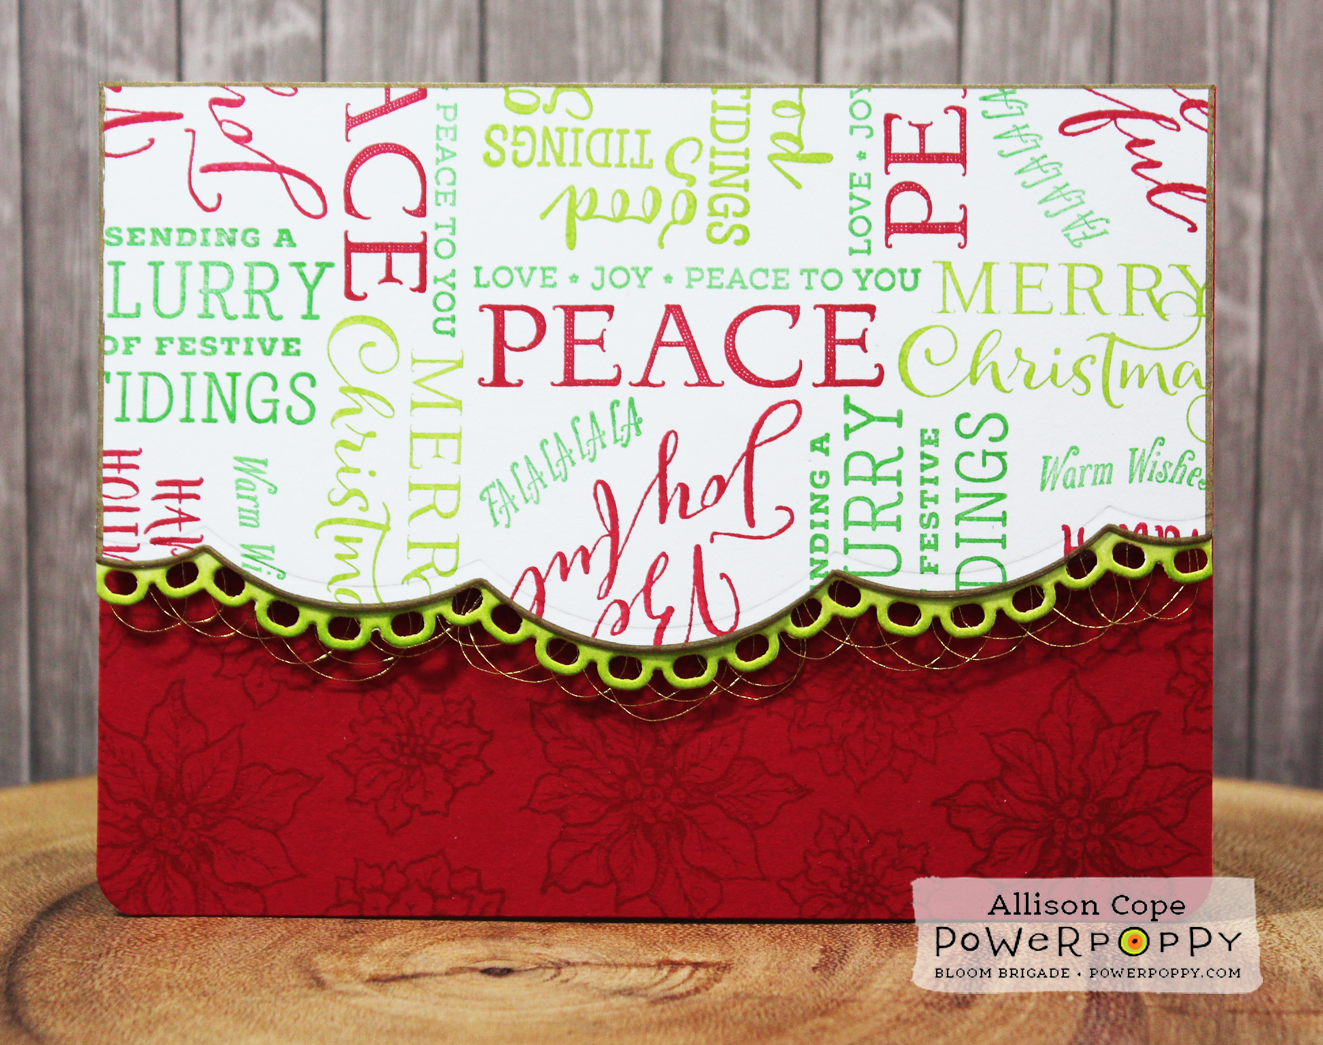
Stamps Used for the Red Back Ground: Merry Littles (large poinsettia), 
Botanical Tree (small poinsettias)


I decided to keep my final panel quite simple and only use one shade of blue ink and add just a slight bit of shading using a single shade of Copic Marker.  So simple but so pretty!


Stamps Used: Artful Display (plates), Wreaths Plain & Fancy (candle),  
Action Santa (Snowflakes), Merry Littles (poinsettia), Botanical Tree (card sentiments) 


Here are the two holiday cards I created with this last panel...


I thoroughly enjoyed creating all these fun turnaround stamped back grounds for you today!  Don’t forget to try this with embossing powders too… you could get a very cool effect!  Think shiny and shimmery for the holidays.
Take a quick moment and visit my personal blog today for a fun birthday card version of this technique.  Click here!

Thanks for stopping by!  I hope you enjoyed my tutorial today.  I'd love to hear what you think about this fun technique... leave me a comment! Ta ta everyone!

~ Allison Cope ~


Cardstock: Recollections (110# White), My Favorite Things (vellum) 
Patterned Paper: My Favorite Things (Painted Prints Smitten 6x6, Tiny Check Brights 6x6), Simple Stories (Very Merry 6x8), Doodlebug Designs (Frosty Friends 6x6), Crate Paper (Falala 6x6), Your Next Stamp (Winter Knits 6x6, Winter Plaid 6x6
Inks: Memento (Tuxedo Black), Catherine Pooler Designs (Rockin’ Red, Grass Green, Lime Rickey, Garden Party, It’s a Girl, Something Borrowed), Versamark, Copic Markers, Sakura (Pen-touch Gold, White Gel Pen
Dies: My Favorite Things (Stitched Rectangles STAX 2, Stitched Scalloped Basic Edges, Scalloped Ovals), Spellbinders (Curved Borders 2, A2 Scalloped Borders 1, A2 Curved Borders 1, PageMaps On the Edge), Pretty Pink Posh (Mini Tags) 
Sequins: Pretty Pink Posh (Sparkling Clear 6mm, 4mm)
Embossing Powder: Stampendous! (Detail White)  
Ribbon: Offray (Thin Green)
Other: Sulky Thread (Metallic Gold), Christmas Twine (Michaels), Stickles (Star Dust)

Friday

News from the Good Vibe Tribe!


Hello all and Happy Friday folks! Are you ready for another heavy helping of inspiration here on the Power Poppy Blog? Because, my friends, I am ready to dish it up! There was so much inspiration out there this week that I was actually giddy as I made the rounds! And.... I cannot wait to share. So, let's jump right in and get to all this excitement!


GOOD VIBE No. 1


This first little burst of creativity comes from coloring phenom Elizabeth Zaffarano, one of Power Poppy's newest Instant Gardners! Did you catch that fun news, along with a brand new digital stamp delight? If you did miss it -- don't have FOMO (fear of missing out), click HERE and read all about this fun-filled news! Then, hop, skip and jump HERE over to Elizabeth's place on the web to see how she created this gilded look above using Power Poppy's Vibrant Thanks stamp set that she said replicates the look of Italian Damascene jewelry using Mica-based paints! So fun and sparkly!

GOOD VIBE No. 2


Folks, there's been a Bloomie sighting! This one happened at the charming little stamp shop Impressive Ideas located in the heart of Norcross, Georgia. Our own "Inky Peach," Katie Sims stopped by to show off her coloring prowess and helped overload these happy stampers with a giant dose of Power Poppy goodness! I can only venture a guess here, but I am sure they were taken with Katie's charm and her incredible coloring skills!

GOOD VIBE No. 3


Christina Hor reeled me in with this fun "Fly Guy" creation she fashioned for her husband as a way to celebrate their 11th anniversary! Check out how she created her own sentiment to go along with this beautifully colored up image! If you want to check out her creation in its full glory, click HERE! On that post, Christina was even gracious enough to share her digi sentiment as a freebie to use to create your own Fly Guy cards! What's even more fun is the fact that this card was her way of saying, "Hey hubs, let's go fishing on our anniversary!" Too cute, right?


GOOD VIBE No. 4

Enna (@ritzyhag on IG)  crafted not one, but TWO stellar holiday cards draped with a monochromatic flair! I know that when autumn hits and card makers start dreaming about their holiday creations, they want/need/crave ideas! We thought Enna's idea for mass producing creations with Power Poppy's Botanical Tree was truly "share worthy!"

GOOD VIBE No. 5 


Okay, this last vibe is just one that melts my heart and makes it bubble up with joy. Why? I remember when Marcy started this amazing company three years ago and mentioned how she wanted to personalize each and every delivery. She grabbed her string, her decorative papers and a slew of washi tape and sounded just so excited to be able to connect with her customers. I, being the somewhat jaded person that I am, thought, 'Well, I wonder how long this could possibly last?' I thought she might just get too busy trying to get orders out the door. Amazingly, it's lasted three years and still brings as much joy today as it did three years ago. What's fun is seeing just how much customers love this extra touch when they post their happy mail on social media. One more reason why I love, love, love my friend Marcella! ;-)


Now it’s time for the all-star line up, the Bloomies are back...


Want to see what the Bloomies beautifully crafted... just for you? Well, stop by, say "hi" and see for yourself!


Have a fabulously colorful weekend, and we’ll see you back here in a few days! You won’t want to miss awesome Ally Cope’s newest Inspire Me Monday tutorial coming your way to kick start your week!

~Julie

Monday

Inspire Me Monday: Gilding Flakes and Stamps!

Hi everyone, Elizabeth here and welcome to the latest Inspire Me Monday!


Do you want to:
  • make a bunch of cards at once
  • and welcome serendipitous and unique results
  • and don’t mind just a wee bit extra in the way of set-up and clean-up...
If the answers are Yes! Yes! Yes!--then today's topic is right up your alley!

Gilding flakes are trendy again, and I’m going to walk you through how to get gorgeous results with those lighter-than-air shiny bits and your Power Poppy clear stamps. You're already off to a good start, as Marcella's illustrations hit that sweet-spot of enough detail to showcase the different shades and qualities of these fine flakes, without being so spindly (or broad, for that matter) that detail gets lost.

You’ll see Botanical Tree featured in the steps below, and I’ve also used Wreaths Plain and Fancy. Maybe it’s a *little* early to be thinking about those winter holidays—however, I find that these stamps lend themselves to a bit of glitz and glow, and it’s a time when you may need to make a quantity of cards, but don’t necessarily want them to look totally identical.


So what are gilding flakes? They are small, light, and delicate pieces of material that will create a metallic effect on whatever they stick to. They are similar to the gilding sheets you find on decorative trays or antique frames, but judging by the price, they do not contain precious metals.

You’ll find gilding flakes in tubs or packets, and they come as single shades, like gold, silver and copper by Tonic (on the right), or in a blend of metallic colors: I’ve got “Persian Dawn” by Cosmic Shimmer on the left. That jar has shades of gold, bronze, silver, as well as some spots of red and green among the flakes.

gilding flakes from Cosmic Shimmer and Tonic

But, before we get to applying the flakes we’ll first need a way of adhering the flakes to paper.  For the Power Poppy clear stamps, I've found that the best way to do this is to use a glue that stays sticky, even when it is dry.  Sometimes this glue is blue when wet, and clear when dry (but still sticky), and called "2-way glue." You can find this glue as a pen, a chisel-tip marker, and as a thicker felt-tipped marker. There’s also liquid products like Flake & Glitter Glue (a Cosmic Shimmer product), which need a spongy applicator to apply to stamps. And there are also “glue pads,” which replace the ink in typical stamp pads with glue.

In my experiments, the easiest method for applying glue to stamps was to use the thick felt-tipped applicator/marker. For this post, I am using the Nuvo glue pen in the Large size. Zig makes one of these as well.  (NB-I did not try out the glue pad, but did try the liquid glue on a sponge, and it did work, but required more clean up.)

Now, before I start applying glue anywhere, I’ll get a dish of lukewarm water ready and next to my stamping area. As soon as I’m finished stamping with the glue pen, I’ll peel off that stamp and place it into the water—the clean-up will go much better! Also, I’ll need some card stock.  I find it easier to work with smooth-finish card stock that's been cut to card-front size (A2, 4x6", etc.).  Darker colors will show off the shine of the gilding to best effect, but I find that even rich, bright colors make great backgrounds.

Stamping set up for gilding with glue pen, stamp, and water bowl for clean up

The Nuvo glue pen needs to be shaken (there’s a little mixing ball that rattles around) and then I’ll prime my glue pen a bit by pressing on the tip onto some scratch paper. Then apply to the stamp by just lightly rubbing it across the surface, and when the stamp looks moistened and a bit milky with the glue, I can stamp onto a piece of card stock.

applying glue to clear stamp with Nuvo glue pen

I usually stamp onto multiple pieces of card stock in one session, and I find that the first imprint is usually not so good. You can practice on scraps of card stock, but it doesn’t take long to get the stamp working well.  I didn’t need a lot of pressure for the glue to stick to the paper, so I just use an acrylic block vs a stamp positioner.

stamping with glue, only light pressure is needed

The freshly stamped image will look cloudy, because it needs to dry for the gilding flakes to stick properly.  Remember, there’s no rush to get all of the designs stamped, because the glue will still be sticky when it’s dry.  I’ve found that the glue will wait for me to finish lots of stamping, even when working with multiple stamps.  In fact, I’ve left some glue-stamped stuff out overnight and… still sticky!  Don’t forget that used stamps need to go into that bowl of water before moving on to the next step.

card stock freshly glue stamped with Botanical tree waiting to dry before gilding

While we’re waiting for the adhesive to dry, let's set up a little “containment station” for working with the gilding flakes.  I’ll decant some of the flakes into a smaller container, and grab a shallow box. I’ll line this box with some scrap paper, and then it’ll be easy to funnel excess flakes back into the container. I also like to have some burnishing tools nearby—something with a scrubby texture for removing excess gilding. I grabbed a cheap stenciling brush, a piece of Rubit Scrubit, and a bit of magic-eraser-type foam. They all work well, but my favorite is the Rubit Scrubit.  One package will last forever, and it is inexpensive. A microfiber cloth or a dry-dusting cloth will clean up any tiny particles.

Gilding set up with burnishing tools

When the glue is very clear, dry, and sticky: shut the windows, turn off the fan (seriously, this stuff is lighter than feathers!), and bring that stamped and sticky card stock over to the box.  I use my fingers to gently place and pat those gilding flakes onto the sticky image.  Once everything is covered, I gently swirl my fingertips over the design to start removing the excess gilding flakes. In the following photos, I’m using a mix of the three Nuvo metallic flakes: silver, gold and copper.

applying the gilding flakes: a mix of silver, gold, copper

Next, I’m using scrubby/brushy things to gently coax the rest of the gilding flakes off of the design, and I'll use the dusting cloth to get the last bits of dust off of the card stock.


Don’t forget to put the extra flakes back into the container! Even the tiny/dusty stuff is precious. And, don’t forget to clean up the stamps with warm water, a little gentle soap and a soft scrub brush.

Finished gilded card fronts. Stamp is Botanical Tree by Power Poppy.

Check out those Botanical Trees! Aren’t they something? And when you use a mix of flakes, you can get such different looks: It’s all random and very interesting!

Finished cards, with sentiments and borders

So how to turn these showpieces into finished cards? My samples above incorporate most of the following suggestions:

  • heat-emboss sentiments with metallic powder.
  • add stripes/borders of double-sided tape, then gild onto that sticky surface
  • add gilded edges by running the glue marker along the sides of the card, allowing to dry and applying flakes
  • add very thin lines, or freehand details with a fine-tip glue pen, let dry and gild
  • add other metallic accents with pens, drops, dots, and stickers
  • apply double-sided adhesive/xyron to card stock, die cut a frame, and gild

Here’s a more intense example of the last suggestion.  I used a Spellbinders die to frame these Paphiopedilum from the Orchids Rock stamp set.  Same stamp, same die, same card base, but different looks because of the gilding mix! That's "Persian Dawn" from Cosmic Shimmer, by the way.

Orchids Rock! stamped and gilded with gilded frame

To wrap it up: Yes, this is a more intense process than heat embossing, or even foiling.  But, at the end of your crafting session, you’ll have a collection of one-of-a-kind shimmering card-fronts: lovely and personal and definitely handmade!


And what luck, the Abundance Collection was just released, and they are all clear stamps!  I think that Dahlia XL and Tree of Life are just begging to go on a "gilt trip!"  (Yes, I have been waiting and waiting to use that joke). What do you think?

Have an awesome week!
Elizabeth

Supplies Used:
Power Poppy stamps: Botanical Tree, Wreaths Plain and Fancy, Poinsettia (sentiment), Orchids Rock
Gilding flakes: Persian Dawn by Cosmic Shimmer/Creative Expressions, silver/gold/copper Nuvo Gilding Flakes by Tonic Inc.
Glue pens: Nuvo Glue Pen (large), Sakura Quickie Glue Pen
Burnishing tools: stencil brush, Rubit Scrubit pad, magic-eraser-type foam


Tuesday

Holiday 2015 Collection... Sneak Peeks Start Today!

Hello, hello! I couldn’t be more tickled to begin sharing our Holiday 2015 clear stamp preview with you. My friends, we are adding FIVE NEW SETS to our Happiest Holiday Collection! In fact, it’s been so hard to keep it under wraps, I’ve already shared peeks of my sketches on my Instagram feed (@marcellahawley if you’d care to join me over there).

I tell you, concocting the ideas for the collection, doing loads of research (what an awesome “job”), drawing the images, styling the sentiments, and all that jolly jazz is an affair in its own right, but ladies, you ain’t seen nuthin’ until you see how the Bloom Brigade design team has transformed my artwork into showstopping Holiday cards.

And we absolutely cannot wait to see what YOU will do with them! Oh, goodness me. The possibilities with these sets are pretty great... from elegant to homespun, and lots of variety in between. Here is a teensy sampling of today’s set just to give you an inkling of what I mean...

Details from gorgeous new cards by Leslie Miller, Cindy Lawrence, and Tosha Leyendekker

The artwork style for the stamp above is inspired by an ancient design technique known as arabesque. According to the dictionary, arabesque is “an ornamental design consisting of intertwined flowing lines, originally found in Arabic or Moorish decoration,” and the style was adapted into Greek, Medieval, Renaissance... there isn’t really an art form that hasn’t used it! I’m sure you’ve got a few images with scrolling lines and shapes in your stamp arsenal.

But what really got me into this vibe was the idea that you can start with a shape or “ornament” and then fill it with your own variety of flowers, vines, berries, fruits, what have you — to come up with an image that holds a lot of interest whether it’s shown in a single color or shaded to the nines!

From the Handbook of Ornament by Franz Sales Meyer, 1957, Dover Publications, Inc.

Here is a neat example from a wonderful resource called Handbook of Ornament, which is a collection of ornamental designs, both 2- and 3-dimensional, throughout history. It’s basically a go-to tome of decorative design, and I pull it out on occasion as a jumping off point for ideas. There’s an entire chapter on flat designs rendered inside a shape, and here I’ve shared a snippet from the Oblong Panel page. Now as you can see, the designs of these ornaments are repeat patterns. The same design elements (leaf, vine, fleurette, scroll) are repeated in each area of the panel to created a unified whole design. NIFTY! And also, it’s something I see done beautifully in the crafting world. So, to make it my own, I decided to take the concept of creating several design elements (poinsettias, berry clusters, roses, lilies, mistletoe, leaves, and vines) and put them together into a tree-shaped ornament, but with an organic structure, so each area of the tree is unique! I saw a wonderful embroidery pattern of spring flowers inside a tree ornament that captured my heart, and I knew that holiday botanicals would be something fun to try! Take a peek at my pencil sketch, which I then went in and fine-tuned and redrew with a Pigma Micron pen...


With the mix of flowers and fruits, seeds, leaves, and berries, you can use this set for the Holidays, or really, for any time of the year! Introducing our first Holiday set of the 2015 release... Botanical Tree.

http://powerpoppy.com/collections/happiest-holiday-collection/products/botanical-tree

I have kept you here waaaaaay too long, because what is truly spectacular about our arabesque set is what you can DO with it! Just take a look at what our Bloom Brigade has created for today’s kick-off:


I do hope we’ll see you back here tomorrow for another fresh new Holiday set peek! ALL SETS WILL BE AVAILABLE FOR PURCHASE on Sunday, October 18th!!!

Have an absolutely awesome day everyone!