Showing posts with label Spring Border. Show all posts

Monday

The Blossom Challenge: Sponge Bath!


Hi Power Poppy fans!  It’s Christine bringing you another fun "The Blossom Challenge” for the month.  I’m feeling especially Springy this month, and ready for all the fun colour that’s soon to come.  So, this month’s Challenge has the theme “Sponge Bath”, and its all about using your sponging tools to bring smooth inky colour to your designs.  

I’ve got two cards to show you today that showcase different ways to sponge ink.  


First off is this beauty from Power Poppy called Spring Border One.  I adore this image and its sweet border style of blooms.  All the flowers are coloured with Copics, and I stamped the large tulip twice so I could add it to the left of the arrangement to balance out my how the flowers appear in front of the arched die cut windows.  


For my sponging technique I used a simple background technique, using Tumbled Glass Distress Oxide Ink on the card base, splattering it with water, and then splattering again with white ink.  Such an easy way to add a background to a scene.  It’s one of my favourite properties of Oxide ink, when you see how great it reacts to water.  


Perfect for a little note for a friend.  

Next I’ve used another gorgeous Spring image from Power Poppy called Daffodil Bouquet.  


For this design I utilized a stencil to create a backdrop for this amazing bouquet of daffodils and muscari (grape hyacinth).  Once my bouquet was coloured with Copics, I used some pale pink cardstock and a diamond stencil with soft shades of peachy pink (Tattered Rose, Victorian Velvet, Picked Raspberry and Seedless Preserves).  Using coloured cardstock and stencilling over top gives you a base colour that you don’t have to add with ink.  


I also lightly sponged the embossing of the die cut frame which allows it to tie in to the colour and accents the embossing slightly.  The sentiment is from Power Poppy’s Peony Muse polymer set. 
 

Those bright pops of colour really shine!  


Now WHO was our winner last month?  Random.org picked Camille (Short on Ideas)with her beautiful Black-Eyed Susans reimagined by the sea!  Camille, contact Marcy at bloom@powerpoppy.com  


Now we’re extending the Challenge to you!  It’s Sponge Bath time!  Use your sponges or blending tools to add inky colour to any part of your design.  You could simply distress the edges of your paper with ink, blend multi-colour or ombre backgrounds, or use stencils to create a background or layer to your design.  All you need to do is use at least one Power Poppy image to be included in the challenge.  

Link your entries below, you can play as many times as you like!  Challenge closes April 15 at 11 pm MTN. 

You are invited to the Inlinkz link party!

Click here to enter

Inspire Me Monday: Digital Ink!


Hello all and welcome to another edition of Inspire Me Monday! Since I love working with and fiddling with digital stamps, today I thought I'd share a few 10-minute cards that involve -- no coloring! That's right, no coloring! That is, unless you want to! Today, we'll be dabbling in a little "digital ink!"

I love bright, bold colors on my cards and this technique lets your printer do all the work so that you could make a bright and cheery card in a jiffy! 

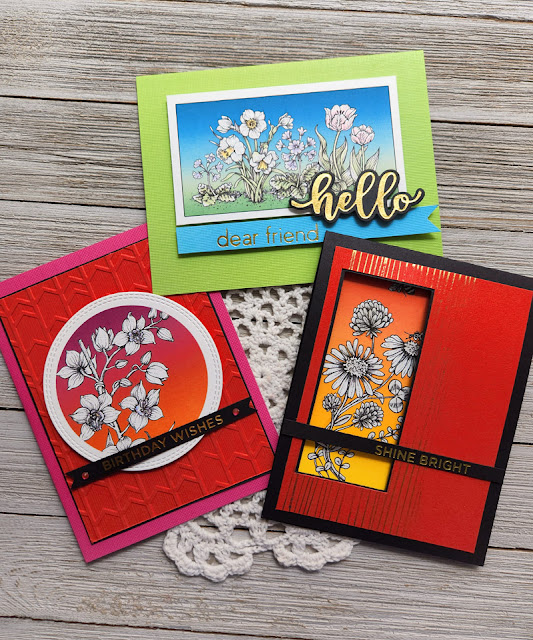
Let's take a peek at what we'll be making today!


I used these digital stamps: Orchid Cascade, Spring Border One and Asters Abuzz

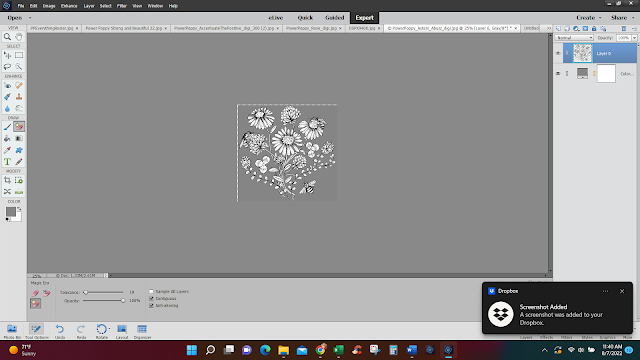
So, how did I do this? Well, you'll need photo editing software that allows you to add some effects. My tutorial today will share tips using Photoshop Elements. It's a budget version of Photoshop and I really love it for digital stamps! 

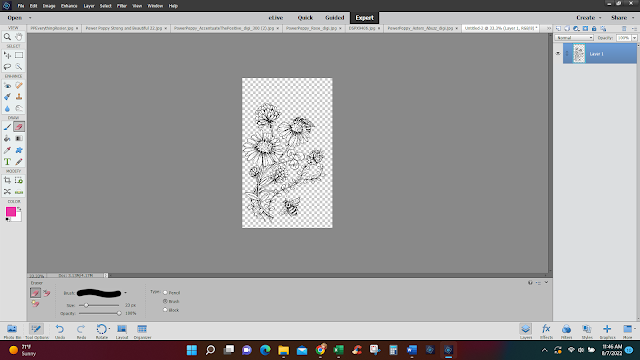
I started by opening up the digital stamp Aster's Abuzz and erasing the background behind the image. I used the Magic Eraser tool and just clicked around until the background was gone. 


From there, I cropped it down into more of a rectangle and erased the part of the image that hung over the cut line. 


I also cropped the bee out and then, by dragging and dropping, managed to arrange him more at the top of the image instead. 


Now it's time for our digital ink! I created a canvas that was the same size as a card front. Using the rectangle marquee tool, I created by rectangle, clicked on "layer" and then clicked on "new fill layer" and "gradient." I chose this red to orange gradient to serve as the backdrop for my aster cluster! 


From here, I just dragged the rectangle over to my aster image and situated it right behind. 


And, here's a look at how this card shaped up! I created a little window because I wanted the inside to be a kind of "surprise!" You can see that I also added a bit of sparkle thanks to some foil accents and a foiled sentiment. TIP: When you print your image, make sure that you are on "best detail" for printing. I know every printer has this type of version. It just ensures that the color is laid down on the paper in the highest saturation. 


Here's a peek at the inside! 

And, you can see that I did try to create a little razzle-dazzle by coloring the image with Wink of Stella clear glitter brush pen. It really sparkles in real life - just adding that little bit of interest! 


See that bit of sparkle? 


And, here are some more ideas! 


For this image, I created the rectangle and then used the "stoke" accent around my gradient box just for a little extra pop. I also splashed some color on the flowers and stems. This is still a 10-minute creation because I literally scribbled on the color, for just a soft effect. The sentiment was created by some of my foil dies. 


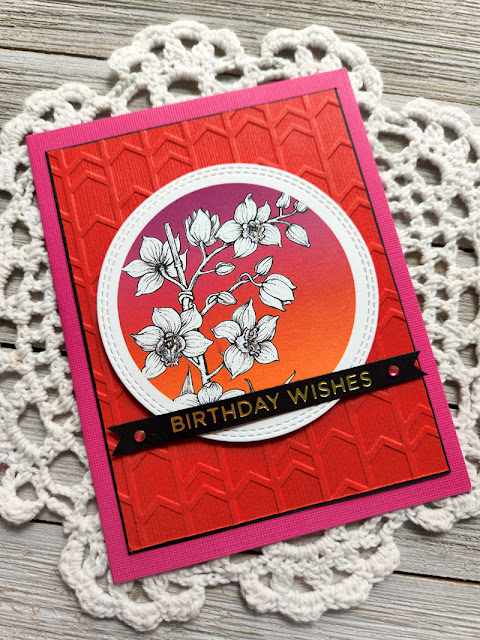
For my last card, I did want to explain how I got my image in a circular shape. You simply open up the image, remove the background and then, using the circular marquee tool, you can cut out a portion of the digital stamp in a circular shape. From there, I created a circle using my marquee tool and then using the same steps as the rectangle shape I created, I added a new fill layer in gradient color. 


And here's a look at how my finished card ended up!


For this creation, I added some pizazz with an embossed background, some rhinestones, a foiled sentiment and then, I added some stickles to portions of my orchid just to make it pop a bit! See? 


And, here's one last look at all three cards together!


I hope you enjoyed today's tutorial and maybe learn a new technique that you hadn't even considered before -- digital ink! Learning little tips and tricks like this sure helps to give your digital stamps a little more longevity. You never really get bored of them! Why? Because they can be used in so many different ways, they can evolve to serve so many different "styles!"

Thanks, everyone for stopping by! I hope you have a fabulous and creative week!


Inspire Me Monday: One Layer Creation


Hello all and welcome to another Inspire Me Monday! It's me again, Lisa, and I have another simple method this week, one layer creations! It doesn't matter if you are using clear stamps or digital stamps, one layer cards are a quick and easy way of getting creative.

Let's Get Started! 

I started out by choosing the digital stamp I wanted for this card. Because I have a ton of them in my yard right now and because they are my favorite little flower I went with the Pansies Digital Stamp Set. Using Microsoft Word I arranged the stamp how I wanted it on my card, put a sentiment on it and then sent it to my printer.


Purple and yellow pansies are really the only ones I get, I just love that color combo, so that's the palette I went with for my digital stamp. The coloring went nice and quick because I have colored this image so much. When I was done I just did a quick light gray border around the flowers and called it good! If you are like me and always pressed for time I hope I inspired you to consider creating more one layer cards!


Here are a few other one layer cards I have done with Power Poppy images:


Have a fabulous week, and don't forget to check out the month long The Blossom Challenge going on!

Friday

T.G.I.P.P.F.!


Hi all and happiest of Fridays to you! Did you catch our blog post title today? Yep. Thank Goodness It's Power Poppy Friday! Boy, do we have some fun to share with you! The Bloomies have been at it again and have a feast for your virtual eyes!

But first... there are some fun things that "sprouted" on the Power Poppy Blog this week and we want to make sure you didn't miss them!

If you didn't catch our Inspire Me Monday post that kicked off our week, here's a little teaser for you! The oh-so-talented Nancy Sheads not only showed us how she colored up this springtime beauty below but gave us a video and a color map so that we can give this a try in our own stamping spaces! You'll have to click HERE to check out her masterful work!


And, if you love a good sketch challenge every now and then, you won't want to miss our Creative Confetti for this week! It's a fun little layout and it's one we want to see YOUR take on! Check it out!


And then click HERE for all the deets!

So, with a road map to coloring and a sketch to give a try, it's the perfect mix of creativity to get you on your way for a colorful weekend, don't you think? But wait, there's more!


Some of these creations were done this week, some were done last but all deserve their time in the spotlight here on the Power Poppy Blog! So, be sure to hop, skip and jump on over to these fine ladies' blogs!

Ally Cope 
Broni Holcombe
Leslie Miller
Barbara Campbell
Nancy Sheads

Thanks for stopping by! We hope you have a beautiful weekend and we'll be back on Monday with some fun things to inspire you as you jump start your week. So swing back!

Until then!
~Julie 


Monday

Inspire Me Monday - Think Spring!

Hello Power Poppy Fans! Nancy Sheads here with the latest edition of Inspire Me Monday. It's only mid-January but I'm ready it to be spring -- spring weather, more daylight, and best of all - spring flowers. The weatherman tells me that I should brace for more winter weather, but I'm in denial. So I browsed through my collection of digital images and settled on one that is nothing less than a breath of spring air!

For today's project, I've created a coloring video featuring Power Poppy's Spring Border One Digital Stamp Set. The set includes a border image, sentiments, and individual images of daffodils, cowslips and tulips.


The cowslip image is a personal favorite. I colored it once before when the digital set was first released, but wanted to revisit it with a different color palette. The color map below shows the markers that I chose.

Today's video shows how I colored this image. Off-screen, I printed the image onto Hammermill Color Copy Digital paper. Prior to printing, I adjusted the image so that the black lines were gray and increased the transparency of the image so that the lines were fainter. I wanted to be able to see the lines, but I didn't want heavy black lines to distract from the delicate flowers.

Grab a beverage and settle in!


Once the coloring was completed, I fussy cut the image and mounted it with foam adhesive to the front of the card for added dimension. I added a sentiment from the Strong and Beautiful Clear Stamp Set stamped in Versafine ink and embossed with clear embossing powder.


STAMPS

Spring Borders One Digital Stamp Set 
Strong and Beautiful Clear Stamp Set

COPICS

V01, V04, V06, V09 (flower petals)
YG01, G24 (flower center)
YG03, G24, G46 (leaves)
BV20, BV23 (shadows)

Be sure you check out my Power Poppy coloring videos on YouTube.

Thanks for joining me today! See you again soon!

Thursday

The spring flowers you love — now in digital format


We’re sneaking in a few exciting digital downloads to the Power Poppy shop to add to an extra spring to your step. 

Our much-loved Natural Beauties clear stamp illustrations are now available in two digital stamp sets with all new sentiments.

Introducing: Spring Border One


Sentiments include: 
Sending sunny vibes your way
I’m here for you
Thinking of you with love
Everything will be OK


Introducing: Spring Border Two


Sentiments include: 
Hope you feel like yourself again soon
You are a force of nature
Thinking of you
Strength & Courage for the days ahead


Both downloadable sets include a “border” of flowers PLUS the three flowers featured as individual files. All images are included in both black and light grey for “no line” coloring.


Thank you for visiting today!