Showing posts with label Layer Cake. Show all posts

Monday

Inspire Me Monday - Happy Birthday

Hello, Power Poppy Fans! It is my turn again to bring you the Inspire Me Monday project. I have to confess to this not being a brand new project, but it is the first time it has been seen here on the Power Poppy Blog! I have been struggling with some health issues again, and am a little behind in my coloring projects! I do hope that bringing this out of the vault will be excused!

Now for the project!

Since my birthday is in February, I decided to make a fun birthday card to showcase several Power Poppy images! The only thing missing from this scene is a new book...but perhaps there is a book in one of those pretty packages! This is my ideal birthday...cake, a warm drink, and a pile of gifts! Plus...chocolate AND strawberries...yes, please!
For this project I have combined three digital images: the cake and tea from the Tea Cake with Strawberries digital set (also available in a clear set called Tea in the Garden), the gifts from the Party Essentials digital set (also available as a clear set called Party Time), and the sentiment from the Layer Cake digital set. 

If you want more information on how to put a digital scene together, please see my Power Poppy post HERE
To get started with a scene, you first need to print your images to the size which fits your card front. (Or, stamp them if you are using clear stamps instead of digital images.) My finished card is 6" x 8", so I printed the image as slightly smaller at approximately 5" x 6".
A color tip: When you are coloring a busy scene like this one, try to plan out your colors ahead of time so that you don't end up with a hot mess of every color in your marker collection! I call it "avoiding the clown party"!

I started out with the red, because...strawberries are red! I chose to "spread the red" around my picture to give the whole scene a balanced look. I then colored the leaves green, but did NOT add more green to the image. I did not want this to stat to look like Christmas!
I knew I needed to color the slice of lemon in the tea cup yellow. That became my second color, which I sprinkled about the scene. I felt that aqua blue would look nice with both the red and the the yellow. To tone it all down, I used brown. Making the cake frosting and the cake stand brown, rests the eye. Creating three white items (the cake doily, the napkin, and the largest box), also helps give your eyes a bit of rest. 

I think the picture is bright, but not clownish. I admit to being a bit sorry about the large ribbon bows, but...once they were glued down, I decided to keep them! Plus, every birthday needs a few big bows!
Here is the list of Copic markers I used. I did NOT use any colored pencil this time.

Background, napkin, cake: E0000, E000, E00, E21, colorless blender
Doily, box: C3, C1, C00
Ribbon, boxes, lemon slice: Y08, Y06, Y02, Y11
Cake, cake stand: E79, E29, E27, E25E23, E35, E33, E57, R83, R81
Leaves, stems: YG03, G43, G99, YG21, YG05, Y11, YG01
Cup, boxes: B04, B01, B000
Strawberries, boxes, cup, cake stand: R14, R27, R29, R89, YG21 (strawberries only)

I selected some matching paper from my vast stash of printed paper to create a finished card. I will use a padded mailer to mail this card to a special someone....or I will keep it on my desk to enjoy for the month of February!

Thanks for stopping by!


Tuesday

Hues That Are as Sweet As Can Be!

Hello happy stampers! Are you ready for a candy-coated color infusion? It's time for Hues to Use and this one is a mish-mash -- literally -- of colors, guaranteed to make your mouth water just a wee bit! 

So, let's check it out, shall we? 


    I have to laugh because, if you know Marcella, you know she LOVES her gummy bears! When we went to CHA a year ago January, the hotel we stayed at had a candy bar that guests could hit up as they checked into their room. Well, Marcy made a bee line for the jar of gummies and it became her BFF while we were there! So, if you check out this image, you might say, "What the heck is that?" Well, read up in Marcy's own words below! LOL! 

  • marcellahawleyWhen you leave your secret stash of gummy bears in the glove box and it gets up to 80.... 🌈☀️🔥 12 flavors melting in your mouth at once! Best gummies on the planet!! @albanesecandy

So, I thought this little photo might be a fun pop of color to inspire that super sweet bit of creativity next time you hit up your stamping spaces! 

HOW TO PLAY: It's pretty sweet and simple! Just use those three colors above in your card or creation and then... link up your project below using our linky! Just. That. Simple! 

On to my creation!


Recently, I cued up one of Amy Shulke of Vanilla Arts' coloring tutorials. This one was on Color Sculpting and using coloring and shading to create the depth that's needed to make sure a cake, for instance, looks round. I thoroughly enjoyed the class! I loved the background that she helped us created with Distress Inks as well and know I'll be pulling that one out of my little bag of tricks again soon! Just in case you wondered, she used the Layer Cake digital stamp set by Power Poppy for this little tutorial! 

So, you can see that all the main colors are there thanks to that amazing background! I will say to create this background is super simple -- simply mask your image, sponge on three coordinating colors of ink and then, wet your hands and flick the water over your background so that you get those super cool watermarks! 

Here's a little closeup for you....


And here's a peek at the inside of my card where I used the sentiment from the digital stamp set on the inside! 


So, sweet friends, 
want to pick up these vibrant colors and play along with me this week? Simply use this color combo, create, and then link up your card below! Who knows, your card might be chosen as one of our faves and you might end up guest hostessing this little post one day soon! Each guest blogger gets a color palette to create with along with a digital stamp set of their choice! Fun stuff, right?

So get those fingers inky and let's see what you can make with this candy-coated color combo in this week's Hues to Use!


Thanks for stopping by!
~Julie 


Monday

Copic Coloring with Mindy - Coloring a Cake

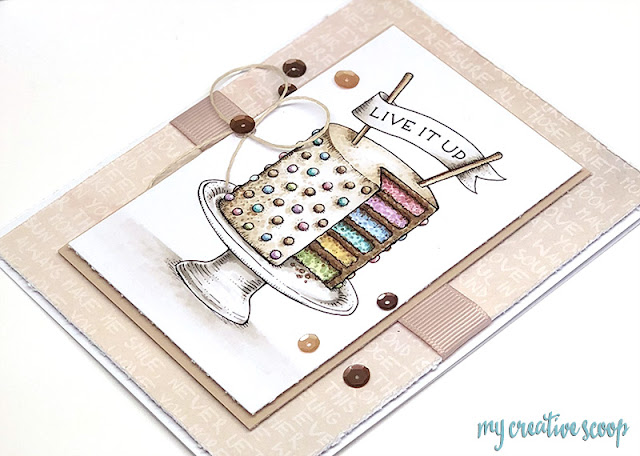
Hello there my Power Poppy Peeps! It's Mindy from My Creative Scoop and I have a new tutorial to share with you on this Inspire Me Monday!

I'm using this adorable Layered Cake Digi from Power Poppy I had so much my fun coloring this image and I absolutely love the way that it came out! Coloring this cake is all about the texture and shading. I literally dotted the entire time I was coloring so I could get the cake texture right. I know so many people have trouble with shading and shadowing but coloring any Power Poppy Image is already helping with where to add those shadows.

If you look closely on the photo below there are tiny lines and dots to show you were to add all those shadows. 

Ok, let's get on with the tutorial you can use any Copic Colors you'd like but here's the colors I'm using.

E43, E42, E41, E25, R85, R81, V12, V15, V0000, B00, B93, B95, BG11, BG13, BG18 Y21, Y26, G20, G24.


You will repeat the next couple steps for each different color and layer of the cake, unless you choose to keep the layers all the same.


I hope you enjoyed this month's coloring with me! I also wanted to share with you that my Mother's Day Coloring Class featuring Power Poppy's Hellebore's Digi Stamp is now available for a limited time. You can sign up today for lifetime access to the course!


Have a wonderful day!

♥ Mindy


Friday

March Power & Spark: Inspired by Fabric!

Are you ready? Seriously, are you ready for a brand new challenge this month that just might have you perusing Pinterest for just a wee bit longer than normal? We love a good inspiration challenge around here and one of our queens of creativity, Ally Cope, dreamt up a super fun way to get some colorful ideas for your next creative cardmaking session. Check it out peeps!


HOW TO PLAY: Here's what Ms. Ally has to say....

We find inspiration all around us! I always am gawking at the amazing fabrics we wear, fabrics we use to upholster our furniture and the fabrics we lay over us at night. So this month, take a look at some fabric swatches that inspire you and use them as a stepping stone to create a fun card.


When it comes to inspiration, Ally DOES NOT disappoint. First up, she had a fabulous link to a board she created on Pinterest FULL of inspiration for you.


CHECK OUT ALLY'S INSPIRATION BOARD HERE

And here's a look at the swatches of fabric that sparked this amazing creation! (Just CLICK HERE to see in the link directly in Pinterest) Oh my gosh, how fun are these sunset shades? 


Now let’s take a look at the card Ally created too using Power Poppy’s clear stamp set Pure Prairie Spirit. (We should mention this amazing illustration also comes as a digital stamp set - Pure Prairie Bouquet - as well...). Notice how Ally picked up on the blue flowers with hints of yellows and violets? What a lovely kickstart to a project. I know you are all going to have a blast playing along with us for this challenge. 


THE OFFICIAL RULES:
  • Use Power Poppy stamps if you have them. If not, it is a great way to win some!
  • Link your creation below using our Linky (please use the exact URL from your post instead of a generic blog address.)
  • Please mention Power Poppy in YOUR blog or gallery post with a link back to THIS challenge!
  • The winner will receive a $50 SHOPPING SPREE TO THE POWER POPPY SHOP!
  • Enter as many cards as you’d like, as long as they fit the theme of the challenge!
Deadline to enter is March 31 @ 8:00 PM EST. At that point, we’ll draw the winner randomly and make the announcement right here on the first Friday in March. 

- - - - - - - - - - - - - - - - - - - - - - - - - - - - - - - - - - - - - - - - - - - -

So, drum roll please, time now to draw that winning name from our February Power & Spark Love to Sparkle Challenge! If you missed this month's entries, you have to click HERE to see them for yourself... 

Moving on to our winner! After random.org put all of the names in the virtual hat, the number drawn was....

And that means our lucky winner is.... 

SONJA VAN LAAR!

Check out the fabulous creation she whipped up using Power Poppy's Layer Cake digital stamp set (you can also create with the clear set by using Power Poppy's set Party Time!)


I personally love how Sonja created a little personalized gift certificate and included the code to the Power Poppy Shop for her crafty friend. I might have to do that sometime soon! It's way too fun, perky and colorful! Love!


 CONGRATS, Sonja! You've won a $50 Shopping Spree! Contact us at bloom@powerpoppy.com and we'll send you your shopping code!

Thanks for joining us sweet peeps! Before you go, you can't leave without hitting up these links below and seeing what some of our fabulous members of the Bloom Brigade have to share!


And swing back by Monday when Marcella will reveal a brand new addition to the Power Poppy Instant Garden a.k.a. digital stamp collection. We can't wait for you to see!

Until next time!
Julie 


Tuesday

Let Them Color Cake!

Hello all of you Happy Stampers! How is your week so far? I hope it is grand with the sun shining ever so brightly -- if not in the sky -- in your hearts! We have a colorific Tuesday for you with amazingly fun pops of color to throw at you! So, let's get right to it, shall we? Check out these hues with a purely electric vibe! 

I have to laugh at this photo because this is 100% Marcy -- hamming it up for the camera in front of all things -- trolls. Yep. Trolls. Marce was chilling with a friend who works at Target headquarters and this was just one of the treasures inside -- motion detecting, rotating trolls complete with that wacky hair. Actually, now that I think about it, I am not sure if I would laugh or be freaked out. Marce just takes it all in stride and sees it as an opportunity to snap a pic and laugh. Like I said, this is our peep-in-chief in the truest sense!

Okay folks, now that you've seen the color cues, time now to see who is helping host this week! Say hello to......


Donna Cervantez, a.k.a. "Nana Donna" agreed to not only share her talents, but a little bit about herself as well! So, let's give her the floor, shall we? 

"Hello everyone! My name is Donna and I have always done some sort of crafting. In 1996, a friend at work talked me into going to a Stampin' Up party. I tried to resist because I know how I am, I just jump in with 2 feet, heck I jump in with all I got.

I bought my first stamp from Michael's and still have it. I now have a vast collection of stamps from various companies. Then, they came out with digital stamps and of course, now I have a nice collection of those too. I love Marcella's stamps/digis because there is so much detail and the shading she adds guides you on where to shade the image. I color using Copics, watercolor, pencils and Zig Clean Color brush markers.

About me, I was forced to stop working in 2007 due to a medical issue. I had a tumor in my spinal cord. So after surgery, I have some walking issues and need to use a walker. I always look at the bright side of things and when this happened, it meant I can stay home all day and craft, and that is pretty much what I do.

I am married to the greatest guy ever. He does most the housework and takes care of me and is always there if I need him. The poor guy has had to re-do my craft room numerous times to make it easier for me to function in. Shhh! Don't tell him I am thinking about doing yet another re-arrangement. We have a bunch of grandkids and great-grandkids that we love to spend time with and one great-granddaughter loves to craft with me. I also love to cook and spend time with friends and family.

When I got the email from Julie asking if I would be interested in designing for a Hues to Use challenge, I was thrilled. I had played along with the Hues to Use challenge before, so I was familiar with it. I love having a color scheme to follow and mostly create my cards following a sketch.


So here is my card using the Layer Cake digital stamp. It just so happens that Amy Shulke at Vanilla Arts was going to be doing a livestream class coloring the Layer Cake image.

I colored the image using Copic markers on Cyrogen paper, the background was made using Distress Inks. I struggled with exactly how to make the card -- then I got the idea to frame it, using a die cut.

I also used the sentiment words from the Layer Cake set and had them printed and cut out, added a few sequins for some bling and that was it.

Here's a closeup for you... 


Amazing work Donna! And, what a treat to see the results from one of Amy's livestream classes! For those of you who aren't familiar, Amy Shulke of Vanilla Arts has used Power Poppy digital stamps for a few of her online classes. You can check them out HERE!

Well, that was a super treat, don't you think? I look at the depth Donna created with this layer cake and it makes me want to grab my markers and see what I can do -- how about you? If you'd like to see more of Donna's creations, all you need to do is hop on over to her blog HERE and see what she's got cookin'! Just in case you wondered, THIS is one of my favorite Donna cards! ;-)

Thanks again Donna for being our host this week! Remember, if YOU would like to host one of our upcoming Hues to Use posts, all you need to do is play along! Once you link up your creation below, we'll all see that spark of creativity and before you know it, you'll be here showing off your mad skills! 

So, get those fingers inky and play along! And like I said, don't forget to link up your creation!

Until next week!
~Julie