Showing posts with label Big Sexy Blooms. Show all posts

Monday

Inspire Me Monday - Distress Ink Resist

Happy Monday! I'm Nancy Sheads and I'm here with this week's edition of Inspire Me Monday!

I usually bring you Copic tutorials, but to be honest my markers and I are not on speaking terms right now. I get like this sometimes - I'm my own worst critic and nothing I color seems to turn out the way I want. So I decided to set my markers aside for awhile and spend some time playing with other coloring techniques.

Today's project features the Big Sexy Blooms and the M-Powering Words clear stamp sets. I love playing with background stamps since the image layout is already done for you. I don't have the patience for masking and fussing over positioning lots of images so background stamps are perfect for me.


Although I could color the flowers individually, I decided to go with an ink blended background in bright colors for extra punch. I used embossing powder and Distress Oxide Inks to create a resist embossed ink blended background.


Want to know the details? Well, here we go with directions and lots of pictures!


  • Cut a piece of white card stock to 4.25 inches x 5.5 inches.
  • Place Big Sexy Blooms stamp face up on your craft sheet. Apply embossing ink to the entire stamp, making sure that it is evenly covered with ink.

  • Place card stock on onto the stamp, rubbing firmly across the entire piece to ensure that the ink transfers evenly.
  • You should see a light impression from the embossing ink on the card stock.

  • Cover the card stock with white embossing powder. 
  • Heat set the embossing powder. Be careful that you do not scorch the paper.
  • Allow the embossing powder to cool and set. 

  • Using an ink blender or brush, apply Distress Oxide ink in Mustard Seed in a circular motion to a portion of the paper. 
  • Do not worry if the ink covers the white embossing. We'll take care of that after the ink blending is complete.

  • Apply Distress Oxide ink in Picked Raspberry. 
  • Slightly overlap the color onto the Mustard Seed to blend the two colors where they meet. This overlap will create a warm orange color that will create a seamless transition between the colors.

  • Apply Distress Oxide ink in Seedless Preserves to the remainder of the image. 
  • Slightly overlap the color onto the Picked Raspberry to transition between the two colors. 
  • Repeat application of the three colors as needed until the ink is blended and you achieve the color saturation that you want.

  • Lightly wipe the excess ink off the embossed image with a paper towel. You will see that the white embossing resisted the ink and will be visible again.

  • Apply a very light coat of Distress Micro Glaze to the image. You only need a very small amount. Rub in, wipe off, and buff lightly with a paper towel. This will enhance blend and brighten the colors. 
  • NOTE: The remaining steps work best if you use a set of nesting dies.
  • Select a medium sided rectangular die and place in the center of your image. 
  • Run die and image through your die cutting machine.
  • You now have a frame and a small background piece. Set both pieces aside.

  • Use one of the smaller nesting dies to cut a piece of white cardstock.
  • Stamp sentiment with a pigment ink such as Versamark.
  • Cover sentiment with clear embossing powder and heat set.
  • At this point, all of the card elements are ready to assemble.

  • On the back of the frame, you can either apply foam tape or foam squares. I like to use craft foam so I cut a piece to size and then used one of the large dies to cut a window in the center. Then I glued it to the back of the card frame.

  • You can either cut a small piece of craft foam and adhere to the back of the sentiment (as shown here) or apply foam tape or foam squares.

  • Glue the card frame to your card base.
  • Apply glue to the back of the smaller background. Make sure that it is right side up. Line it up inside the card frame and adhere to the card base.
  • You now have a raised frame and the center background is set back.

  • Glue sentiment to center of card.
  • Add embellishments as desired. 
  • Stand back and admire your work!


Whew! That's a LOT of photos, but it's really not very complicated and you could easily make these cards in bulk.

Be sure you check out my Power Poppy coloring videos on YouTube.

Thanks for joining me today! See you again soon!

** Nancy **

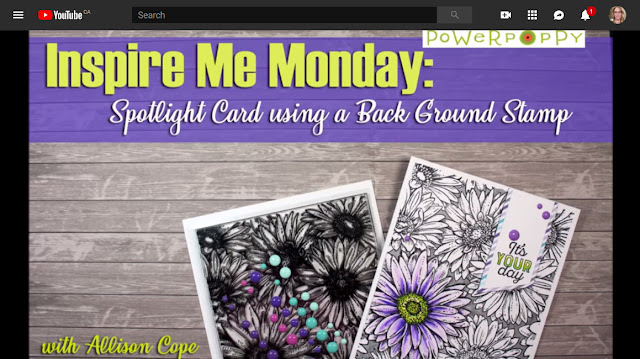
Inspire Me Monday: Spotlight Card Using a Back Ground Stamp

Howdy all!  Welcome to Inspire Me Monday here at Power Poppy!  I’m Allison Cope and I’m your hostess this week!

Today I thought I’d using the spotlight technique to create a card with.  All the spotlight technique is, is highlighting one spot on your card… this can be done by cutting a shape from your image and only colouring in that shape… or just colouring one object within your image… and that’s what I’m going to do today!

I’ve chosen the glorious “Big Sexy Blooms” back ground stamp to use. Since I am using a water based medium, ZIG Clean Colour Real Brush Markers, I have chosen to stamp with my Versafine “Black Onyx” ink.

I chose the one large bloom to highlight along the bottom left edge, so that the image I coloured and and popped up using foam adhesive.


I also chose to use the lovely “It’s Your Day” sentiment from the “Strong and Beautiful” stamp set to accompany my blooms.

Come and check out this really easy way to create a card…
https://www.youtube.com/watch?v=Krho9jsuAFg&feature=youtu.be

Thanks for joining me today!  I hope this inspires you to pull out your back ground stamps and create a spotlight area of colour!

~ Ally ~


stamps: Power Poppy (Big Sexy Blooms, Strong and Beautiful)
cardstock: Strathmore (Smooth Bristol White)
ink: Versafine (Black Onyx), ZIG Clean Colour Real Brush Markers
patterned paper: Pink & Main (Frosty 6x6)
dots: Kraftin' Kimmie Stamps (Underwater Dots)

Tuesday

Creative Confetti: Be Inspired!


Whew! What a flurry of activity here on the ole Power Poppy blog with the Enchanted Garden Release, eh? It's been quite the exciting week with so much eye candy that I am sure thankful that this kind of "candy" doesn't come with a calorie count! We'd all be sunk! ;-)

Being that there has been so much going on, I thought it would be fun to do a bit of a rewind on some of this past week's events and give you a little creative jolt! That way, if you missed some of the goodies, you have a chance to go back and check them all out! So, let's get on with this week's Creative Confetti and....


HOW TO PLAY: Well happy stampers, it is just as easy as the graphic says! Just take a little hop through our release week and if you stumble upon a card or technique that inspires you, use it as a launching pad to create a card in your own stamping space!

I know that I have been more than inspired this past week! There have been so many cool techniques showcased that I thought I would share a few as potential inspiration points for YOU!

DID YOU SEE? 

Ardyth Percy-Robb had a great video and post HERE on spotlight stamping! Why not try to put an image in the spotlight and use her creation as inspiration?


Sally Allnock created a handful of monochromatic creations that are jaw dropping! Check them out HERE and, who knows, maybe they will help spark inspiration in one of your future creations! 


Therese Calvird created a buzz with her creation by using just one image and one bold sentiment! She just did a little turn, stamp and repeat! Here's a peek below but if you want a little more in the way of details, just click HERE! 


And, last but not least, this grouping of cards really knocked my socks off with their crisp and clean simplicity. In fact,I didn't get to make a sample for this challenge but I am thinking this one below might be my inspiration! Kelly Griglione created interest by masking off a section of her card -- just enough space to add a sentiment. All I have to say is WOW! I love this look. So clean and classy! 

So, there you have it, folks! TONS of inspiration for you! We hope you take a trip back through this week's blog rolls in search of a fun technique, a cool layout or a fun color combo and be inspired! Once you find that dose of inspiration, simply create and then link up your creation below! 

Being that this is the first challenge of July, we do need to take a break and put all the names of those happy stampers who played along with us during the month of June and draw a lucky name! After all the names were thrown into the virtual hat, random.org drew this number....

And that means the winner is.....

**** KATHY ASPER ****

Kathy is a stamper who I love to call "prolific!" She creates -- it seems -- non stop! Every time I visit her blog, I see a half dozen new creations all handmade with love and creativity! Take a look at her winning creation below! Cute, huh? Don't you love the sentiment and the creativity behind it? I sure do!


Kathy, to claim your prize and a $25 shopping spree to the Power Poppy Shop, all you need to do is email us at bloom@powerpoppy.com and we'll get your winning code right to you! Congrats! 

And that, my friends, is it! We hope you take a little trip, get inspired and then create to your hearts desire! Don't forget to share because each and every entry gets thrown into the hat for a $25 gift code to the Power Poppy Shop -- so get those fingers inky, will you?


Until next time!
~Julie 

p.s. Did you see if you comment on all the blog links HERE you also get a chance at winning a $25 Power Poppy gift code as well as $25 to the Ellen Hutson Shop? FUN STUFF FOLKS! 


You are invited to the Inlinkz link party!
Click here to enter

Wednesday

Enchanted Garden: Previews start today!


Welcome, friends, I’d love to share my newest clear stamp collection, Enchanted Garden.

Beginning today, you can breathe in a dynamic array of cardmaking possibilities. Here’s something extra-exciting: Members of the Instant Gardener design team, who primarily showcase our digital designs, are with us for the next five days sharing their creations. 

Resting among wild Johnny Jump-Ups in Gerainger, Norway

We’ll have flowers galore (would you expect anything less?) including my first botanical background stamp. Some images are LARGE and in charge. I’ve tucked in mushrooms, ferns, and fantastic sentiments. Several of the stamp canvases are larger than usual, as there was just too much goodness to be contained in a standard 4 x 6". A treasured classic design is being introduced alongside a fresh new illustration — you’ll just have to stick with us all week to see what we have in store.

And on our release day, July 1, we’ve got a very special treat in store... just wait a few more days to find out what it is!

---------------------------------------------------

First up... an idea that’s been a long time coming. Folks have been asking me for years for a botanical background stamp. One that can be simply embossed or stamped in a single color, but one that can be colored and embellished to one’s heart’s content. My friends, ask and ye shall receive. 


Introducing Big Sexy Blooms

An entire 5 x 6" canvas overflowing with Gerbera Daisies, drawn with love and care and tiny details that help you know where to place your highlights and shadows. You guys, I try to help you make a masterpiece with every creation, I really do!


So what can you do with Big Sexy Blooms? I was hoping you’d ask. Let’s go see what our superstar team of designers has come up with:


See you back here tomorrow for more peeks and previews!