Showing posts with label Tulips in Hobnail Pitcher. Show all posts

Monday

Garden Dirt: Tulips in Hobnail Pitcher, a Swatch for Underpainting with Copic Marker


Green is bursting everywhere!


We're still a bit early in the season to have many flowers blooming here in my small corner of the world, but the green spouts and buds are out.

Tulips are one of my favorite flowers and I thought I'd force a few bulbs (artistically) for this segment of The Garden Dirt. Let's get ready to talk about green!

Hello, my name is Amy Shulke and I'm the illustrator and art instructor over at VanillaArts.com. Welcome to another edition of my color swatch series here at Power Poppy.

If you're new to my lessons, you're probably wondering why I'd name a beautiful flower coloring series after dirt. We want to think about pretty colors right? Certainly not dirt. But we're talking dirt because every garden needs dirt, it's the foundation for life. We need dirt for coloring too, dirty colors are the foundation for realism.

You can read more from my Garden Dirt series here.


Think about the parts of a flower...


Most people don't think deeply about flower anatomy. You've got a general idea about leaves, stems, petals, and the funny things in the center that the bees all like.

Close your eyes and picture your favorite flower. No cheating, don't go sneak a peek at one, let's just think about a flower you know really well... Now tell me about how the flower petals connect to the stem.

Hmmm. This is harder than you expected, right?

We're so used to thinking about the blossoms and leaves that we rarely think about the stems. When we do think about stems, they're just some random tube shapes coming from somewhere under the blossom.

Admit it. Right now, you're not really sure how flower petals connect to the stem. Most of you are thinking about silk flowers where you can pop the whole flower head right off the plastic stick.

Ahhhhhh, grasshopper-- you're missing the most astoundingly beautiful part of a flower!


Real flowers are not like silk flowers!


With silk flowers, you have a green plastic stem and pretty colorful petals glued on top.

But with real flowers, the petals grow out of the stem. With some flowers, it's actually hard to tell where the stem stops and the petal starts.

We all remember chlorophyll from elementary school science class, that's the stuff which makes leaves look green. And if you think about it, chlorophyll makes the stem green too.

But here's the cool part... chlorophyll doesn't just stop dead at the top of a stem.

If you look closely at the base of a petal, you'll see green chlorophyll climbing up from the stem into the flower petal. Look even closer and you'll see the pretty pink, yellow, or red color from the petal leaking down into the stem.

Colorful petals and green stems are connected; they're part of the same system. The color from one body part oozes into the next body part.

Which means that even on the most brilliantly colored blossoms, you'll see green seeping up on the underside of many petals.

That green blend is beautiful!

For more realistic flower petals, add green to your Copic Marker blending combination


I know this idea frightens you. Green blended with red makes blech! Green blended with yellow ruins the yellow. Green blended with orange makes vomit...

I know. I can see you getting squirmy in your seat. The laws of color mixing strictly prohibit mixing light red and green together.

Uh... what exactly is it that happens if you mix light red and green? Does it explode? Does fire rain from the sky? Plagues of frogs, locusts, or IRS agents?

Relax.

Nothing bad will happen if you add G43 to your pretty red blending combination.

I did it in my tulip project here and I'm still alive enough to tell you about it.

Go ahead and try it. Tell the cops that Amy said it was okay. You'll be fine.

It's pretty.

Very, very pretty. And isn't that why we color?


Let's color tulips together!


The tulips shown here are a small portion of Power Poppy's Tulips and Hobnail Pitcher digital stamp but my color recipe will work with any tulip image. Try it on the tulips in Springtime Love Roundel, Spring Border, or Love One Another. This recipe even works with other flowers.

I started by bringing the G43 from the stem up and into the base of each petal. Then I softened the G43 with a few flicks of G40. Then I continued on with R21 up to the middle of each petal and softened it with R00. I left the edge of each tulip as clean white paper. 

G43 to G40 to R21 to R00. Sounds weird, looks stunning!

And hey, we're coloring tulips over at Vanilla Arts this month. My Tulip Wreath project uses a very similar blending combination. Join us there for a little bit of advanced artistic coloring.

All Vanilla Workshop classes are immediate access. Work at your ow pace, color it as many times as you want!

Have fun adding green ink to all your blending combinations!


Happy Coloring!

Tuesday

A "You Pick" Hues to Use!

Hello sweet peeps and welcome to another color-infused Hues to Use Challenge! For this week's challenge, we decided to throw a little twist into the mix! After choosing this absolutely gorgeous photo Marcy snapped of a Hellebore in bloom, I honestly couldn't decide between that pale peach shade or that vibrant blue backdrop in the sky. So, I said -- You choose! Feeling like you want to create with the lush shade of peach? Do it! Wanting to pack a little more punch with a sky blue? Go for it! 

Just pair one of them with the two other colors in this week's challenge! Check it out folks! 


HOW TO PLAY: Easy, peasy lemon squeezie! Just use three of the four colors above to create and then... link up your creation below! We cannot wait to see how you mixed this one up! 

And sweet stamping friends, we are super blessed to have yet another guest with us today to kick off our challenge! This sweet woman has some mad skills when it comes to coloring so what better challenge to have her be the hostess than... a color challenge! Say "Hello" to.... 


"Hi, My name is Corinne, I have been married to my high school sweetheart for 30+ years, the most wonderful man, We have a gorgeous daughter, Cynthia, and 3 gorgeous grand-babies -- Elliana, Mason and Adaline -- that are all down in Florida. I have an amazing twin sister (Irene) along with 4 other siblings and of course my beautiful Mom. We live in Ohio and our beautiful winter is over for this year. Here comes the heat! Yes, I LOVE winter. I have been crafting for years, love all kinds of crafting. I love my Copic markers, making cards, altered art and scrapbooking.

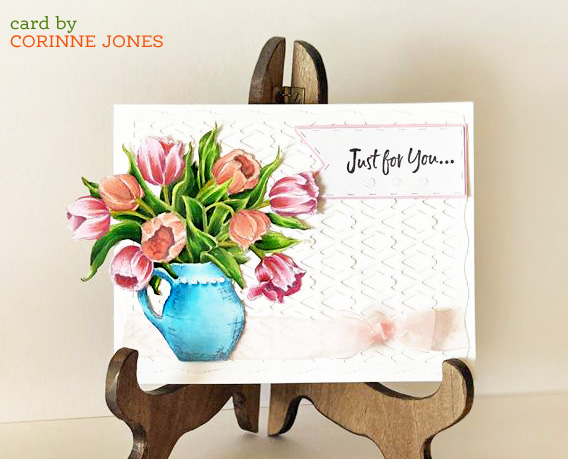
CORINNE'S CARD


For my card, I printed off the Tulips in Hobnail Pitcher Digital stamp set and colored it up with my Copic Markers. I then Fussy cut out the image so I could put it in front of this wonderful Tonic Deco Diamond die cut background. I wanted to add a touch of ribbon, so I found some beautiful matching sheer ribbon and made a bow at one end. Then I stamped Just for you from the Dahlia XL stamp set onto my creative basic Basic Stitched Flag using 2 layers from the set. Thought it was a perfect match for this card. I wanted to keep it all clean and simple so these gorgeous tulips really stand out. 


Thanks Corinne! I absolutely love how your amazing coloring POPS on that soft and elegant backdrop. Sigh... so pretty!

Do you want to play along with us this week? Pick up three of the four colors in our graphic above, create, and then, link up your card using the linky below! We'd not only love to see what you create, you might just be like Corinne and be one of our next hostesses with the mostess for an upcoming Hues to Use!

ONE LITTLE NOTE! Are you a member of Passionate Paper Creations and Friends on Facebook? It's a fun community where coloristas can share all their beautiful work plus sponsors (like Power Poppy) can share members-only specials, challenges, etc! Why am I sharing? Well, this week, Power Poppy is the sponsor and there is a little "special discount" we are offering just for members. So, run, don't walk, over HERE and become a member if this super supportive and fun community!

Thanks for stopping by & thanks again Corinne for hosting!
~Julie

Hues to Use inspired by ... VEGGIES!

Hello sweet peeps & welcome to yet another color combo to spark a bit of creativity! I am sorry that I am late getting these colors to you! I pulled a "human being" and completely spaced this post! Do you ever have those days where you ask -- "What day is it?" Well, Monday came and went. I had my card all ready to go and then -- BAM -- forgot to write the post! UGH! So, let's move on and see what I have in store for you this week!


Did you know a cruciferous veggie a day keeps the cancer at bay? Well, Marcy does and that's why she truly digs this plate above! This is all an effort to eat more broccoli, more brussels sprouts, more cabbage or as she calls it, "all that cruciferous jazz!" Above -- those fun oranges, greens and bits of off white are what Marcy whipped up as a kind of cruciferous slaw that she says was pretty good --  although not as good as the Salted Carmel Truffle Blizzard she had the night before! ;-) Regardless, I thought this plate of fresh and healthy goodness was the perfect dose of inspiration for this week's challenge!

SO, HOW DO YOU PLAY ALONG? Well, my friends, it is as easy as 1-2-3! Simply use all three colors in your next creation and then, don't forget to link up your fine work using the linky below! Just that simple! 

So, how did I take this trio of colors and put them into play? Here's a look! 


I took the digital stamp set -- Tulips in Hobnail Pitcher -- and printed it off. One quick note, if you like this digi, this beautiful image is also available in a clear stamp set with... DIES!  For the sentiment, I did use the one from the digital stamp set Orchid Cascade. I loved the font and how compact it was -- perfect for my little circular die!

So, to get the color scheme was easy -- I have greens in the foliage, a splash of white in the layout and of course, orange in those beautifully drawn tulips! Of course, I colored it all up with Copics and used a mix of greens plus YR00, YR04 and YR07. The greens were YG03, YG05 and YG17 (for the most part).

And, here's a closeup...


And that, my friends, is it! So get those fingers inky and play along with me! If you put these colors to use, don't forget to link up your card below to that we can all see! And, as I always mention, you never know when a card or creation might have us asking you to guest host this weekly challenge! Wouldn't that be fun? So, give these colors a try and have fun too! 

See you back here soon!
~Julie 


Friday

Take me away... with some Good Vibes!

Hello my sweet stamping friends! Can you believe it's Friday already and here we are back at it again -- set off an explosion of feel-good things to help brighten your weekend? Well, we are! It's time for....


So first off we have a virtual feast for the eyes! Marcy is getting ready for Kathy Racoosin's 'The Coloring Challenge Road Trip' TOMORROW and she just thought things would be so much better with some hand-painted art surrounding the guests. She's so thoughtful like that! Check out this free-flowing work below showing one of our Chief Peep's favorite flowers. Sigh.... isn't it grand? If you want to see her other work click HERE, HERE, HERE, and HERE to see the amazing things she's whipped up over the last few days with her paintbrush and some acrylic paints! 


One customer we are really digging on right now is @grandmabonnie2Check out her gorgeous work using Power Poppy's digital stamp set Tulips in Hobnail Pitcher! The bold color! The striations of detail! The fun and festive die-cuts and decorative papers! Yes, a good vibe indeed! 


One designer card we are loving is this one below using Cup of Columbine by the oh-so-fabulous Jennifer Dove! The coloring on her birdie is to die for and the rest of the image is just downright yummy as well! Breathe in this dose of spring folks, breathe it in! 


For this next good vibe we truly need to channel our inner Christopher Cross. I can hear him crooning now....  "Sailing, takes me away to where I've always heard it could be. Just a dream and the wind to carry me, and soon I will be free...." Ahh..... this gorgeous image below is one taken on Bloomie Christine Okken's journey -- sailing in the British Columbia sunset. I sure wish she would have let me jump in her suitcase on this little trip!


Have you played along in this month's Inspired By Fabric Power & Spark Challenge? Man, what a fun one Ally Cope ushered in with this one! You'll have to click HERE and read all about the challenge and how YOU can play along! Check out the marvelous creation by Irene Rhodes below and then click HERE to see the fabric that inspired it using Power Poppy's digital stamp set Flowering Branches! Brilliant Irene -- BRILLIANT! 


If you aren't already on inspiration overload with all these good vibes coming your way, guess what? We have a few more! 


Be sure to stop by to see what some of our Bloomies have been up to! I know you won't regret making a stop to their places on the web!


Thanks for stopping by and spending a wee bit of your day with us! It's yet another GOOD VIBE! Seize the weekend and hopefully, the sunshine is shining in your neck of the woods! Jessie Banks will be in on Monday to share another one of her fabulous Inspire Me Monday tutorials so.... be sure to swing back by to see what awesomeness she has in store!

Until then!
~Julie 

Talented Peeps A Plenty!

Hello Peeps! Is it FRIDAY already? What a treat! I always love this day because honestly, with all the beauty in blog land, I see these creations and just want to spend the rest of the weekend in my happy place coloring and creating!! Oh, you card makers inspire! 

First up, we are on the final day of our way fabulous sale for all you lovers of our Instant Garden, a.k.a. our digital stamp line. Check it out — use code COLORMEHAPPY for 25% off your purchase of digital stamps:


Now that we got this fabulous housekeeping note in, it's time to unleash some excitement that we found the web this week! You better buckle up because man, oh man, do we have quite the ensemble of creative peeps to showcase! 

SHALL WE BEGIN?


Maggie sure has been busy with the Daily Marker's 30 Day Coloring Challenge and -- she has put Power Poppy in the spotlight more than a few times! This image from the Power Poppy set Go Wild caught my attention because I just love the sweet way she colored it up! But, she also has an amazing creation using the rose image from this set -- click HERE to see. 'Whoa!' is all I have to say about both of them!


Spring is surely in the air with this clean and classy wonder done by the hands of Meg Shea!  I just love this time of year when the flowers we stamp can match the flowers that we are starting to see sprout out in real life yards and garden spaces! Meg used Power Poppy's new stamp set Natural Beauties for this one. If you want to get a real chuckle check out her IG post HERE to see one of the side effects of getting her fingers inky! I can honestly say, in my 17 years of stamping, I have never pulled off a feat like that! HA! 

Goodness gracious -- would you check out this eye-popping, jaw-dropping creation from Gloria Stengel? The robust reds and vivid yellows just make my heart sing with "happy!" Gloria used the Power Poppy digital stamp set Tulips in Hobnail Pitcher to whip up this pure delight for the eyes! 


Karen Wallace fashioned a card that is positively pretty in purple! I love the depth in Karen's coloring and that pop of blue is just the perfect touch! Just in case you were wondering, Karen used Power Poppy's digital stamp set called Everything's Rosy! 

And if that inspiration just isn't enough, why not click on over to see THIS CARD by Emily White -- such a breath of spring! Or, you could also hop on over and leave a little love in the form of a comment to Nancy for THIS card. Or, pop in and see THIS vibrant beauty by Patti Willey! Goodness sakes alive -- so much inspiration out there folks! I honestly could go on with about a dozen other links!

BUT...... WE HAVE MORE EXCITEMENT TO SHARE TODAY! In just a matter of days, a brand new member of our Instant Garden will be rearing it's pretty little face -- just in time to share a little spring! I couldn't resist sharing a little sneaky peek! While this image below is probably less than 10% of the overall image, it is even stunning in my humble opinion. So, my digital gardeners -- mark your calendar for April 5th and know Marcella has another beautiful bunch of blossoms that you will soon be able to color up with reckless abandon!


And on that fine and beautiful note, it's time to stalk the Bloomies to see what fun ways they've put the creative sides of their brain to use!


And that, my friends is it for us today! We hope you leave with so much mojo that you just can't contain yourselves!! ;-) Coming up Monday, more creative influence is headed your way. Why? We will have a very special guest in the house! Mindy Baxter of "My Creative Scoop" will be hosting another episode of Inspire Me Monday... so you will definitely want to tune back in to see what she's whipped up to help you kick off your creative week!

See you then!
~Julie

Sunday

Spring Fling Day Three: Loving Tulips and Sweet Memories

Just a note here before we begin. I did not mess up Daylight Savings time! But I did oversleep... because I was up until 3 am going through all the Giveaway entries... good golly was that exciting. More on that later.

OOoooooOOoooooOOO we just keep on keeping on with the fun this week, are you loving it as much as I am? Two full days of Spring Fling previews are under our belt, three sweet stamp sets have been shared, and today we have two more to add to the stack of temptation! If you haven’t seen any of the other sets yet, take a moment to scroll through our blog to catch up on the juicy cards and creations the Bloomies have been whipping up! Plus you can see my new haircut. Yes, the breaking news and most important information can be found here, including the status of my out of control mane.

ON TO THE STAMP PREVIEWS...

Have ya seen our little peeks at this set yet? The one I spent some time coloring one beautiful morning, and was so excited playing with my tubes of paint that I decided to make a photo shoot on my dining room table with all my “little stuff”...


I woke up and had this vision in my head of arranging the stamps around an inspiring blurb, and for me, this verse is helpful. It’s hand-lettered, not a part of the set, but you could add anything you want inside a scattered circle of Sweet Peas! I shot a few details of the process as the image was coming alive on my watercolor block...


These are the stamps from our new clear stamp set that I think is one of most fun things I’ve played with in a while!! To create this set, I started with our digital version, Sweet Pea Show, which I drew earlier this year. It has been quite the hit with colorists across the world much to my delight, with a rainbow of colors and creative approaches. But the fun part of this clear version is that I took some computer-aided clippers to the vines! The result is a stamp set with a whole BUNCH of single sweet peas in various lengths with subtle variance in scale, along with new drawings of pea pods, tendrils, peas, and a fresh batch of small curlicue sentiments that go with it. It’s all too sweet! Introducing Sweet Memories.


You can do so much with this set, and I know it’s one that I will return to agin and again because it’s gosh darn FUN to play with the twisting, twirling tendrils and our flouncy, fancy hybrid sweet peas. These are no standard peas, my dears. These are special, just like you! hehe! :) Seriously I mean it, though. Special peas for special peeps.

On to the NEXT new stamp set preview for today... let’s just hop right in, shall we? Isn’t everybody everywhere just Loving Tulips? Find me one person who does not like a tulip. The simplest ones are hard to pass up, and the French, Parrot, and species tulips are downright jaw-dropping. So let’s check out this set that might ring a bell with ya....


Do you recognize that pitcher of prettiness? It’s based on one of our most popular digis everrrr, Tulips in Hobnail Pitcher. But I refined the clear stamp version a bit, and it’s just as awesome and fun to color as the digi. PLUS, this one comes with a spotty sentiment that I hope will win your heart as it did mine. The swoopy scripty “Hello!” is based on a vintage greeting card I found, and attempted to recreate — but with a polka-dotty vibe just to be extra lively.

This new set will also have COORDINATING DIES — yes, I am going there — and they will be in the shop next week!

ADDENDUM: Our alert cardmaking friend Maria V. inquired as to whether the dies for Loving Tulips will fit the digital stamp. I’d like to report that they will fit with a small adjustment. The digital stamp needs to be slightly reduced when you go to print. You'll just change the size to 97% in the print dialog box and the artwork should nestle right in. This was not my intention, but due to variance needed when manufacturing the clear stamps, the digital image is not a perfect match. If this becomes too tricky for folks, we may upload a "die-friendly update" to be available to anyone who has purchased Tulips in Hobnail Pitcher. Stay tuned, darlings!

Now let’s run ’round and see what creative cards are on display for today by the talented Bloom Brigade design team, who are just totally outdoing themselves on this release, I’m sure you’ll agree:


Thank you sooooo much, Bloomies!! And thank you so much to my wonderful customers who have been burning up the internet with their kind comments so far during our previews.

. . . . . . . . . . . . . . . . . . .

And now it’s time to announce the winner of the Power Poppy Giveaway — you know, the one where we are giving away the ENTIRE SPRING FLING COLLECTION of 8 stamps to one entrant and a friend who was tagged.

We got approximately 80 ba-jillion entries from our blog, Facebook, and Instagram — and I want to tell you that by the end of going through all of them (I was awake until 3 am!!) I wish I could give them to every single one of you. If I ever win the lottery, I’m totally going to. 

But for this time around, we have one winner, who tagged one friend...


*** BARB ENGLER ***

Barb, Congratulations to you!
You win all 8 stamps in our collection, and the friend you tagged wins 8 stamps, too. That friend is Lisa Tilson.

Please send us a note at bloom@powerpoppy.com with both of your addresses so we can get those stamps on their way to both of you lickity split. Can't wait to see what you make with them, ladies, I hope you’ll share photos of your work with us.

THANK YOU ALL so much for entering, for your beautiful, loving, and sometimes very moving comments... this was great fun and I think we’ll have to do it again!!

See you back here tomorrow, yes? TWO MORE stamp sets will be coming out to play, and we’ll be one day closer to everything being available to purchase on March 14. 

Enjoy your day,

Friday

February Challenge: Say YES to NO Lines

Hello Peeps and welcome to another wildly creative and wonderful Friday here on the Power Poppy Blog. Not only do we have fun things to share, we have a brand new challenge to kick off the month, hosted by the lovely, and warm-hearted Cindy Lawrence. So, let's share those details first!


HOW TO PLAY: If you've ever reached for your coloring medium of choice in the hope that the stamped lines below would fade into the background, then this little challenge is just for YOU! No Lines coloring allows your stamped image to appear more like an original drawing or watercolor, and it’s all about stamping or printing the image in a light ink and avoiding dark lines.

Here’s what Ms. Cindy had to share about her challenge “Say YES to NO Lines!” She was even sweet enough to offer a few tips if you've never tried this fabulous technique before!

To color an image using the ‘No Lines Coloring’ technique, stamp or print your image in a light color.  I try to choose a color that makes sense with my image.  For example, if I’m coloring an image of a person, I’ll use a light skin tone or tan ink. For floral images, I often use a pale green, particularly if they have a lot of leaves. I find it also helps to stamp the image again in a black ink on another piece of paper. You can use this image as your reference while you're coloring the lightly stamped image.
When I color up the image, I will often use my lightest ink color to lay out where I’m going to put my shadows and highlights first. This allows you to plan your image without fully committing right away. Next, I color dark to light from the shadows out towards the highlight areas. I find this easier when doing the ‘No Lines Coloring’ technique. You may find the light to dark technique works best for you.

Keep in mind, as you color it is going to look pretty bad before it looks good. It will have an ugly stage for sure. Don't give up on it! I promise it will get better!

Not being able to see the lines of the image presents a little more of a challenge than usual, but it is so worth it for the beautiful painterly look you get in the end. I hope you have fun with it!

Thanks, Cindy! I have to admit, I have never used this technique, so the challenge is ON in my own stamp room as well.

THE OFFICIAL RULES:

  • Use Power Poppy stamps if you have them. If not, it is a great way to win some! 
  • Link your creation below using our Linky (please use the exact URL from your post instead of a generic blog address.)
  • Please mention Power Poppy in YOUR blog or gallery post with a link back to THIS challenge
  • Winner will receive a free clear or three digital stamp sets of their choice from the Power Poppy Shop
  • Enter as many cards as you’d like, as long as they fit the theme of the challenge!
  • Deadline to enter is February 28 @ 8:00 PM EST. At that point, we’ll draw the winner randomly and make the announcement right here on the first Friday in March.

Here’s the full peek at Cindy’s full-of-blue hues creation:


Goodness gracious, that is a feast for the eyes, isn't it? If you want to read up on “how” Cindy created this look, just hop on over to her blog using the link list below! Cindy used Power Poppy's digital stamp set Tulips in Hobnail Pitcher to create this look. If you'd like a few tips on how to change the color of digital stamps after you've snatched them up, just click HERE to one of our tutorials on the topic!

Moving right along! Now that you have all this inspiration and insight, it's time to reach into our bag of tricks to see who won our Power & Spark Winter Blooms Challenge from January! 

We had 49 players last month submitting 56 beautiful entries -- Wowza! There were so many lovely ones, I swear I might have had to pick my jaw up off the floor more than a few times! Random.org threw all those entries into its little random generator and the winner it drew was.....


That means the lucky stamper is....

***BARBARA CAMPBELL*** 

And here's a peek at her absolutely fabulous creation using Power Poppy's Glistening Paperwhites!  


Congrats, Barbara! Your card is so very clever, lively, and well executed. Just a wintertime dream, really! Simply email us at bloom@powerpoppy.com and let us know which clear stamp set or three digital stamp sets you'd like us to send your way.

Before we hand things over to our Bloomies, there were a few Power & Spark entries that deserve a major SHOUT OUT. First up, Nancy Kirk shared an amazing way to get a watercolor look with Copic markers using at least one material most of us have around the house! Here's a peek at her cards and you can catch her video tutorial HERE!


And second, Laine Webb made a gorgeous ribbon-accented box using Power Poppy's Dynamic Duos: Peonies & Tulips. Click HERE for a step-by-step tutorial on how to create this beautiful little gift in and of itself. Just delightful, Laine, we enjoy your work immensely.


Now it’s time to turn things over to our classy and sassy members of the Bloom Brigade to see what they’ve whipped up today for your viewing pleasure! I am 100% sure you'll see even more inspiration for this month's Say YES to No Lines Power & Spark Challenge...


Thanks for stopping by and spending a little bit of your day with us!

We’ll see you here on Sunday with a freshly remixed digi from Marcella’s archives... it’s sure to put some joy in your day with flowers that have a sunshiney personality all their own.

THEN: Tune in on Inspire Me Monday when Guest Designer Corinne Jones joins us to share insights into how she gets all that depth in her Copic Coloring. See you soon!

~Julie

P.S. We know some of you have been having troubles linking up your creations for the past Power & Spark Challenges, especially if you live an ocean away from the U.S. Please try again. We think have figured out the problem, so please see the notes below about how you enter in your link information, it is a bit picky about how the web address is entered -- allowing everyone to share with JOY!

If you continue to have issues, please drop an email to bloom@powerpoppy.com and we will help you get your entry posted! We LOVE seeing your beautiful work, peeps!


Monday

Inspire Me Monday: Sentiments in the Spotlight!


Hello all! Julie here with another “episode” of Inspire Me Monday!

How many times have you made a card, and then had to cross everything you had in the hopes that your card arrived at its destination in one piece? Well, today I am not only going to show you a few cards that are very mail-friendly, they use a different kind of thought process that puts your sentiments in the spotlight!

Here's a peek at what we are making! The decking out will come later -- so you'll have to stick with me to see how this all turns out! ;-)


Every single one of those above is a single layer. Fun right? So, let me share some of what I did to create these looks!

ONE BIG HELLO! 

For the first card, I started by stamping the word "hello" from the Big Scripts stamp set. Then, I took a clear ruler and a fine tip black marker to make the lines above and below my sentiment. I will say that I did run the marker over the ruler a couple times, just to make sure the line was solid and not broken in any way.


Afterward, I added some dimension thanks to a paper piercer and template. I think it just helped make this area stand out a bit!


Now the fun begins! I used a Post-It note to mask my sentiment section...


Then, I took the Ranunculus from the Dynamic Duos: Foxglove and Ranunculus stamp set and stamped it above the black line using blank ink and then moved the Post-It to cover the other direction and then I stamped the lower portion of the ranunculus bunch to make it look like the bunch was shooting out from underneath my sentiment section. See?


And, after it was all colored up with Copic markers, I layered it on some distressed looking pink decorative paper and added some minor accents with glitter glue and rounded corners.


LOVE & THANKS

For the next card, I wanted to use some of my dies as stencils. This rectangle die is a super simple shape but just think of the shapes you could use as word windows! Any shape and every shape!! All it would take is a steady hand with your fine-tipped marker!


I started by stamping my sentiment, then secured the die using bits of washi tape. I traced the inner part of the die using the same fine-tipped black marker. 

Ta da!


From there, I made a mask of that box simply by tracing the inner part of the die onto a Post-It Note and cutting it out....


After that, I stamped the branch from Power Poppy's Happy Crabapple clear stamp set several times over top until I covered the entire front of the 4" by 5.25" piece! I colored with Copic markers, matted it up and here's a peek at the finished card! As you can see, I accented the inner portion of the box with some ivory Copic Markers and some paper piercing, just to make that pop a little bit more. I also -- which you can't see really well -- accented my flower centers with a wee bit of glitter glue to make it sparkle. While I have three layers, this one is still extremely "mail friendly!" 


SENDING LOVE

This last card I whipped up by creating a little sentiment window with a punch! I started by stamping the sentiment from the Dynamic Duos: Glads and Gerberas. Then, I matched it up with just the right circle punch and created a mask by punching a circle out of the top sticky part of a Post-It Note, covering the sentie! You can see, I set this up in my Misti Stamping Tool and there's a reason for that! 


I am going to start by stamping the Gerbera Daisies from the set over top in black...


 Now, the fun part! Because I used my Misti, I am going to remove that mask, clean off my stamp and ink it up using a faint pink ink (Memento Angel Pink) and stamp right over the top! 


You can barely see the pink, but in real life it just gives it that extra bit of dimension! From there, I punched the circle out of a heavier card stock and let my fine-tipped pen do some work again as you can see in my finished card!


While I added some glittery enamel dots, those little guys are still pretty flat making this another card I can pop in the mail without a worry! So there you have it -- three ways to make your sentiments stand out -- with Post-It Notes, Punches and Dies! 

Thanks for popping in and joining me for another Inspire Me Monday! I hope you dig through your supplies and see what you might be able to use to put your sentiments in the spotlight!!!

Have a fabulously creative week!
~Julie