Showing posts with label Apples in Season. Show all posts

Monday

inspire Me Monday: Copic Base Layers

Hello, my Power Poppy Friends! It is my turn to share some inspiration with you. I started out wanting to share something with an autumn theme, but it is as far from autumn as you can get where I live! We are in the triple digit temperatures for the second week in a row here in inland southern California! And, with no end it sight! It is normal for here, so I am told, but I am not used to this heat. We have been here for one year, and...wow...it's HOT! 

I decided to keep my originally planned image, but to make a simple change at the end, as you will see.
Now, for the technique I chose this week: Copic Base Layers. Or, as some people call it, under-painting. I am not sharing true under-painting, as it is a lot more complicated. What I decided to share is something called "basing" or "base layering." This is a popular technique in adult coloring groups. Many folks use water-based markers or water coloring, to put down a first layer on coloring pages, then they will add colored pencil on top. Since I am using a digital image and my choice of paper, I am using Copic alcohol markers.

Let's get started!
First, print the apples image from the Apples in Season digital stamp set onto white cardstock suitable for Copic coloring. I use Hammermill 100 pound (271 gsm) Premium Color Copy Cover for most of my Copic projects, but you may use whichever paper is your favorite. I am using a black line version and have printed the image at approximately 5" x 7". 

Next choose your markers, one for each main color in  the image. I chose a Copic R14 for the apples, YG05 for the leaves, and RV02 for the flower buds. I chose colors that were between the medium and light tone that I would pick if I were coloring a full Copic piece.
Use the three markers to base (or under-paint) the images. I chose to not color the flowers that I wanted to be mostly white, nor the branch, which will be brown. I did a nice layer of ink with each color and then allowed the ink to dry.
Next choose a set of colored pencils that are a middle hardness which will work well if your cardstock is quite smooth. The pencils need to be soft (or waxy) enough to blend, but you don't want to burnish and fill in the tooth of the paper too quickly. Remember, smooth cardstock has very little tooth (texture). If the pencils are too hard, they will just sort of skim over the surface of this very smooth paper.
I chose a set of pencils called Schpirerr Farben, which are marketed as an oil pencil, but seems to be in the middle between oil and wax. The pencils are a medium softness and quite vibrant. I used the pencils to add details and shading to my inked images. 

My set of pencils has 96 colors. Below are the colors I used.

Apples: 240 True Love, 650 Ruby Brown, 130 Burnt Sienna
Leaves: 090 Golden Yellow, 560 Apple Green, 520 Green, 510 Moss Green
Flowers: 012 Ivory, 260 Carnation, 280 Rose, 290 Fuchsia Pink
Branch and stems: 668 Espresso, 660 Brown

Because we fist added the alcohol ink layer, we don't need to lay down as much pencil to cover the white of the paper! We can add more layers of color and more detail because we are not needing to fill up the tooth (texture) of the paper with the pencil. 
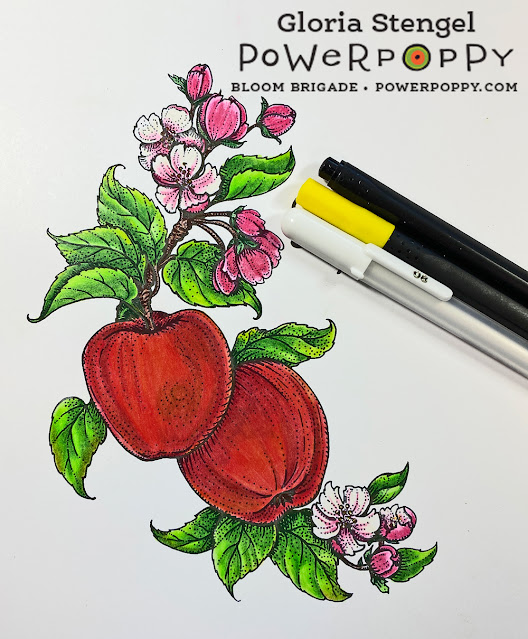
I used a few fine line pens and a white gel pen just for some tiny details on the flowers. 
Normally an image of this size, coloring fully with Copics, would take me two to three hours to complete, maybe longer. If I use only pencils it may take me as many as 8 or more hours to complete. 

Using this technique, it took me approximately 35 minutes to finish this coloring project! Base layering with Copic covered the white of the paper and the pencils added shading, highlights, and dimension! 
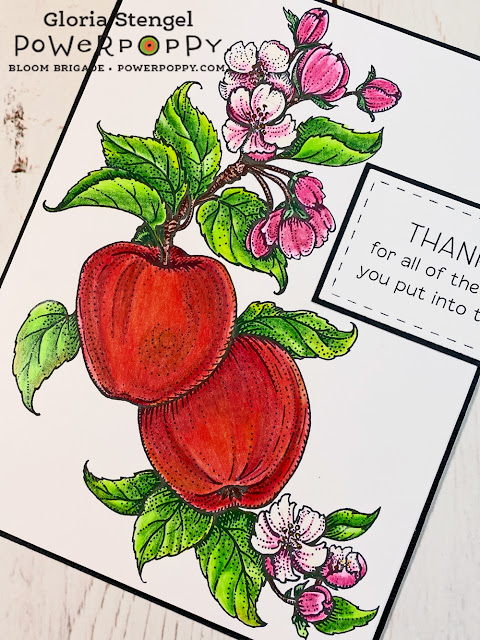
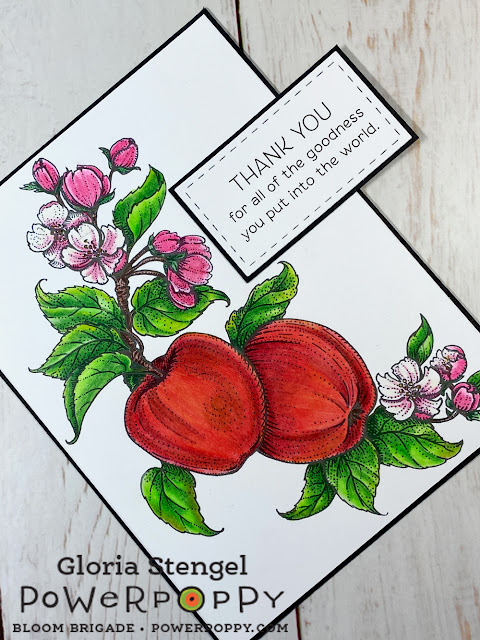
Now for the change-up. I realized that you won't see buds, flowers, and fruit on an apple tree at the same time. Plus the addition of the flowers made this image decidedly NOT autumnal. So, I had to cover up the sentiment that I had pre-printed onto my image. 

I printed a different sentiment onto the same type of cardstock. I chose the sentiment from the Folklore Flora digital stamp package.  I simply used a die cut to trim out the sentiment, then added a black mat with cardstock. A little glue, and presto! The original sentiment is all covered up! 
I hope you enjoyed learning about base layering and that you will give it a try, especially on larger images. It really does speed up the coloring process! 

Keep in mind that alcohol markers will ALWAYS bleed through your paper! If you wish to try this technique in a coloring book, make sure you are using a single-sided page and that you protect the following pages from the ink bleed through. 

Power Poppy Products Used:
Apples in Season digital stamp set
Folklore Flora digital stamp package

Other Products Used: 
Copic markers
Schpirerr Farben colored pencils
Arteza fine line pens
Sakure gelly roll pen
White cardstock
Black cardstock


Tuesday

Creative Confetti: All Boxed Up!


Hello all and Happy Tuesday! How's life in your neck of the woods? Beautiful, I hope! I have a fun challenge that is open to interpretation, which means I hope we have some creative sparks flying and can see this little challenge go in so many different directions! Check it out!


HOW TO PLAY: Use a box element on your card or creation. Think graphically! Or, think literally by actually creating a box! That's okay too! So, my sweet stamping friends, that's all it takes this week to add an entry to our monthly drawing for $25 off in the Power Poppy Shop!

On to my creation!

I have to say that I was really inspired by Jessie Banks quick watercolor creation that she unveiled yesterday in her Inspire Me Monday post. I love those little cherry blossoms and so, I knew that I wanted to have a few spring blossoms take center stage in my creation. They are just so fresh and full of spring! Only, mine aren't cherry blossoms at all ... but apple blossoms! 


I'll start by saying that I used the Power Poppy digital stamp called Apples in Season and then, I went and nipped and tucked and created this grid in Photoshop Elements. Let me show you what I did!


I started by creating a 4" by 5.25" canvas. I created a square using the Marquee tool, clicked on the tab at the top that says "Layer", clicked on "New Fill Layer" and then when it asked what color, I used the little color dropper tool to choose the same white as my background. From there, I added a "stroke" around my box. You can see when you look at the screen capture above that the stroke I used is highlighted with a box.

From there, you right-click on that box and click on "Duplicate Layer" until you get three duplicates. Then, when you look at your canvas through a grid (it's a tool you can click on under "View" ), you can line up all your boxes perfectly so you have a four-square design!


From there, I opened up the Apples in Season stamp set and used bits and pieces. TIP: If you click on "Layer" and then click on "Merge Visible" all four boxes will stay where they are. From there, you can use the magic eraser tool to erase the background on each box so that you can allow pieces of your image to show through the box. That's what I did here! I also wanted some of the image to hang over the box - which meant making a duplicate of the image, letting pieces of it hang over the edge and erasing the other areas that I wanted to stay behind the grid frame. I got a little tricky with my image but you don't need to. The whole idea was to frame up pieces of my image for a visual pop!

Here's a close up below!


Quick details on my card! I used Copic Markers and used R0000, R81 and R83 for the petals, G20 and G24 for the leaves and then G0000 and BG11 to highlight my image in each box. I added a little glitter glue to the centers and then added the sentiment in the plain box from the clear set called Always Here.   From there, I just matted it on a decorative paper card, added some pop thanks to a Stampin' Up Embossing Folder, and then added some silver cording and a fun pearlescent button. Tada! Quick - pretty - inspired - and fun!


 . . . . . . . . . . . . . . . . . . 


Before we bid you adieu, we do have to draw the winner from our May challenges! Can you believe it is actually June already!?!?

So, after we threw all the virtual names into a hat, random.org drew this number!


That means the winner is.....

* * * * JULIE GEARINGER!! * * * * 

Julie joined us for Barb's challenge to use the "Rule of Thirds!" She created this sweet creation below using Power Poppy's Sunshine of My Life digital stamp set (Psst! This one is on sale right now for $2.99!) and dolled it up using a die-cut to create her thirds and added color with some watercolor pencils! I love the result with the dreamy background she created and the bold color!


Julie, to claim your code to the Power Poppy Shop, all you have to do is email us at bloom@powerpoppy.com! Just that simple!

Okay sweet stamping friends, now it's your turn! Let's see how you take this challenge and think "out of the box!" or, in the box, or just as a box! ;-) If you have Power Poppy stamps, please use them! If not, remember each entry will be one more chance at winning a $25 gift code to the Power Poppy Shop!  (That means you might be able to WIN some!)

Just a note! Because the 30th of June is a Tuesday, this month's challenge will end on  June 29th so we can draw for the winner that night! So, let's get those fingers inky to get your cards on the linky! ;-)

Until next time, happy stamping!


You are invited to the Inlinkz link party!
Click here to enter

Friday

September Power & Spark: Hitting the Books!!


Hello folks and welcome to a whole new challenge designed to bring that bit of design power and a splash of creative spark to help motivate you to make outstanding cards and papercrafting projects. Are you ready to see what we have in store for you this month? Our fab hostess is the uber talented Bloomie Katie Sims. Let's get right to it, shall we?


HOW TO PLAY: Are you a bit of a bookworm? Does your heart yearn for a great page-turner? Let's hear from Katie how she wants us to combine our love of books with our craftsy sides!

“Although, I will miss those lazy summer days, I have to admit that I love Fall and all the wonderful things that come with the season! Cooler temperatures, shorter days, falling leaves, football games, and the giddy feeling I get with the back to school rush. Call me sentimental, but even after more years than I care to admit since I’ve been in school, I still feel the need to go shopping for pencils, pens, paper pads, books, and all of the fun little things that you do to prepare for a new school year! So how about a challenge that will inspire you to “Hit the Books”? You can use an image containing books, or how about a neat book print designer paper, or even create a book mark or book cover? Whatever you decide, just make sure your inspiration is book related! I can’t wait to see what you create!”


Great challenge, Ms. Katie. Let's take a look to see how she put this book-loving challenge to the test!


Be still my heart! Katie not only covered the front of a journal and decked it out with Power Poppy's Apples in Season digital stamp set, which she so masterfully colored, she made a sweet-as-can be bookmark using Power Poppy's clear set Farmers Market. I love the pop of red and the reminder that fall and apple cider season is upon us! With this beautiful inspiration before us, now it's your chance to turn the page and give this challenge the good ole college try!


THE OFFICIAL RULES:


  • Use Power Poppy stamps if you have them. If not, it is a great way to win some.
  • Link your creation below using our Linky (please use the exact URL from your post instead of a generic blog address.)
  • Please mention Power Poppy in YOUR blog or gallery post with a direct link back to this challenge
  • The winner will receive a $50 SHOPPING SPREE TO THE POWER POPPY SHOP
  • Enter as many cards as you’d like, as long as they fit the theme of the challenge
  • Deadline to enter is September 30 @ 8:00 PM EST. At that point, we’ll draw the winner randomly and make the announcement right here on the first Friday in October. 

    .....................................................................


    Moving on! Every first Friday we take a look back at all those ab fab entries, throw them all in a virtual hat and draw out one lucky winner for a $50 Shopping Spree to the Power Poppy Shop! Well folks, it's that time! In August, the amazing Cindy Lawrence asked you to take a look around your home and be inspired by something inside -- a color scheme, a work of art, a design feel. And man, did you all rise to the challenge! Just click HERE to see all the entries from our Power & Spark Inspired by Home challenge!

  • So Random.org stirred it all up and drew....


    That means our lucky winner of the Shopping Spree is....


    *** ANN TUCK! ***


    Ann created this beauty using Power Poppy's freebie Kindness is the Way digital stamp and imitated the feel from an art print that hangs in the corner of her dining area. You'll have to click on over HERE to see her inspiration and how she brought it to life on this lovely creation!


    Ann, in order to nab the code for your shopping spree, just email us at bloom@powerpoppy.com and we will get your winning code to you soonest!


    Check out the creative genius brewing at some of our favorite designers' spots on the web! Those Bloomies are at it again and you won't want to miss what they've whipped up this week!


    Thanks all for stopping by! Hopefully, you'll want to "Hit the Books" and join us with this fun-filled and creative challenge! As always, after you get your fingers inky, don't forget to link up your creation below so we can all see your fabulous handiwork!


    Until next time!

    ~Julie


    Tuesday

    Hues to Use: Soaking Up Summer


    Hi all! Are you ready for an explosion of color that you can then use to spark your own creativity? Well then, you have come to the right place!

    Since we recently celebrated Labor Day, which is the official end of summer, I thought all of us -- as colorista rebels -- would say, "Oh yeah? End of summer? No way Jose!" And we'd just show Mother Nature that we still have a love for this sun-shiny season! And so, I thumbed through Marcella's IG feed and zeroed in on this beauty! In the words of Marce, "When all the things on the table are color coordinated, you gotta take a photo of it!" 


    We've got a bit of lime green, a little candy apple red and a splash of grass green for you this week -- one last way to be 'Soakin' Up Summer!! Aren't these hues downright delish? Well, wait until you see what our guest designer did with this color combo! That's right, we have a guest this week and that fine and talented lady is....

    KATHLEEN SANDERS A.K.A. COLORIN' KATE! 

    Before we get to her AH-MAZE-ING creation, let's hear a little bit about this cardmaker who just so happens to have mad multi-media coloring skills! 

    "Hello, I'm Kate. I have two adult boys. I live in the Midwest/ Wisconsin. For the last 20 years, I have been blessed to be able to teach coloring classes at my local stamp stores and work as a demonstrator at various trade shows.  My love for coloring started as a young girl with coloring books and was rekindled when introduced to the world of stamping.  I use whatever medium I feel best lends itself to the art I am working on.

    Let's take a look at what I created using Power Poppy's digital stamp set Apples in Season...


    For this card, I used the mixed media approach that has been my standard since I started stamping, that is an alcohol marker and colored pencil combo.  

    Thanks so much for taking a look at my take on the Hues to Use Challenge for the week. I feel so honored to have been given the opportunity to be a guest among an extremely talented group of designers whose work I have greatly admired for years."

    We thank YOU, Kate, for sharing this gorgeous creation. Your coloring on that apple not only looks delish but it is so realistic! I might just have to "pin" this one so that I can give this kind of shading a try the next time I print off this digi! Fabulous job!!

    I have to say, Marcella and I had the distinct pleasure of meeting Kate last winter at CHA as she worked at the Tonic Studios booth. She's just as darling in real life as her coloring is breathtaking. We sat and talked for quite a bit and it was so fun to meet crafters who shared your love for all things Power Poppy! 

    So, what are you waiting for peeps? Dig into these summery shades and then, link up your creation below! And as we always say, your creation could spark an invitation for YOU to be a guest designer for one of our upcoming Hues to Use blog posts! We put you in the spotlight and you get a fun new digital image to create with! And if that doesn't "get" you, consider this! It's too much fun not to try your hand at this color combo! ;-)

    Thanks for stopping by! We can't wait to see what you create!


    ~Julie