Showing posts with label Potted Primroses. Show all posts

Monday

Inspire Me Monday ~ Free Standing Pop-Up Card

Happy Monday!  Allison Cope here for Inspire Me Monday.  Today we’re going to make a fun Free Standing Pop-Up birthday card using a whole bunch of fun stamps!

Here’s your supply list for today’s card:
  • 4 1/4” x 11” card base cardstock
  • 2 3/4” x 5 1/4” tag matting cardstock
  • 2 1/2” x 5” tag patterned paper (You may want 2 pieces)
  • paper trimmer, craft knife, stamps, ink, double sided tape, dies (optional)
  • SCORING LINES: 1”, 2 3/4”, 3 3/4”, 5 1/2”, 7 1/4”, 8 1/4”, 10”

Join me in at my crafty desk today and let’s make this fun card!  Grab your favorite beverage and away we go…

https://www.youtube.com/watch?v=Djdys3GW8nc&feature=youtu.be

For our card today I used the cups & cupcake image from the Under Glass stamp set.  Our birthday sentiment on the back of the tag came from the Floribunda stamp set.

To decorate the card base we used the cake on a plate from the Party Time stamp set, the forget-me-not flowers and the butterfly from the Soothing Sympathy stamp set, the potted Primroses and the single Primrose bloom from the Potted Primroses, the tea cup and saucer and the little daisy and the strawberry from the Tea in the Garden set and finally the champagne glasses from the Dream Wedding stamp collection.

Here’s a photo of the front of the card…

This is the back of the card again…

This is the card from the side showing how it stands up…

And finally, this is the card folded flat to fit inside an envelope!  Hooray!


Thanks for joining me!  See you again soon!  Happy stamping!

~ Ally ~


stampsPower Poppy (Under Glass, Floribunda, Party Time, Soothing Sympathy, Potted Primroses, Tea in the Garden, Dream Wedding)
cardstock: Recollections (Teal Collection 110#, 65# White)
patterned paper: Catherine Pooler Designs (Prickly 6x6)
dies: Spellbinders (Long Classic Scalloped Rectangles, Long Classic Rectangles), Catherine Pooler Designs (Circles Dies)
ink: Memento (Tuxedo Black), Catherine Pooler Designs (Fiesta Blue), Copic Markers 

Tuesday

Creative Confetti: Plant Kindness


Hello sweet peeps! We have one of the most amazing hobbies, don't we? We get to feed our soul creating something amazing and then, we get to bless someone else by giving away what we spent time crafting. It's kind of like kindness -- it's meant to be received and then immediately given away. 

In honor of this wonderful thing we call card making, I thought it would be nice, every now and then, to focus on why this community of creators is so special! Instead of focusing on color, shape or layout or being inspired by a photo or season, let's be inspired simply by the art of making something and sharing it! 


HOW TO PLAY: Use the word kind in your creation or create something with kindness in mind i.e. thinking of you, just because, etc. If you need a little fuel to spark that creative fire, I searched out some of the fabulous sets that have the word "kind" or "kindness" just to jog your memory! HERE is the link!

You might wonder where this inspiration came from. Honestly, it was THIS Facebook post from Ms. Marcella herself.


I was so incredibly touched by it. It reminded me of that old Aesop quote which reads, "No act of kindness, however small is ever wasted." Who would have thought that a simple hug and an outstretched hand would spark a friendship that is bubbling over with joy? Ahh... it's just too good.

So, with that beautiful thought in mind, I dug through my stamp sets and got to creating with the pure intent of spreading some kindness.


I ended up using the Well Hello Dahlia digital stamp set and pairing it with the sentiment from the Potted Primroses stamp set.  Orange is my favorite color and so, when I think happy, I think orange. In fact, if you look at color theory -- orange and purple emote the most happy feelings when we see them! So, if you really want to send some kindness and "happy thoughts," think orange and purple! I need to restock my purple stash of decorative paper -- I didn't have the right shade, so I reached instead for a cool, easy blue! 

After printing off my image, I got to work coloring with Copics and used nearly every yellow and orange I own! For the flowers, I picked up:YR68, YR04, YR07, Y02, R14 for the large flower; Y15, Y35, and Y38 for the yellow flower off to the right; BG01, BG04 for the right vase; BG000 and BG10 for the left vase; R01, RV00, and R32 for the left flower; G20, G21, and YG67 for the greenery and B00, B91, B93 and B95 for the center vase. The bottoms of the vases were shaded with BV0000 and BV01. The highlight around my image was done with G0000. Whew! That's a lot of markers! I did have fun though.... 

And here's a peek at the sentiment that I stamped on a dark blue with Versamark ink and then embossed with white detail embossing powder. Mat it all up on some fun blue and orange decorative papers, add a little twine and a button and... ta da!  


So, who will you shower with a little kindness? What will YOU create? We can't wait to see and don't be afraid to share your own stories of random acts of kindness. They inspire! Who knows how they will touch someone else? Gospel singer Kevin Heath actually took Aesop's quote and made it his own. He said, "No act of kindness is too small. The gift of kindness may start as a small ripple that over time can turn into a tidal wave affecting the lives of many." Don't you want to catch that wave? I know I do!

After you're done creating, don't forget to link up your creation below so we can ALL see! Remember, every entry is one more chance at a $25 gift code to the Power Poppy Shop! So, spread some kindness, catch the wave and maybe, just maybe, have kindness returned when you win! ;-)

Thanks for stopping by and sharing a bit of your day with us!


~Julie
a.k.a. The Creative Confetti Thrower


You are invited to the Inlinkz link party!
Click here to enter

Primroses and Auriculas are now in digital


Don’t fall out of your chair... but I am releasing Digis on the 5s on the actual 5th of the month. I know, it’s craziness. What’s even crazier? The cuteness factor of these new digital downloads.


I’m such a sucker for Primroses. Their colors, sweet shapes, interesting leaves, and cold-hardiness put them at the top of my early spring list. When I saw this gigantic table covered with them at Home Depot several weeks ago, I knew it was a sign. “Release the Potted Primroses clear stamp images as digital stamps!” I heard the message echo through the cavernous DIY den. And so, paired with all new sentiments, here we have ’em:


Primroses is a nearly 3" cluster of blooms and buds, displayed atop deeply etched foliage. I’ve included two thank-you themed sentiments, and then this wonderful little missive by Scottish poet George Macdonald:

Bountiful primroses,
With outspread heart
that needs the
rough leaves’ care.


See how the leaves are so rich and textural? They offer such a nice deep background to display the flowers. I have always swooned over this card by Christine Okken, above.


Auricula Theatre is the other digital release today, featuring Primula auricula plants, which have a single stem of blooms rising aloft over soft, springy leaves. 


Why the dramatic name for this stamp set? I was thoroughly inspired by the traditional British method for displaying these special primroses for show. Gardeners build shelves on which to show off the flowers in bloom. If you have a moment to Google: “auricula theatre” I can assure you of two things. One, you will want to build one of these structures and dedicate your life to growing precious, prize-winning primroses. Two, that is a lot of work, so maybe you can just download, print, and color some instead. Again, Christine Okken has wowed us with her card above, where she created her own little theatre (using the British spelling here to be proper... hehe).

I hope you enjoy our new offerings. 


Creative Confetti: BACK TO SCHOOL Edition

Are you ready to throw down? YES WE ARE! It's time, my sweet stamping friends, for another explosion of crafty fun. And, this one is just in time for some pretty big days ahead for the kiddos or even grand-kiddos in our lives! Let's get right to the....


This little challenge is chocked full of new ideas each and every week to help you change your point of view when you hit your crafting spaces. We want to help you stretch new creative muscles and guess what? We're right with you every step of the way! If you play along with us, link up your creation below for a chance at a $25 gift code to the Power Poppy Shop.


Did you know that we only have ONE linky for the month. That means that if you try all of the challenges, you get EXTRA chances! Click HERE for our first challenge of the month and HERE for our second!


THIS WEEK’S CHALLENGE 


On to my creation! 

Who else gets excited when school supplies are on sale? You do too? Do you stock up on notebooks and highlighters and want a pencil pouch even though you really don't need one but it sparkles and it's cute and you think you NEED IT? Well goodness! I am so glad I am not alone! In a recent shopping trip with my daughter, this little idea for Creative Confetti was born. I thought I could raid her stash of Crayola markers and nab a few other things and use them in my next crafty pursuit. And so, my friends, I did just that!

What I forgot was, my daughter is a sophomore in high school and really hasn't needed Crayola markers for a while! Thankfully, she's a packrat and we found this old pouch full of markers that appear to have had a pen or something explode all over them. Beggers can't be choosers, I guess!


The real problem was -- I had no idea if they had any juice left in them! So, out came the notepad and I started a scribble fest!


Lucky for me, I had a great range of colors!


And we dug through some other things and found some old note cards and some colorful paperclips as well. So, with my items chosen, it was time to get crack-a-lackin'! After looking at the scribbles, I kept seeing primroses -- over and over in fact. Look at that color range. It was pretty much perfect for Power Poppy's Potted Primroses set. Don't you agree?

From there, I grabbed the stamp set and some watercolor paper and stamped! I wanted to show this because, I have the hardest time stamping on watercolor paper. That's where the MISTI stamping tool is PRICELESS! See how my image is less than desirable on that lower flower? Well, ink and stamp it again and it's perfect!


So, you might ask, how did you plan to use your daughter's markers to color? Well, it is just this simple folks! I chose the range of colors that I wanted, and this is where the magic happened! I grabbed a water brush and an acrylic block and used the brush to pick up the scribbled color on the block.


I will say that some colors were a bit too bold. The greens weren't great so I ended up scribbling two shades of green together and mixing up the color to be a deeper green. I also didn't have a real terra cotta color, so I took orange, red and that burgundy and mixed those three together on a palette. 

And here's the finished, colored up bunch! 


And, here's a look at the whole finished card -- complete with 1. Crayola markers 2. a paperclip 3. an index card and 4. some glitter glue (what kid doesn't like using glitter glue in school???) So, yes, I even earned a little extra credit on this one! 


Well, that was fun, eh? Now, my friends, it's your turn! And, so, I give you the "Official Rules!" 


HOW TO PLAY:
  • Create a card or project that uses a few school supplies in the creative process! 
  • Use Power Poppy stamps if you have them, if not, you might win some if you're randomly chosen. Each month, we'll round up all those that play in any of the month’s Creative Confetti challenges, and draw a name from the entries to win a $25 GIFT CARD for the Power Poppy Shop!
  • To enter, link up your creation below, sharing the direct link to your card from your blog, Instagram, or card gallery. 
  • Our link will be open all month for you to play along with us! Try one Creative Confetti Challenge or partake in them all for extra chances to win.

So, now all that's left is for you to raid your kids or grandkids stash of school supplies and get a little crafty. Heck, you could even invite your kiddo or grandkiddo to be a part of the process! How much fun would it be to have an afternoon of crafting with those pint-sized loves of your life! Of course, when you're done, don't forget to link up your creation(s)! 

Until next time!

~Julie 
a.k.a The Creative Confetti Thrower


Monday

Inspire Me Monday: Color Theory

Happy Monday everyone!  Welcome to Inspire Me Monday!  I'm your hostess Allison Cope and we're going to talk a little bit about COLOR THEORY!

Come and find out a little bit more about the fabulous color wheel...


Here's a quick look at the cards I used as my examples today...
Featuring Folk Heart and Short Stacks

Featuring Folk Heart

Featuring Peony Love and Potted Primroses 


Featuring Folk Heart


Featuring Orchids Rock

Thanks for joining me today!  So the next time you begin to color your latest and greatest Power Poppy image, think about how you're going to use color to the fullest!

Happy coloring everyone!

~ Ally

Inspire Me Monday: Fun Grid Back Ground Building


Howdy all!  Welcome to another Inspire Me Monday here at Power Poppy

I’m your hostess Ally and today I’m sharing an easy tutorial on how to make some fun back grounds using a grid technique.

Last Friday I introduced two fun cards showcasing some cool hand made back ground paper.  Check them out…

These two cards showcase the “Cozy Cupfuls”, “So Grateful” and “Good Thinking: Love Notes” stamp sets. Sooo cute, right?

So today, I thought I’d share how I made that back ground.  All you’ll need is some paper, a few smaller sized stamps, a pencil, a ruler, an eraser and some imagination!

Grab a cup of your favorite beverage and join me in my scraproom.

Here’s another close up of our grid inspired back ground card featuring the stamp sets “Good Thinking: Love Notes”, “Bough Wow Wow” and “Potted Primroses”.

Take a look at the layered vellum blooms…

And the cute little peek-a-boo window to show off the sentiment…

Thanks for joining me today.  I hope my tutorial and cards inspire you try this fun technique on your next card.

~ Allison Cope ~


Supplies
stamps: Power Poppy (Good Thinking: Love Notes, Bough Wow Wow, Potted Primroses)
inks:  Memento (Tuxedo Black), Versamark, Copic Markers
embossing powder:  Stampendous! (Detail White)
cardstock:  Neenah (Solar White), Recollections (110lb White), Vellum
patterned paper:  Lawn Fawn (Let’s Polka Mon Amie 6x6)
dies:  Avery Elle (Dotted Die), Simon Says Stamp (Stitched Squares)
sequins:  CraftMedley
other:  ribbon

Inspire Me Monday: Inktense Pencils


Howdy all... and Happy Monday to all those out there in Blogland.  It's Inspire Me Monday and I'm your hostess Allison Cope!

Today on the Power Poppy Blog we're going to talk a little bit about Inktense pencils and creating cards with large sentiments.  I'm going to pull out my "Happy Crabapples" and "Potted Primroses" stamp sets and we're going to do a little stamping and coloring together.


So here is a peek at the card I'm going to share the coloring process with you today. 


So grab a good cup of something tasty and join me at my stamp table...


For my final card, I added some clear Wink of Stella pen and some White Jellyroll Pen details to my crabapples and blossoms...
Inktense Pencils: Sun Yellow, Sherbet Lime, Apple Green, Tangerine, Poppy Red, Cherry, Shiraz, Bark

Thanks for taking the time to stop by today!  I hope you enjoyed my video tutorial and give this medium a whirl!  Happy Thanksgiving to all my Canadian peeps out there!

~ Ally ~

Supplies:
Stamps:  Power Poppy (Happy Crabapples, Potted Primroses)
Cardstock: Canston (90# Watercolor Paper), Recollections 110# White cardstock
Patterned Paper:  Fresh Squeezed Chevron 6x6 (My Favorite Things)
Inks:  Jet Black (StazOn), Inktense Pencils, Wink of Stella (clear), Jellyroll White Pen 
Dies:  Stitched Rectangles (Lawn Fawn), Stitched Basic Edges (My Favorite Things)
Lace:  Misc..

Inspire Me Monday: Primroses put on a SHOW!

Hello all and welcome to another Inspire Me Monday with your hostess, Julie Koerber! Today, I am going to work a little masking magic to show you how you can take a darling trio of primroses and make your very own “auricula theatre.” What, pray tell, is an auricula theater? Well, it’s a piece of garden decor that lets the small but mighty, bold-colored primrose put on a BIG show! This method of display started in 17th century Europe and has been a lovely expression ever since. Since primroses are delicate and sensitive to too much light, these hutches were created to protect, yet show off these beauties too! See?
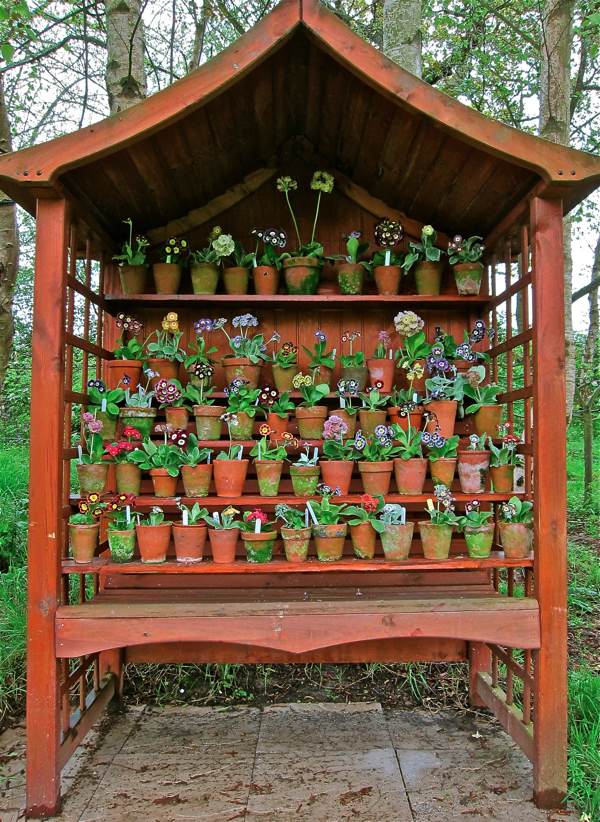

Or, how about this sweet structure with all of those moss-covered terra cotta pots? LOVE!


So Ms. Marcella and I were talking not too long ago and she said, “We really....ReAlLy.... REALLY have to show folks how to make their own auricula theatre with our Potted Primroses set! At the time, I had NO idea what an auricula theatre was. Auracula what? Afterall, I am a brown thumb. Marcella is the epitome of a green thumb! I digress. I wish you could “hear” Marcella when she gets excited. She talks, oh, about a thousand words a minute and has mini screams mixed in for good measure. How could I say no when she asked me to give you all a “how to?”

So, here goes — a peek at how YOU can make your own auricula theatre thanks to a little ink, a stamp set and a few Post-It Notes! Let's get started!

WHAT YOU NEED:

  • Potted Primroses stamp set
  • Ink color of choice (I used Memento Tuxedo Black)
  • Post-It Notes
  • detail scissors
  • Copic markers or coloring medium of choice

LET’S START... by stamping our trio of pots image onto our card stock and then make a mask using a Post-It Note.


CONTINUE... by cutting out your mask and laying it over top your stamped image!


WITH THE MASK IN PLACE... Take the single stamp from the Potted Primrose set and stamp it off to the left of your main trio.


NOW... You need to make a mask of the single primrose. You’ll notice I didn’t trim around it completely because I planned to build my theatre from the bottom up. So really, the most important part of the mask is the top three flowers. 


WITH YOUR BOTTOM LAYER MASKED... stamp the primrose trio again at the top. You can see that I stamped it so that the little note “Primula Auricula” sign would be masked in the second image. I didn’t want multiple signs in my final theatre if that makes any sense! ;-) From here, you’ll just keep moving your two masks and adding primroses — either the trio or the single pot — until you have the configuration that you like! 

There will be times when you set your mask down, and stamp over top only to have a piece of your image missing, like you see below....


DON'T WORRY! This happens! And, here’s how you fix it!


WITH THE HELP... of a Copic Multi-liner pen (.01mm) you can fill in the gap with ease!

And, after mixing it up and masking along the way, here’s a peek at my auricula theatre in the making! One additional tip — as I masked, I made sure that the flower I was laying down would hide the end of the shelf from the primrose trio. This way the shelf looks continuous — the way it should! 


Aren’t those little pots darling? I couldn’t wait to color them up. And.... so I did! I used Copic markers and after I was done, I knew that my “theatre” needed a little bit of pop in order to look like the real deal. 


TO CREATE.... the auricula theatre, start with a 5-3/4" by 5-1/2" piece of kraft paper. On the 5-3/4" side, score at the 1/2" and 3/4" lines and then flip the paper 180 degrees to get the other side at the 1/2" and 3/4" lines. Afterward, I took the Spellbinders Labels Seventeen and centered it in between the two most inner score lines and cut that center portion out.


FROM THERE.... I stamped the two corners using the large round primrose stamp from the Potted Primroses set and Memento Toffee Crunch ink. Then, I folded along the score lines so that once folded, it would, in essence, create a little box. The cool thing is that if you are mailing this, you just need to collapse the box to one side or another to make it flat! Since there’s no top on the box, it does this easily! 


ABOVE IS A PEEK AT THE INSIDE.... of the card! I used another sentiment from the Farmers Market stamp set and then, again using Memento Toffee Crunch, I stamped the large primrose on the inside corner as well.  


AND HERE’S A LOOK AT MY FINISHED CREATION!  I added a few pennants (notched strips of decorative paper from the Carta Bella Yesterday paper collection), a rhinestone adorned paper flower and the sentiment is also from the Potted Primrose set. It really says “A Cheery Hello,” but when I stamped it on a 1/2" pennant strip, the “a” was cut off and, well, I thought it still worked! ;-)

So with a few Post-It Notes, a fun and cheery stamp set and some markers, you too can make your own auricula theatre. This one doesn’t even need a green thumb to care for it but it’s bound to deliver sunshine to one lucky receiver! 

Thanks for joining me today! Have a fabulously creative week! 
~Julie