

Here is what the lovely finished project looks like, and I’ll take you through the steps it takes to create it!
First I began with our lovely Countryside Bouquet - Deluxe Stamp set, stamping in in Memento Tuxedo Black onto XPress It Blending Cardstock.

I actually stamped 3 of these bouquet images, one that I would be using for the card face (about 4 x 4) and then two other images of the same stamped onto more of the cardstock.
There are a couple of ways you can proceed from here. You could colour all three images individually (using the same colouring on each image) and then cut the second and third images into strips, or you can also proceed like I have. Going this direction requires a little less colouring time. Start by by colouring your main 4 x 4 image as you like and set aside.

Then, with the extra two stamped pieces I oriented them exactly the same direction (here with the stems at the bottom and the bouquet running above. Then I took out my paper trimmer and trimmed these images into uneven-width strips going horizontally with one image and then vertically with the other. These become the popped up strips of the design. Next you can take some of the strips from each directionally cut image (leaving some strips behind) and colour those up (I chose every other piece or so).
It’s important that if you’re doing this method that you colour up your main image first - when the pieces are cut into strips it’s not always as easy to orient what lines or parts you are colouring so this way you can always refer back to your main coloured design, matching it up for reference as needed. Trust me - I know this from experience :). Those tiny lines don’t always make sense when they are just in thin little pieces in front of you.

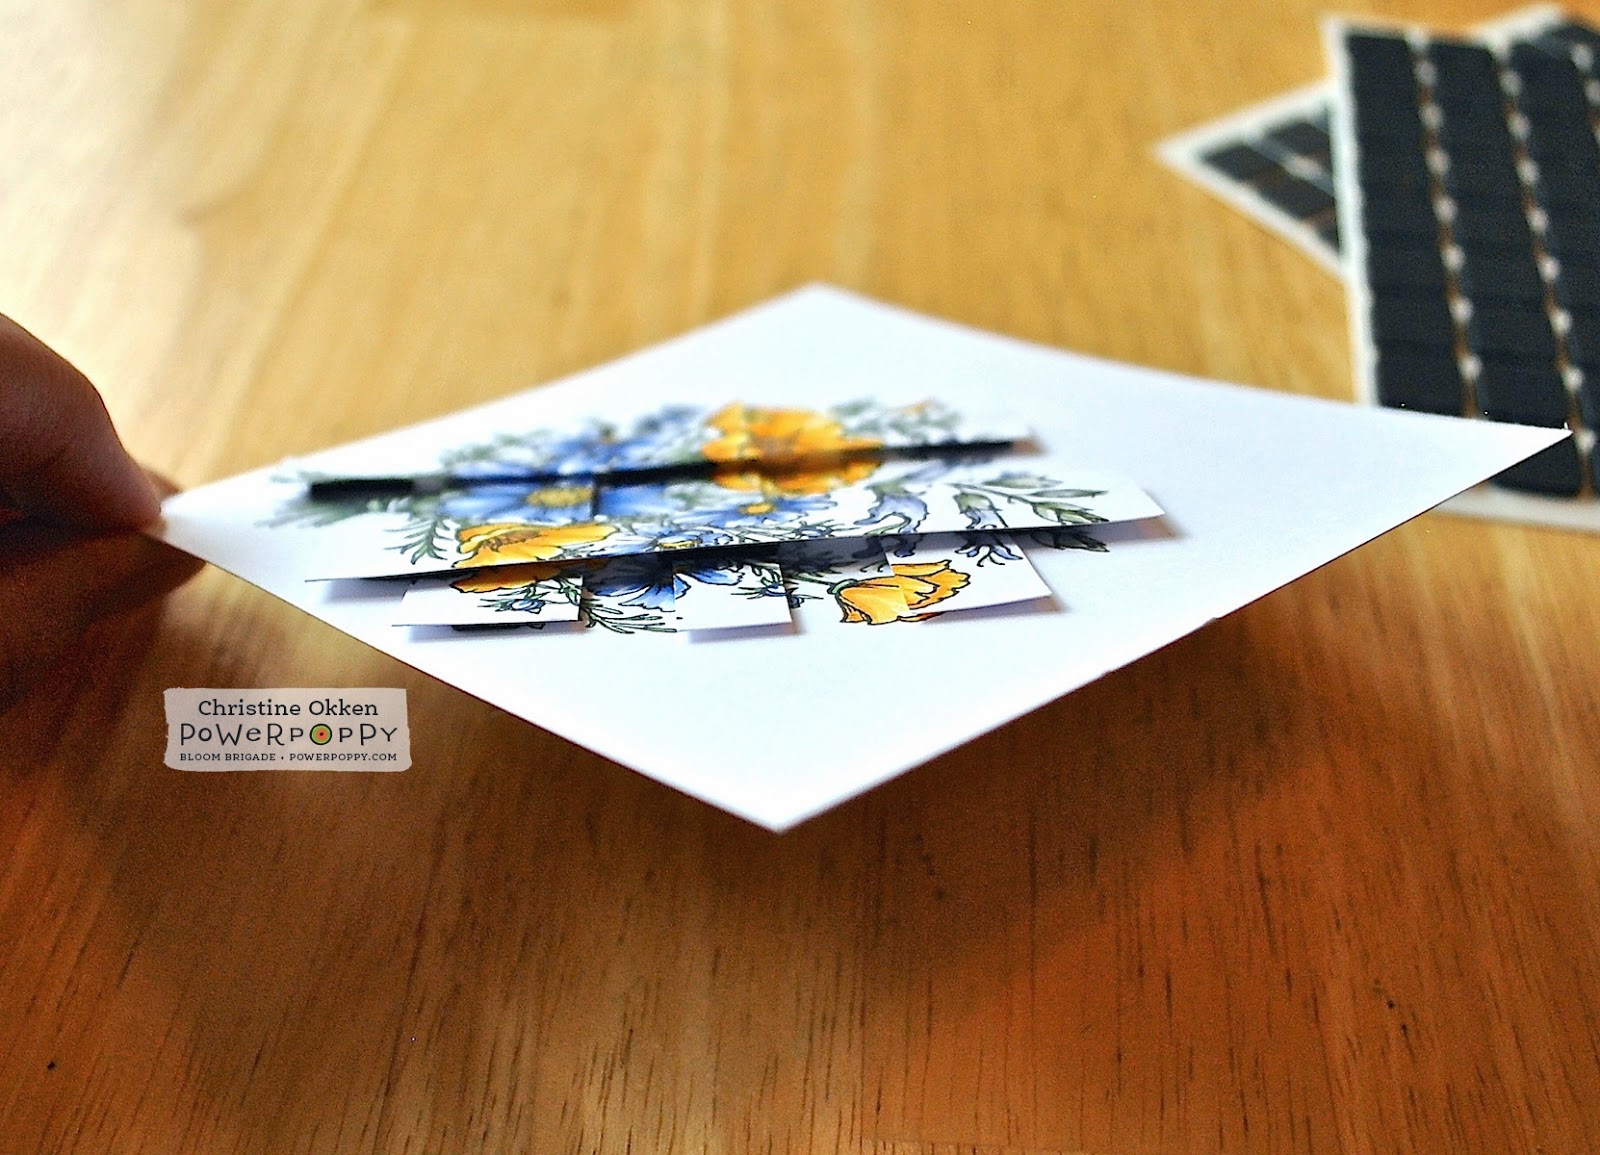
Here you can see the two vertical pieces I’ve chosen and coloured and the three horizontal pieces I’ve coloured up.

Next you’re going to layer your strips over the main image matching the designs exactly. You could chose to weave the strips between horizontal and vertical, but I chose to lay all my horizontal images first with a thin popped adhesive square, and then add the vertical strips on top. Your main image peeks out underneath the popped up layers adding all sorts of fun dimension.
Now, because of the way I stamped the main image in the corner running diagonally, the strips are actually form more of an X than a cross. You could do either way, it’s just up to you! Both are visually effective.

Here you can see the vertical strips added with a thicker popped adhesive square so you get more dimension to the layers.
A bit of a side view letting you see that sort of basket design it forms.

Here’s a close-up of the finished design also showing a peek of the sentiment from our lovely Dynamic Duos: Peonies and Tulips set, stamped in a soft green ink.

Because I wanted the design from the strips to really play center stage I didn’t add any other embellishments, so it’s a really neat Clean and Simple design with some definite punch!
Thanks for joining me today and I hope you enjoyed learning a new way to jazz up your images! Let me know if you tried it out, I’d love to come and see!
(Copics for those of you who’ve asked: BV60, BV63, BV66, Y15, Y35, Y38, YR14, YR15, BG90, BG93, BG96, BV02, BV04, V02, G21, G24).
14 comments:
This is very interesting and such a new way to look at a stamp. Thanks Christine for a wonderful tutorial.This a beautiful card and Love the colors.
Love your cards, thank you so much for sharing with all of us. Cannot read the copic colors, anyway you can post them? Sorry, but I am fairly new to this and this would be a perfect card for my sister. Thank you
Hi Cindi - I edited to add the Copics I used :)
This is fabulous, Christine! Just the kind of stuff I learned in the online class Stretch Your Stamps2. Innovative ways to use images. And, as always, your coloring is beautiful. Thanks for sharing this; going to try it.
Really gorgeous and I love anything that deconstructs stamped images, because it keeps it fresh! Thanks for sharing :)
Oh, Christine, this is stunning and, yes, so innovative and genius! I just love the layers and your gorgeous coloring, of course! Wow, it sure is inspiring! Hmmm...definitely am pinning this...need to try it!! I just love the look, and with the simple matting and sentiment, it's striking! Wow! Hugs!!
Never seen anything like this and it is just Beautiful, very cool!
How very interesting and unusual and utterly fabulous, Christine! Thank you for taking the time to share how you did this.
Gosh Christine -- you took an image and just made it so mod and fresh -- love your take on things girl. You are ALWAYS thinking and showing off that fabulously creative brain of yours!
Christine, your card is just breathtaking! I'm struck by how you started with what is a rather busy bouquet image, and created a card that's so simple and fresh!! It's a feat in itself, as you've elevated that image to another level! (Or shall I say levels! :) Thank you so much for sharing your artistry and talents with us, your detailed step-by-step, and even your Copic colors with us! We are very grateful. xoxo
This is so cool!!!! Thank you so much for sharing the step by step tutorial with us - I'd never be able to figure it out on my own. :-)
WOW!!! This looks absolutely AMAZING!!!!! Stunning effect!!!
What a creative and striking technique Christine! It really does make the image pop even more! WOW! Gorgeous!
This is awesome. I must try this. Thanks :)
Post a Comment