
I wanted to share one of my favorite masking tips with you today... this is a favorite especially for small or detailed images, and Marcy has created some beautiful images for this holiday release that feature lots of small elements and beautiful details.
Traditional masking involves fussy cutting a shape out of thin paper to cover up areas we've stamped. Nobody wants to do that on a small image. Right?? For watercolorists, there are brushable masking fluids, but they can be fussy as well, and take a little practice to work with... and the patience to wait until they're *completely* dry before removing them... *ahem*
Do you have a Glaze Pen? I have a few. These are made by Sakura, and they're typically used to add a little shiny accent to a colored image. I had noticed that they're described as waterproof, and guess what?! They are. And they are my secret masking weapon.
Here's how I made today's card. I stamped in StazOn ink onto watercolor paper - this stamp is from the Bottlebrush Holiday set. When you watercolor, it can be tricky to lay down an even wash of color, or to avoid painting in tiny details. I started by using my Glaze pen to mask off some highlights.

Here's what that looks like - can you see where they're 'glazed'? Also - I love that the highlights are sketched in to remove the guesswork (thanks Miss Marcy!!). I added dots to the larger ornament where they're indicated too. Let the glaze dry completely before you add water, or it will run.

While the glaze was drying I moved over to the bottle brush tree and filled in the ornaments, then covered them with a coat of glaze. I did my watercoloring with Peerless watercolor sheets... I like to use them for detailed images because they're so easy to pick up in small amounts and with tiny brushes.

I watercolored over the dried glaze on the ornaments, and you can see how the pen resisted the paint. Here I'm adding another layer of glaze over the dried paint so that I can wash the area later. Sometimes we forget that masking can be done in stages and layers.

Back over to the tree, where I added some random dots for little snow spots. A tip for getting a good, even flow from your pen - move slowly.

I stamped and shaded the banner and glazed it too.

Now I can add some color to the tree, and those glazed dots will stand out like painted snowy tips.

Except for the tree, the full image is actually covered with glaze at this point, so spritzing water over it will not affect my protected coloring.

Here I'm adding color into my misted background, and the glaze is resisting the color and water. This makes it so easy to do this fun wash! This does work for sponged backgrounds too, and with alcohol inks, in case you prefer another medium.

Here's an angled shot so you can see the water beaded up on the glazed ornaments.You can just dab that water off for quicker drying time.

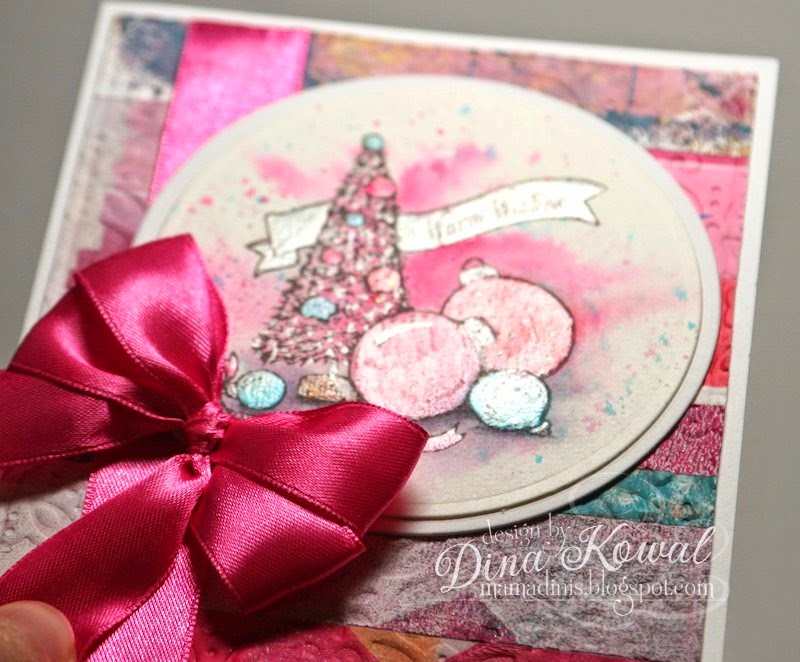
Here's my finished card, with a few added splatters. My background panel was made with strips of gel printed paper.

Close up...

And at an angle so you can see the shine - I love that it's functional and pretty at the same time!
Thanks for letting me share!

11 comments:
Another fabulous tutorial Dina!!! I have one of these pens too and it is little used! Thanks for sharing an idea that will help me use the tools I already have! Beautiful creation -- and fabulous flouncy bow!
Oh, Dina, I love these glistening jewels — it is so helpful the way you showed the cards at an angle so that we can see how the effects appear during the steps! GORGEOUS, and as always, your luscious, vibrant colors are total show-stoppers. Thank you kindly, Mistress of Marvelous Artistry!!
Thank you for a very informative tutorial. I loved it. The finished card is very pretty.
Such a beautiful card. Thank you for sharing your tips with us.
Your card is just gorgeous and I learned a lot from your very informative tutorial.
Thank you so much for sharing your talent with us.
Thank you for sponsoring the Split Coast Stampers HYCCT event!
Very cool technique, Dina. Thank you. I couldn't find a Facebook page for power poppy but I wanted to thank them for being so supportive of splitcoaststampers and Hope You Can Cling To. We all really appreciate their generosity. Love the stamps, too. Didn't know them before.
Stunning card! Thanks for the creative tip.
Thank you so much, Jean! Appreciate your note. :) ~marcella from Power Poppy
Oh, Dina, what a stunning card with such sparkle!! And your colors are fabulous and that yummy ribbon! Thanks for the tutorial! Hugs!
Dina, I am going through my Junk mail folder. Grrrrrrr gmail! Love this card and this technique. So creative and I will give it a try!
kReN@afourthlife.blogspot.com
Post a Comment