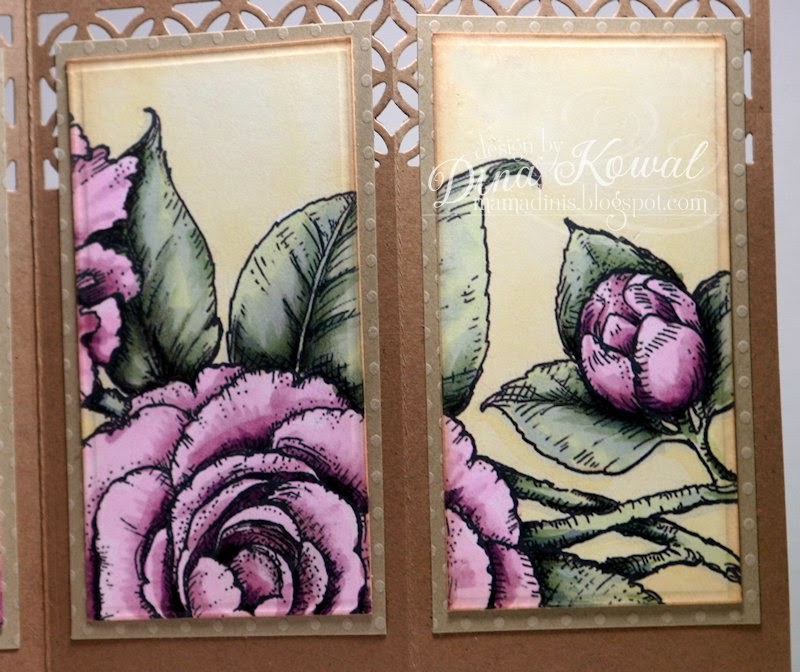
Hey there - happy Inspire Me Monday! I’ve got a fun project to share today that I hinted at on my blog a few weeks ago - you might remember if you were here for the Camellia release hop! My project today is a Screen Divider Card - this is a tutorial from Splitcoaststampers that we featured last month during our Holiday Tutorial Blitz, but it's a great card for any occasion.
The instructions and measurements are all available at the link above. For this version, I wanted to use a single colored image to cover all 4 panels - the panels can be cut and decorated separately, but aren't we all looking for ways to cut corners and speed things up? This was a great way to color the panels all at once, and the larger Camellias were much easier to color in. Even at this size, the detail is incredible!
I set the margins to 0" and resized the Camellia image to 9.34" x 6.37". (Those measurements don't have to be precise! Just somewhere around there will give you the size needed for this project.) NOTE: Be sure to set your printer settings for borderless printing - otherwise, you'll have a quarter-inch white border around the edge.
The piece I needed for my screen divider panels is 4" x 8.5", so I trimmed across at 4" and then cut the rest of my sheet into card front sized panels and created two other cards.
Before coloring with markers, I used a glaze pen to protect the tiny stamens of the flowers. The glaze pen acts as a resist medium, even with alcohol markers.
After coloring, I added some deeper shading with a pencil.
My panel was cut into 4 equal pieces, 2-1/8" wide.
I sponged the edges of each panel lightly so that each one seemed like its own design.
Here's a little tip for cutting the legs of the screen divider card - I centered and stuck my die to the back side of a Post-It note. the edges of the note helped me to position the die right where I wanted on the edge of the card each time.
I folded the card in half and cut the center panels first, then did the outer panels.
I always score around the edges of each panel for a more finished look.
Here's a closer look at my finished creation!
I hope this gives you some ideas for using digital stamps in a larger format! These little cards make beautiful decorations as well. Happy holidays to you!


11 comments:
I've made a couple of these cards with the stamps and now I KNOW I have to have this digi, this is beyond gorgeous!!!!
This is beautiful, Dina! I love your coloring and shadowing technique ;)
Love the idea! Always looking for ways that the time I put into making the card lasts longer than just a glance on the recipient side... Make a game or gift of the project. This is one of those! Thank you so much for sharing it.
Hugs
This is lovely. I like how you die cut the top of the panels too. TFS
What a breathtakingly beautiful Divider Card Dina! Thank you for sharing and writing your Instructions in such an easy way so I can follow along. This is going on my To Do List for 2015.
This is such a beautiful piece of art. Thank you for putting together such a wonderful tutorial.
Hello Dina: what a magnificent, amazing work of art, simply lovely. I love this screen divider cards, they are perfect to showcase your images, your coloring and the shading is gorgeous. This cards can be enjoyed by the recipient for a long time.
Thank you so much for the super clear and precise directions, I will give this a try.
Hugs.
Blown away beautiful! And thank you for taking the time to share the directions and pictures! This is really a very neat project that I hope to try in my future!
This is stunning... Master! Off to pin this. Awesome work, and of course I'm inspired! Merry Christmas Dina and everyone at PP.
I don't normally work with digis, but you may have converted me, Dina! Thanks for sharing such a gorgeous project! Wishing you and yours a Very Merry Christmas!
Oh, Dina, this is exquisite! Your coloring is always amazing, and I love the beautiful design of this Screen Divider Card! Wow, what a stunning and gorgeous piece of art! Have a blessed Christmas! Hugs!
Post a Comment