
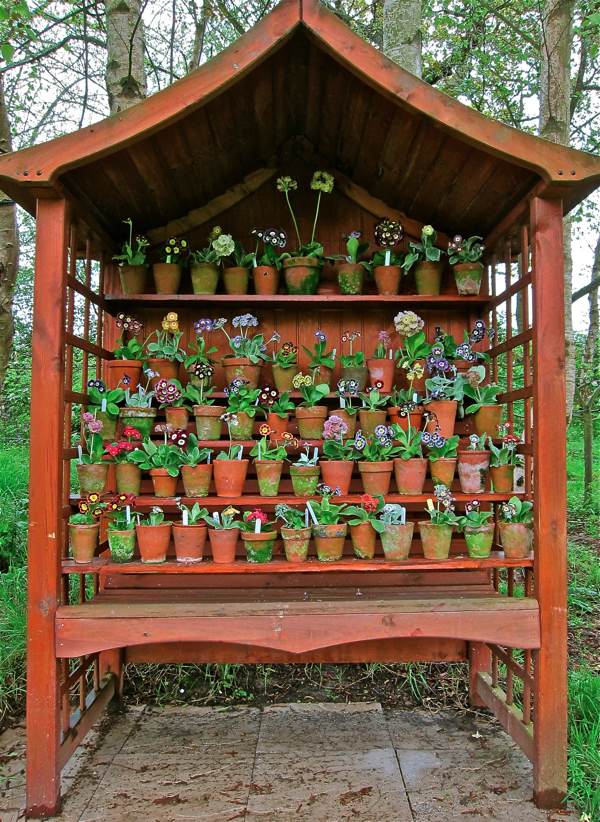
Hello all and welcome to another Inspire Me Monday with your hostess, Julie Koerber! Today, I am going to work a little masking magic to show you how you can take a darling trio of primroses and make your very own “auricula theatre.” What, pray tell, is an auricula theater? Well, it’s a piece of garden decor that lets the small but mighty, bold-colored primrose put on a BIG show! This method of display started in 17th century Europe and has been a lovely expression ever since. Since primroses are delicate and sensitive to too much light, these hutches were created to protect, yet show off these beauties too! See?

So, here goes — a peek at how YOU can make your own auricula theatre thanks to a little ink, a stamp set and a few Post-It Notes! Let's get started!


WHAT YOU NEED:
- Potted Primroses stamp set
- Ink color of choice (I used Memento Tuxedo Black)
- Post-It Notes
- detail scissors
- Copic markers or coloring medium of choice
LET’S START... by stamping our trio of pots image onto our card stock and then make a mask using a Post-It Note.
CONTINUE... by cutting out your mask and laying it over top your stamped image!
WITH THE MASK IN PLACE... Take the single stamp from the Potted Primrose set and stamp it off to the left of your main trio.
NOW... You need to make a mask of the single primrose. You’ll notice I didn’t trim around it completely because I planned to build my theatre from the bottom up. So really, the most important part of the mask is the top three flowers.
WITH YOUR BOTTOM LAYER MASKED... stamp the primrose trio again at the top. You can see that I stamped it so that the little note “Primula Auricula” sign would be masked in the second image. I didn’t want multiple signs in my final theatre if that makes any sense! ;-) From here, you’ll just keep moving your two masks and adding primroses — either the trio or the single pot — until you have the configuration that you like!
There will be times when you set your mask down, and stamp over top only to have a piece of your image missing, like you see below....
DON'T WORRY! This happens! And, here’s how you fix it!
WITH THE HELP... of a Copic Multi-liner pen (.01mm) you can fill in the gap with ease!
And, after mixing it up and masking along the way, here’s a peek at my auricula theatre in the making! One additional tip — as I masked, I made sure that the flower I was laying down would hide the end of the shelf from the primrose trio. This way the shelf looks continuous — the way it should!
Aren’t those little pots darling? I couldn’t wait to color them up. And.... so I did! I used Copic markers and after I was done, I knew that my “theatre” needed a little bit of pop in order to look like the real deal.
TO CREATE.... the auricula theatre, start with a 5-3/4" by 5-1/2" piece of kraft paper. On the 5-3/4" side, score at the 1/2" and 3/4" lines and then flip the paper 180 degrees to get the other side at the 1/2" and 3/4" lines. Afterward, I took the Spellbinders Labels Seventeen and centered it in between the two most inner score lines and cut that center portion out.
FROM THERE.... I stamped the two corners using the large round primrose stamp from the Potted Primroses set and Memento Toffee Crunch ink. Then, I folded along the score lines so that once folded, it would, in essence, create a little box. The cool thing is that if you are mailing this, you just need to collapse the box to one side or another to make it flat! Since there’s no top on the box, it does this easily!
ABOVE IS A PEEK AT THE INSIDE.... of the card! I used another sentiment from the Farmers Market stamp set and then, again using Memento Toffee Crunch, I stamped the large primrose on the inside corner as well.
AND HERE’S A LOOK AT MY FINISHED CREATION! I added a few pennants (notched strips of decorative paper from the Carta Bella Yesterday paper collection), a rhinestone adorned paper flower and the sentiment is also from the Potted Primrose set. It really says “A Cheery Hello,” but when I stamped it on a 1/2" pennant strip, the “a” was cut off and, well, I thought it still worked! ;-)
So with a few Post-It Notes, a fun and cheery stamp set and some markers, you too can make your own auricula theatre. This one doesn’t even need a green thumb to care for it but it’s bound to deliver sunshine to one lucky receiver!
Thanks for joining me today! Have a fabulously creative week!
~Julie
19 comments:
This card is adorable. I have never heard of this practice with primroses. Thank for the very interesting background for the card idea. I like to use masking and will be trying my own version in the future.
I love this, it's so wonderful.
Holy smokes, that's just FABULOUS! I'm an avid gardener and have Primrose in my gardens (they were in bloom in December actually) these are beautiful!
Oh my Julie!!! It's freakin' adorable!!!! Look at all those cute little happy & bright flowery faces! Great tutorial girl!
WOW!! This is so cool. I Have never heard of this practice. So fun. The card and masking is fabulous!!
Brilliant card ladies...I just love it, so bright and cheerful and super take on the photos. Bring back the masking technique yes, wonderful way to get more use of your stamps
I think I just let out a Marcella scream too... this is absolutely stunning. The presentation ... the coloring the tutorial.... Absolutely phenomenal.
Oh, Julie!! I agree with Nazeema, yipes!! This is so adorable, and I love the auricula theatre you've created with your card! It's gorgeous! Thanks for the tutorial, and I absolutely think this will be a treasured card for someone special! Totally in love with it...and you all!! Hugs!
Wow!! Wow!! WOOOOOWWWW!! What a clever, creative, and oh so stunning idea Julie!! Talk about GORGEOUS!! Can I get a "Woot-Woot"!!!!
Beautiful work! Would it be possible to get a list of the markers used in coloring this mini-masterpiece? I could never replicate something as well as your creation but it would be great to start out on the right foot with the marker numbers!
Thanks so much for considering!
Donna M
This is so cute and I'm totally going to steal, I mean *try* this, maybe for Mother's Day!
saffronkingfisher.com
Totally clever idea and beautifully executed!! The only thing I can grow are weeds. This is beautiful.
Wow! I've never heard of this kind of theater, so thank you both for the education and for the eye candy! Your final piece is gorgeous!!!!!!!
Oh Julie this is just adorable and totally makes me smile!!! So glad you set your creative talents in high gear to come up with this auricular theater!!! It's so cheery and I am in love with your card design!!!
That is such a cute card - and thanks for educating me about a new word for the day!
This is as sweet as it gets, Julie! Love your auricula theatre! :)
This is as sweet as it gets, Julie! Love your auricula theatre! :)
So beautiful! Love it.
OMG I love this auricula theatre! I didn't think I would get so much education from this website, much less a history lesson! :)
Post a Comment