Friday

Heaven and Nature Sing!

Happy last day of the new release peeks! Oh, wait, and HAPPY HALLOWEEN!!!

Hopefully you’re sitting at your computer or iPad with a couple of fun-size Snickers or Baby Ruths, and your coffee, revved up to go. I really think today’s set is gonna rock ya... Maybe even moreso if you’ve been listening to Rockin’ Robin on the way to school, at your son’s request, as I have! :)
 
Most of you know I’m a sucker for nostalgic old ephemera. Bring on the books, postcards, magazine pages, labels, packaging... I eat it all up, from the lettering styles and composition to the color palettes and the subject matter itself.

While gathering inspiration for my Happiest Holiday collection — and this is the last set, there are EIGHT in all, see them here — I snuck away to antiques shops and antique malls, shuffling through stuffy piles of stuff, and sifting through shoeboxes of paper goods. Doug and I ventured out on daytrips to small towns outside St. Louis and poked into junk stores (we love doing that!) on the hunt for vintage Christmas goodies to spark ideas. I really struck gold in a few booths at an antique mall down the road, finding handfuls of penny postcards dated from 1908-1912. O Happy Day! Cue the Happy Inspired Artist Dance!


The design themes of that era were so pervasive — lots of birds in pine trees. Lots of picturesque churches. Lots of holly sprigs and mistletoe. Oftentimes two or three of these themes were all in the same card, isolated into small framed areas. Some of ’em were quite terrible. Just too much going on. While others had a harmony and sweetness that really touched me. I have to confess, the compositions of these cards reminded me of trends in modern cardmaking! Embellished frames and die cuts, embossed details dotted with sparkle, gold or silver-foil stamping and edging, fanciful sentiments... It was kind of an epiphany. We’re coming full circle with our card creations — only now they cost a little bit more than a penny. ;) hehe.

My November release has many-a-nod to the classic themes of these 100-year-old postcards. So far you’ve gotten a glimpse of the holly swags of Bough Wow Wow and the snow-covered church of O Holy Night, and several of the Merry Littles reflect that old-time look. But today’s set might be the most nostalgic of all... featuring two rockin’ robins. Introducing: Heaven and Nature Sing.

http://powerpoppy.com/products/heaven-and-nature-sing 
 
I’m almost giddy to share this set with you... Heaven and Nature Sing has seven stamps, several are ideal for holiday cards, but really, the main images can be used throughout the year. It’s all how you treat the subject matter, and how you make it “sing” in your unique way! Will it be deep jewel tones or a fresh and cheerful treatment? How about both!

The Bloom Brigade has gone above and beyond with their card samples, and I can almost hear the GASPS! that will be arising across the land — er, the world! — as you open their blogs. Please join me in seeing what everyone has made for today!! Thank you, special special Bloomies!! AND — we have a GUEST today for this peek.... the lovely and gifted Dina Kowal is also here. O Happy Day again!


Tomorrow... we’re HOPPING! Hope you’ll spend part of your day with us, and then it’s time to grab your sets in the store! We’ll be shipping ’em out as the orders come in.

Have a Happy Halloween! Off to finish the sideburns for Finn’s Blues Brothers costume. He’s my own little rockin’ robin.

Thursday

Have Yourself a Merry Littles Christmas!

Welcome back to DAY 3 of our highly spirited Happiest Holiday release. I am so glad to see you here!

We’ve had great fun this week showcasing cleverly-crafted cards and teasing you along with peeks of our new Christmastime stamps! The creations my fabulous Bloom Brigade dreamed up and shared on Days 1 and 2 were as vibrant and beautiful as anything I can imagine. They are putting so much talent and time into this entire release, and I want to share the BIGGEST THANK YOU to each of those ladies. Ally Christine Cindy Danielle Dawn Julie Kathy Katie Leslie Stacy Tosha — you women RULE!!!

Today I’m going to show you a set that is so jam-packed with “merry little” images, it could take WEEKS to share the various stamps and the ways they can be used. Ain’t nobody got time for that. So we’ll just show you a chosen few! The set is called Merry Littles and I can already see myself using it on everything from gift tags to wrapping paper to place cards... even though it’s the simplest of all of my sets, I think it might be my favorite!

http://powerpoppy.com/products/merry-littles

There’s a little bit of everything Christmas in Merry Littles! For nature lovers, I’ve drawn sprigs of spruce and juniper, pinecones and branches, a tuft of mistletoe, a petite poinsettia. Make wreaths, boughs, borders — or let these little guys fly solo!

Other Merry Littles have a playful vibe (I really can’t help myself): A piping hot cup of cocoa with a twisty pirouette cookie, a shining candle surrounded by berries, a star-topped bottlebrush tree, the perfect little package tied up with bling, even a whimsical Santa hat. And that’s not all! Four handmade sentiments have a very merry look, and are just as sweet on their own as when paired with the other “littles”.

I hope you’ll take some time to pop around the BLOOM BRIGADE’s blogs to get a look at what they’re up to with just a few of this set of 18 stamps!

TAKE IT AWAY, BLOOMIES!


I am already so excited to start making things with this set, but first, we’ve got ONE MORE NEW HOLIDAY SET to share with you tomorrow... See you then!


Wednesday

O Holy Night

Hello, hello, HELLO! I first want to say thank you sooooooo much for your happy notes yesterday about our family’s big life announcement!! You ladies know how to make a gal feel special! Doug and I both appreciate all of your warm words. I’m still smiling. :)

Well, let’s talk about stamping. Did you happen to catch Christine’s dreamy, magical, and mood-setting Inspire Me Monday post? It was all about colouring (she’s Canadian, so we are rocking the u!) moonlit winter snow. She did such a gorgeous job with her shining yellows and subtle hues spilling out onto the snow, you should go run over there and look at it real quick! But then come right back!!

Our second set for the Happiest Holiday release is called O Holy Night, and it will be available to purchase on Saturday!

powerpoppy.com/products/o-holy-night

When the choir sings O Holy Night on Christmas Eve, and the congregation joins in, harmonizing, standing side by side, it is such an intense moment. Tears well up and our hearts feel so full and so grateful! 

A few years ago it snowed at least a foot on Christmas Eve, and as we headed to the 11pm service, everything was absolutely coated in snow. Trees were drooping, the snowflakes were falling like mad. Driving with my folks in their SUV, we pulled up to my church, and the glistening scene with the golden glow emanating from the candlelit church windows onto the snow is imprinted in my memory so clearly. O Holy Night, indeed.

This set has a country church in just such a snowy winterland scene. A wonderful setting for an old fashioned Christmas service. I’ve included several peaceful and pretty sentiments to O Holy Night to help your card come together beautifully!

BLOOM BRIGADE, we’d love to see YOUR take on this snowy church scene!


Come on back on Thursday, because we have ANOTHER HOLIDAY SET to share, and it is lots and lots of little tiny fun!

Tuesday

NEW HOLIDAY RELEASE: Part Deux... and some news!

Oh, hey! You’re back and so are we. Good timing, too, because it’s the first day of our big November HAPPIEST HOLIDAY release sneak peeks!!!

I hear what you’re saying, ALREADY!?! Oh, yes, more fun to tempt you with, and I think it might be our best ever!!!

This release snuck up on me a bit, because this past week has kind of been a blur. May I tell a little story before we start revealing the sets? (Scroll on down to the stamping goodness to skip this part!)

Now, I know you folks don’t know me all that well on the personal level, but I’ve shared here a few times that I have a boyfriend named Doug. I’ve also made mention that he is the love of my life. I mean to tell ya, we are CRAZY about eachother. Doug and I started dating close to 5 years ago, after we ran into eachother at a skateboarding event for old people. (After my divorce, I was trying to get out of the house and keep myself fit, and thought, heck, maybe I’ll try something I haven’t done in a long time... skateboarding!) I’d heard a bunch of my friends from the old days were getting back into it, so why not me? No matter that I was 38. So, there I was at the “Old Man Skate Night”, dropping in on the ramp and eventually, pulling some of the tricks I used to do back then. I was, dare I say, stoked.

Skateboarding at a local ramp in 1988 (frontside grind, my favorite move)

But easily the most stokable part of the night was noticing that a skateboarder on whom I’d had a teenage crush in the 80s was on the ramp, too: Doug Scronce.


We talked throughout the session .... he was also now divorced ... we both had two children, and our kids were the exact same ages! We knew lots of the same people, and had several funny connections and stories. He made me laugh, he was sweet and witty and charming, and boy, was he cute. We ended up talking that night over Facebook messages, set up a date, and honestly, we knew within a week that this was different. THIS WAS IT.

Since then, we’ve been inseparable (albeit living in separate-but-not-too-far-from-eachother houses), our little family of six has gone on adventures to the beach, excursions through the woods, and have had some of the most memorable times just hanging out at home. Our oldest daughters have their own band called WaterColor. Our younger two are always wearing costumes they’ve concocted and cracking eachother up. It’s been wild and wonderful and fulfilling and at times challenging, but above all, these years have filled us with happiness. 

It is with a big smile that I share with you that last week, Doug asked me to be his wife.


I said YES! :) Our kids are super excited, and we can’t wait to have their help planning the wedding. Finn has already asked if he can be Doug’s “Man of Honor.”

I’ll be sharing more of the fun here on my blog, and you might end up seeing a wedding flower set coming down the line. Because just like Law & Order, my set ideas are ripped from the headlines!

Speaking of sets: Here’s what you may have come to see in the first place before I got sidetracked with skateboarding and engagement stories... Our first set from HAPPIEST HOLIDAY: PART DEUX...

powerpoppy.com/products/bough-wow-wow 

Bough Wow Wow will give your projects major POW! Knock ’em out with a punch of CUTE! I’ve drawn two central bough images, each inspired by vintage ornaments, ribbons, and greenery (excuse while I break into “these are a few of my favorite things!”) — but each is totally unique! Oh, the fun you’ll have! There’s hand lettering and lots of little accents to choose from. There are so many directions to take these — or just stamp in a single color and get those cards churned out in style! Well, let us get those creative wheels turning by visiting the bodacious blogs of the BLOOM BRIGADE!

Ladies, take it away:


I hope to see you back here tomorrow, because we have more to share from this special holiday release! Woo hoo!

Monday

Colouring Moonlit Winter Snow


Hello Power Poppy Friends!  It’s Christine greeting you here and I’m kicking off a fabulous week of Power Poppy November Releases!  Today you’re in for a very special treat....I get to super-sneak-peek a stamp set coming out on November 1st with today’s tutorial.  It’s a stunning set called O Holy Night, and it celebrates all that I love about the Christmas Season.  

Because this stamp set depicts a gorgeous Church scene on a winter night, I wanted to show you how to colour it in a really serene, but dramatic way.  


I began by stamping the scene onto Cougar Opaque Ivory cardstock with Memento Tuxedo Black ink, and then also stamping the scene onto some Eclipse Masking tape, trimming it out,  and creating a mask to go over the image (see above).  I like Eclipse Masking tape for this type of technique because it sticks to the whole image and won’t move.   You will also want to put your image on some scrap paper, ‘cause you’re about to get inky!  Or at least your paper is!  


Then I took my brayer and some Nautical Blue Memento Ink and in an oval pattern I brayered the dark night sky onto the image.  I brayer in layers building colour bit by bit.  Because it is a moonlit sky I wanted it to maintain light around the moon so I avoided too much brayering in that area.  This helps to give the moon a glow.   In this scene the moon is essentially backlighting the Church, so the glow would come around and behind the Church.  The top corners and sides have the deepest colour of sky so there’s lots of brayered ink there.  


Here you can see what it looks like when I was done brayering.  


This picture shows the look of the scene when I lift off the mask, before I start colouring.  See how the glow works for the scene?  

Now I have a white moon, a white Church and white snow.  How can I bring life to these whites and distinguish them from each other?  Let’s keep moving on!


Since I want to add some definition to the snow and to the Church I need to add some colour.   The moon and snow aren’t just plain white, they would have tones off all sorts of other colours that bring life to the white.  Above you can see I’ve coloured up the greens peeking through the snow on the trees (YG93, YG95, YG99).  Now with my C00 and B21 Copic Markers I colour in the shadows of the snow on the trees.  The C00 smoothes and softens out the blues in the shadows.  


Next, I want to give the gorgeous full moon a glow.  It doesn’t take much colour so I used some really soft yellows to sweep some colour on the bottom left area of the moon, around the moon and onto the sides of the trees near the moon.  


Then I want some light to be coming from the Church windows so I added some Y00 in the windows and as you can see in the picture below, spilling out of the windows onto the snow.  


Finally,  you can see I’ve added some cool greys and blue to the Church - still making it appear white, but moonlit at night.  I love the peaceful feeling of the scene.  


Here is the finished design.  I added some Picket Fence Ranger Distress pen dotted over the yardstick to create stars in the sky, and then paired it all with My Mind’s Eye Joyous designer paper and some pretty accents.  


And now you can see that white isn’t just white.  It’s all about what you add to it to make it shine on this beautiful night!

Thanks for joining me today.  We look forward to the Sneak Peeks starting tomorrow!  You will love them!  

Friday

A Bevy of Beauty -- Just for YOU!


Okay Power Poppy fans, are you ready for a little inspiration to kick off your weekend? Well, we’re ready to show you some! Not only will we share our PEEPS of the WEEK, we have some absolute treasures to share from our Bloom Brigade!

LET’S GET TO IT!

First up, have you played along with our Power Poppy Peep of the Week Challenge? If not, listen up! HERE’S HOW TO PLAY: All you need to do is use the linky below and share a new Power Poppy creation. Just that simple! It can be anything — a card, an altered item, a 3D creation, a set of cards, ANYTHING! We can't tell you how much we love to see what you create!

OFFICIAL RULES:
  • Use Power Poppy Stamps on your creation! 
  • Link up your creation using the Linky below (It helps us to find you! Although it's not a necessity to win. We scour creations all over the web!).
  • Could you please mention the Peep of the Week challenge in your blog or gallery post with a link back to this blog post? We would sure love it if you did! 
  • We’ll accept entries up until Thursday @3PM EST and will announce the Power Peeps of the Week next Friday for our Peep of the Week post.

TIME TO UNVEIL OUR PEEPS OF THE WEEK!


Delicate beauty -- I think that’s one way to describe this stunning creation from Melanie Ann MacKenzie! The soft colored poinsettia with those absolutely exquisite die cuts -- not to mention all that perfect fussy cutting? It’s a WOW card for sure using Power Poppy's Poinsettia stamp set!  


I absolutely LOVE the bold color here in Patti Willey's Farmers Market creation. Not only are those apples as sweetly colored as can be, so is the thought that this beauty was a hand made creation for her son who is serving in the military. Patti, we agree! He’ll love to find this card that’s been made with love in Mail Call! :-)


And one more Peep this week -- here comes this vintage beauty from Karen Wallace using our Joyful Arrangements stamp set! Look at the touches of antique lace and the soft sponging around her beautifully colored image! I love the color scheme so much, I see a little “CAS-ing” in my future! ;-)

Ladies, yours are the latest creations to land on our Power Poppy Peeps of the Week board over on Pinterest! As a winner, would you like our POWER POPPY PEEP OF THE WEEK BLOG BUTTON to “wear” on your blog with pride? Simply email us at bloom@powerpoppy.com and we’ll send that button right to you! 

If YOU would like to end up being honored in this way, all you need to do is get your craft on and show us your card making style with Power Poppy Stamps! Don't forget to link up your creation below -- you could end up winning a stamp set of your choice!

IMPORTANT NOTE!  

Next week kicks off our Power Poppy Release Week featuring part two of our Happiest Holiday Collection! I am so giddy about these divine designs and I know you will be too! Because we’ll be showing off  FOUR NEW STAMP SETS, Power Poppy’s Peep of the Week will close on the 31st and we’ll share the week's winners on November 2nd! 

Now it's time for the Bloom Brigade to take center stage! You'll have to stop on by, say "hi" and see their beautiful creations for the week! 

Allison Cope
Christine Okken
Danielle Kennedy
Dawn Burnworth
Julie Koerber
Tosha Leyendekker

Be sure to leave these fine ladies some love in the form of a comment, link up your Power Poppy creations below and we’ll see you all back here soon! 

~Julie


Tuesday

Mums, pumpkins, kale, and ...


Still Life with Batman
2011

When the mums and pumpkins come out... so do the superheroes! I arranged fall goodies on the front porch a few years ago, digging the color scheme and how it was all coming together. After a few days, most of the maple leaves from our giant tree blanketed the steps, which was just so pretty and peaceful and enchanting. I grabbed my camera-phone to capture the beauty, and next thing I knew, a caped crusader had plunked himself into the center of my display, looking well chuffed.

I appreciate these moments like crazy!! I am giggling just thinking about it. And my little Batman can hardly fit in that once-way-too-big costume anymore. :)


Monday

Ink, Spray, Smash, and Stencil!

Hi, Dina again! It's Inspire Me Monday, and it's my turn to share!

Over at Splitcoaststampers we're in the middle of our annual Hope You Can Cling To card drive.... this is the 5th year we've had the event, and it's always a great time - a full month of chatter, prizes, virtual hugs, tears as we remember loved ones, and always a whole lot of card making! There is a card-making challenge posted daily, and cards that are made in response to the challenges are sent to MD Anderson's Cancer Center in Houston. The cards are set out in baskets in the breast cancer ward, for patients to share with each other or send to a family member, or for visitors or volunteers to use to brighten a patient's day. Last year over 4000 cards were sent - I can't wait to see the total this year!

We're so excited to have Power Poppy involved as a sponsor this year! I hope you'll come over and take a peek if you haven't been involved already. Miss JULIE is hosting today's challenge, and one of the techniques she chose as part of her challenge needed a new video on the site. I'm the video girl, so I put a video together to demonstrate the Ink, Spray, Smash technique (you can click HERE for the photo tutorial). While I was playing around with glossy cardstock and inks, I tried another variation with a stencil just for fun.


These are the cards I made using the backgrounds from the video... all of these are in my box of Hope You Can Cling To cards which is going postal today!


I love these little holiday vignettes - I colored this one with Peerless watercolors, using a great masking technique that I'll share with you next month! (stamp: Joyful Arrangements)


This is one of the stencil backgrounds - I love the subtle pattern that the stencil left in the blended color. This image was colored with Distress and watercolor markers. (stamp: Sunny Harvest)


I watercolored this image at the same time, again with Distress watercolor markers. This background was actually a 5th print that I didn't show in the video, taken from the ink on the stencil. (stamp: Sunny Harvest)

I'd love to see where this tutorial takes you - each print has such different results ... and of course I'd love to see you support our Julie in her challenge today!

Thanks for letting me share!

Thanks for stopping by!

Friday

Time for a little SHOW & TELL!


Hello Power Poppy fans and welcome to the end of another creative week! Are you ready to see what the Bloom Brigade has been up to? Or, are you excited to see who the next few Peeps of the Week are? We SURE are!

If you haven't been following us over the past few months, here's a special invite for you. We need YOU to play along with US and show off your Power Poppy goodness! HERE’S HOW TO PLAY: All you need to do is use the linky below and share a new Power Poppy creation. Just that simple! It can be anything — a card, an altered item, a 3D creation, a set of cards, ANYTHING! We can't tell you how much we love to see what you create!

OFFICIAL RULES:
  • Use Power Poppy Stamps on your creation! 
  • You CAN combine challenges — we love to see just how creative you can get using our stamps! 
  • Link up your creation using the Linky below (It helps us to find you! Although it's not a necessity to win. We scour creations all over the web!).
  • Could you please mention the Peep of the Week challenge in your blog or gallery post with a link back to this blog post? We would sure love it if you did! 
  • We’ll accept entries up until Thursday @3PM EST and will announce the Power Peeps of the Week next Friday for our Peep of the Week post.

WITHOUT FURTHER ADO, OUR PEEPS OF THE WEEK!


We found this beauty over on the Splitcoast Stamper Power Poppy Gallery! Take a look at this beauty from DJ Rants using Power Poppy's Sunny Harvest set! I just love all the little extra DJ added to make this one sing! The texture from the embossing folder and die cuts -- OH MY! What fabulous coloring and fall colors too!

Excuse the brief interruption, but did you know if you use the keyword: powerpoppy on SCS, you automatically land in our Power Poppy Gallery? How fun is that?


Next up is this watercolor beauty by Barbara Walker using our digi stamp Geraniums! Who knew you could watercolor digital images? Well apparently Barbara did because she pulled off this stunning creation! You'll have to click on her name for a link to her creation -- she has some fabulous tips! I know I'll be using some of her advice in the near future!

Ladies, we can’t wait to add these beauties to the Power Poppy Peeps of the Week board over on Pinterest! And remember, if YOU plan to use Power Poppy stamps in a creation this week -- join in on our Power Poppy Peeps of the Week Challenge simply by linking up your creation below for a shot at winning a STAMP SET OF CHOICE! You still have time to enter, so what are you waiting for?

ANOTHER FUN TIDBIT! We do have a Power Poppy Peep of the Week Winner blog button if you are or have been a winner and want to “wear” this button on your blog with pride! Simply email us at bloom@powerpoppy.com and we’ll send that button right to you! 

Want to see some of the latest eye candy, courtesy of the Bloom Brigade? You’ll have to hop on over and see...

Allison Cope
Christine Okken
Julie Koerber
Leslie Miller

Be sure to leave these fine ladies some love in the form of a comment, link up your Power Poppy creations below and we’ll see you all back here soon! 

~Julie


Wednesday

A little art therapy with my coffee

http://powerpoppy.com/products/sunny-harvest

Well, hello there!

Did anyone else see this news flash about how coloring has been found to help relieve stress in adults? I saw the article from the Guardian posted on Facebook the other day and thought, HECK YEAH IT DOES! This groundbreaking phenomenon could have been revealed years ago if the researchers had been following the papercrafting community. Coloring: It’s Cathartic. (Can I get that made into a bumper sticker?) This morning I took my coffee with a little cream, and a side of stamps and watercolors. I feel better already!

I have a bunch of big deadlines this week and just realized that my kids have the next two days off school for parent-teacher conferences. This gives me a fair bit of worry, just wanting to be sure I get everything to my clients on time, getting your orders filled (I made sure I was all caught up on that first thing, ahem!) along with getting to the soccer game tonight, the grocery store, the bank, swap out loads of laundry, etc, etc. We’re all juggling stuff like mad, and wanting to be present with our families — living in the moment! Girl, it can take it’s toll on the old psyche.

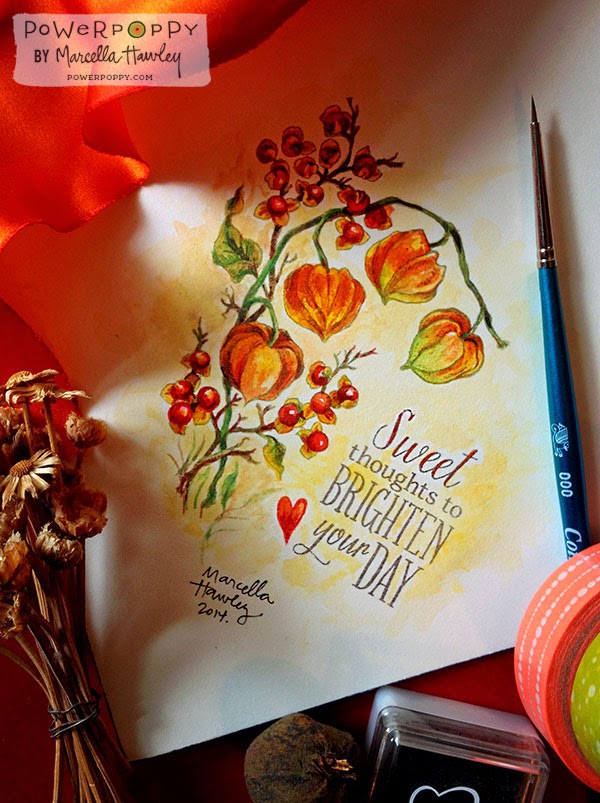
Well, I plan to check a number of items off my to-do list today, I promise. But I wanted to share my “art therapy” from earlier this morning, seizing an opportunity to just COLOR. The image I used is the Chinese Lanterns and Bittersweet stamp from my Sunny Harvest stamp set. The sentiment is from my Farmers Market set. While the leaves are changing outside and we plan to go punkin’ pickin’ this weekend, I thought it was only fitting to color up an image with some fall flair. It will be perfect to give to my mom and step-dad, whose garden is laced with Chinese Lantern (Latin name is Physalis alkekengi, also called Winter Cherry, you’ll see why in a second).


This is an old photo, but I love it so! My mom gathered up armfuls of these puffy pops of color and brought them over to help decorate for Lulu’s first birthday party (11 years ago — ACK!). She even put them in a pinky-red transferware pitcher. (Read here for more about my beloved mom and her transferware.) I had a theme of orange, hot pink, and white, and we had real orange and magenta paper lanterns hanging from the ceiling... bouquets all over the house. I must’ve had more energy back then, because even thinking back to decorating for the party I feel kind of tired. Where’s that coffee again... I might’ve accidentally used it for my water cup when I was painting....

This year my folks’ Chinese Lantern crop wasn’t quite as bountiful (it can be very invasive in a garden, and they had a horticulture/landscaping student come and clear out some overgrown areas), but I popped over recently and my mom and I found several surviving plants. It’s so fascinating to me how they can go through such a wonderful metamorphosis! On this visit, I found examples of some fresh green, papery “lanterns”...


And then another several stalks were that vivid deep orange color that is simply breathtaking! (Seriously, you might need to take a step back from your monitor because it is so awesome.) Look how the orange even bleeds into the bright green stem! I didn’t notice that earlier when I was coloring, and now I wish I’d done the stems that way. Ah well, it was supposed to be cathartic, not botanically correct. :) 


And lastly — and oh baby this is good — the papery “lanterns” dry to reveal the fruit inside! These will last for months and months after the summer, hence the nickname Winter Cherry.


I hope I’ve given you some jolts of color to inspire you today, and maybe just the nudge you needed to have an “art therapy” session of your own.

Have a good one!

Monday

Pick a Piece of Patterned Paper Please!

Power Poppy paper piecing tutorial Poinsettia

Hello everyone!  Welcome to another fun and fabulous Inspire Me Monday!  I'm Allison Cope and I'll be your hostess today.

Have you had a chance to check out all of our amazing new Happiest Holiday stamp sets yet?  Well if you haven't, take a gander at these!  Four amazing new holiday inspired stamp sets all waiting to be added to crafty stash, for you to begin the process of creating your holiday cards.

Now don't get me wrong, I LOVE colouring with my Copic Markers but sometimes I like to shake it up a bit.  Sometimes I like to pull out some fun patterned paper, from both past and present, and just have fun cutting and playing with them.  Fussy cutting is my therapy.  These patterned papers aren't just for behind all your gorgeous stamped images... oh no!  Why not use these beautiful patterns to accompany your stamps!  Yup... this technique is called PAPER PIECING and that's the process I'm going to share with you today!

I couldn't resist pulling out the brand new "Poinsettia" stamp set and getting started!  This stamp set is PERFECT for this technique.

1.)  The first step was to stamp the whole entire image onto some cardstock.  I chose to stamp it on a rustic cream cardstock that has all kinds of cool unbleached paper fibers showing throughout it.
Power Poppy paper piecing tutorial Poinsettia

2.)  Next I chose to colour in the tiny pomegranates and the pine boughs with Copic Markers.  (I know, I know... I used some markers! :) Told ya I loved to use them!)  I thought it might be easier to colour them instead of paper piecing these guys.
Power Poppy paper piecing tutorial Poinsettia

3.)  Next I stamped my image onto some teal and cream almost checkered paper.  I accidentally didn't get all of the image to stamp properly but that's okay, it'll still work because the area that's not quite clear will be covered by other patterned paper pieces.  I carefully cut out my poinsettia. 
Power Poppy paper piecing tutorial Poinsettia

Notice the leaf at about the 10 o'clock position?  It's not entirely cut out on it's lines because I'm going to put more paper over it.

4.)  Then I grabbed another pattern and stamped my image on it.  This was a paper with snowflakes all over it.  I fussy cut or hand cut out less leaves around the outside of the flower this time.
Power Poppy paper piecing tutorial Poinsettia

5. )  I grabbed another kind of patterned paper again, a solid teal paper, stamped and then fussy cut out more towards the center, only the smaller leaves of the poinsettia this time.
Power Poppy paper piecing tutorial Poinsettia

6. )  And finally, I grabbed some of the same cardstock as my base poinsettia, stamped, fussy cut and coloured the center of the bloom with a yellow marker.
Power Poppy paper piecing tutorial Poinsettia

Once the center was glued on, I backed it with a die cut stitched circle and put it on my card base.
Power Poppy paper piecing tutorial Poinsettia
 Supplies:  Stamps, Power Poppy (Poinsettia);  Patterned Papers, (BasicGrey (Aspen Frost, 25th & Pine), KaiserCraft (Christmas Carol);  Cardstock, Stampin' Up!, Flourishes, Papertrey Ink;  Ink, Memento (Olive Grove), Copic Markers (BG72, R02, R11, R12, Y15, YG93, YG95);  Lace, Stampin' Up!;  Die Cut, MFT (Stitched Circles);  Other, thread.

The patterns are subtle but it make that poinsettia unique and beautiful... especially in it's teal blue shades!

If you like the poinsettia paper pieced from the "Poinsettia" stamp set, well then you'll love the stocking too!  Check out my paper pieced stocking card right here.

Thanks for joining me today!  Happy Thanksgiving to all of my Canadian stamping friends out there today!  Happy stamping, cutting and pasting everyone!

~  Allison Cope ~