
HELLO ALL! Julie here to share a few little projects to get you ready for the gift-giving season! I know we're just celebrating Halloween today but you can never be too prepared for the holidays, can you? ;-)
Because all of us seem to see time as a precious commodity when the holiday season rolls around, I thought I'd do a round-up of easy to create gift card holders that you can do in a jiffy and have on hand. My niece and nephews are all young adults and sometimes, buying for them is, well, almost impossible! So, I like to surprise them with a little shopping spree i.e. a gift card!
SO GET READY FOR 3 EASY WAYS TO
PACKAGE UP GIFT CARDS!

GIFT CARD HOLDER 1: This little number has an element of surprise involved. Tug on the snappy little ribbon and... Voila! There's the gift! (I'll show you how this "reveals" itself a little later on!)

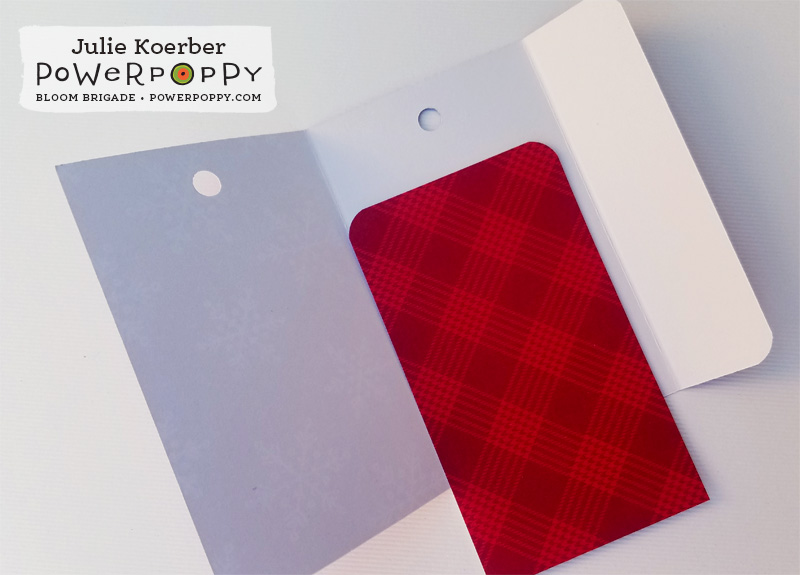
Start with a 4" by 6" piece of patterned paper, score it along the longest side at 2.5" and at 5" so that you have two 2.5" panels and a 1" overhang. After you score and fold, punch a hole in the center of the two 4" panels like I did below. Punch both at the same time by folding the two sides over on each other. That way, the holes will line up perfectly! ;-)

You'll now need to create the paper that serves as the holder for your gift card. It measures 2-3/8" by 4". Feel free to round the corners as well if you like!
Take roughly 15" to 18" of ribbon and string through the inside left and inside right of your sleeve, just like this...

Tie this at the top in a slip knot to secure. This ribbon will hold the gift card slider in place! Now it's time to deck this baby out! I used Power Poppy's Holly Golightly stamp set and colored and cut out the holly tag with one of the sentiments in the set.
And this-- below-- is what your gift card slider looks like when you pull up the ribbon! It just slides that little gift card right to the top! To adhere your gift card to the piece of paper that will slide up and down, just use a couple of glue dots. Make sure that you don't adhere the glue on the magnetic strip. I have no idea if that might impact the use of the strip!!

GIFT CARD HOLDER 2:

This next gift card holder is one that you can add to a package or string around a card. If you have a tag die cut or some shipping tags, it is even easier to create! I made mine using some holiday tags that I had on hand. They look a lot like shipping tags, so you could deck out a shipping tag just the same. I mixed it up and used two tags sandwiched to have two contrasting sides of decorative paper! When it comes time to gift this little number, I'll be sure to check the "nice" box! :-)

Now, this part requires some measuring. Measure the width of your tag and then add an inch to that number. Now, make a square using that number. So, if the width of your die is 3" make a 4" square. Score 1/2" in on the left side. This will be used to create your pocket on the tag. Cut a diagonal across the scored square. Don't go corner to corner, this diagonal will serve as your gift card pocket. See?

Put some adhesive on the printed side of the flap, fold over and secure to the wrong side of the bottom tag. Just like this...

Now, put the other decorated tag on top and using a little glue, tape the other edge and bottom to create your pocket.

JUST A NOTE: There will be a little overhang on the right side of your tag. There's supposed to be! I knew that I would rather cut off a little than to fall short! I accented with a piece of sparkly washi tape but you could accent this diagonal using a border punch or die as well! Your piece will end up looking like this....

From here, deck out your tag and... you are ready to give this one away! Here's one more look at the finished project. You can see that I used Action Santa to make this little tag gift card holder and decked it out with some snowflake sequins adorned with rhinestones. Oh, and that little jingle bell at the top? It really jingles!
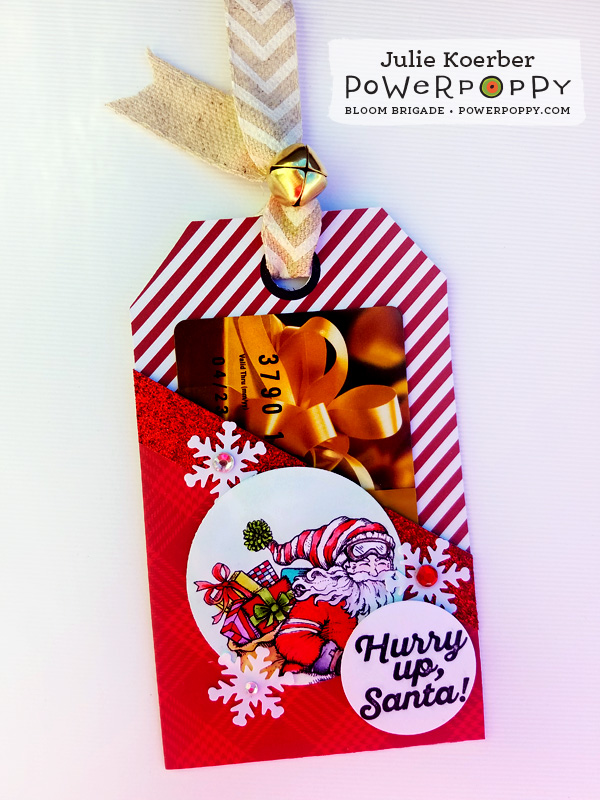
And here's a close-up of the little Copic colored Santa! Even though this little Santa is skiing in the Action Santa set, I wanted to diminish that to make it just about Santa for this creation, like he was busy making a special delivery! I cropped him down a bit and despite the fact that he's wearing ski googles, I love it! I mean, he rides in an open sleigh, he might need ski goggles! ;-)

GIFT CARD HOLDER 3:
This gift card holder could NOT be any easier! A few scored folds, a cut-out slit and bam, you've got an easy gift card jacket! To start, you'll need an 8.5" by 4.25" piece of card stock that is scored at 3" and 6.5" on the longest side. You'll also need a 4" by 3" piece of card stock. Grab a ruler, a tape runner, a craft knife and a 1/2" circle punch,
Start by lining your ruler up on the 4" by 3" piece of card stock and creating two parallel 3.5" long lines. I did this on the back side of my printed paper so that I could actually see the lines....

Using the ruler as your guide, cut these lines with your craft knife. Remove the slit that you made by snipping off the strip on the two short sides and then, using a 7/8" circle punch (mine was scalloped) half punch the circle from the lower portion of your slit, like this...

Being careful not to travel too far into the center of your 4" by 3" piece of paper, add tape to the extreme edge and secure to your folded notecard, like so. See how nicely that gift card fit? It's snug as a bug in a rug! ;-)

If you like, you can add a decorative border to the top of your fold for a little extra pizazz! I used a Spellbinders border die and while the die was still on, I used the die to add some accents with white gel pen! In the photo, it looks like there is an open scallop,but really, that's just a drawn on accent!

Now all you need to do is deck out your creation and... slip that little gift card inside the slit! I added some sheer polka dot ribbon, some silver cording and the tag was done thanks to the Holly Golightly stamp set. I inked up the center portion of the sentiment using a Cottage Ivy Memento Dew Drop ink pad, wiped off the excess ink from the scripted part of the sentiment and then used a Love Letter Memento Dew Drop ink pad to ink up the top and bottom! If I was really thinking, I would have jazzed up the tag with a shaped die cut or something a little more fancy. This one truly is sweet and simple!

Well my sweet stamping friends, I sure hope that you enjoyed these little ideas! They are super simple and, as a result, super fast to boot! If you do give one of these a try, I'd love for you to share a link so that I can see just how cute yours turned out!
Have a fun and crafty week and... HAPPY HALLOWEEN!
~Julie
14 comments:
Oh, I love these gift card holders! Beautifully designed!
These card holders are lovely! Gotta try them!
Awesome ideas!! I love each of them! Thanks for the great tutorials, a must do!! Joleen
EPIC EPIC EPIC!!!!! Julie Koerber for the win! I'm so inspired, I think I'll be making these too!! Thank you, Jules.
Super cute gift card holders.
Oh I just love tags and gift card holders, and stamping and ink lol These are fantastic and look delightful (and easy) to make! Niiiiice!
Beautiful tags!! Love the different ways to make gift card holders!!
-Berina
Moxie Craftie
Beautiful tags Julie, I'll have to try some of these.
Thanks for the nice words everyone! These were super quick and super fun to make! Hope you try them too! :-)
Well, I am finally reading this WONDERFUL Inspire Me Monday post! WOW! Julie, you totally rock, and I love each one of these fabulous gift card holders! And I love the step-outs and the measurements. These area beautiful and sweet and seem easy. I really love them all! Thanks, sweet friend for all this work to explain and share. Woohoo!! Hugs! xoxo
Awesome projects!! Thank you so much for the measurements - this helps so much! These gift card holders are so awesome!
These are terrific! Your instructions are so well written that I'm sure I'll be able to make some to give this Christmas...filled with gift cards, of course!
Such CUTE and useful ideas Julie! Awesome tutorial!
So glad that I came back here. I missed it when it originally posted. I will be trying some of these lovely gift card tags. Thanks!
Post a Comment