Tuesday

Creative Confetti: Free for All!


Hello all and Happy Tuesday! We hope that you are all ready for the holiday and are now just sitting back, basking in the glow of it all! With the holiday and New Year upon us, we wanted to wish you all a blessed time surrounded by everything and everyone you love!

Because this is a time for family, Power Poppy will be taking a break. Look for new posts, fresh content and even more surprises coming your way after the first of the year! Creative Confetti will make its comeback Tuesday, January 7th! 

Until then, it's a.....


HOW TO PLAY: All you need to do is create using Power Poppy stamps! And, I'll go one step further -- why not cue up one of our past Creative Confetti challenges! You can go back to the very beginning if you like! If you do decide to do this -- make sure you add a link in your post showing us which one you decided to give a try (again!)

I wish I had a sample to share this week but it's been a bit of a crazy train at my house. In the midst of the hustle and bustle, I ended up getting the flu. So, no creative time for me this past week. 

On a happy note, I hope you do have some creative downtime in between doing all the fun holiday things, eating your favorite goodies and visiting with your favorite people! Have a little Free for All and after you're done, just link up your creation below so we can all see AND so you can have a shot at winning a $25 gift code to the Power Poppy Shop!

JUST A LITTLE NOTE! Because we are taking a break, the linky will remain up through January 6th and we'll announce a winner on the first challenge of 2020 on January 7th! 

Thanks so much for stopping by! Merry Christmas to YOU!

~Julie
Creative Confetti Thrower

You are invited to the Inlinkz link party!
Click here to enter

Monday

Inspire Me Monday - Let's Chill!


Hello Power Poppy Fans! I'm Nancy Sheads from the Bloom Brigade here with this week's edition of Inspire Me Monday.

Two days until Christmas! If you're like me (and I suspect many of you are), you are scrambling madly to get everything done before the holiday. And although I vow every year that I'll start earlier, I'm still making holiday cards so I'm looking for images that I can color quickly.

So today's video features this adorable snowman from the Let's Chill Digital Stamp Set and a simplified color palette to get the job done.  


Although this card will probably go out in my Christmas mailing, I often use a snowman image for a variety of occasions such as a winter birthday, get well or thinking of you cards. So don't tuck away your snowman images on December 26th! Pull them out and enjoy them until the snow melts.

Ready to color? Let's get started!


STAMP

Let's Chill Digital Stamp Set

COPICS USED

BG000, B91, BV000 (snowman)
B91, B93, B95, B97, C1, C3, C5 (scarf)
Y35, YR04 (carrot)
C1, C3, C5 (buttons)

Be sure you check out my Power Poppy coloring videos on YouTube.

Thanks for joining me today! Happy holidays!

~ Nancy 

Friday

Come see what the Bloomies have made...


Merry Merry, everybody! We’re keeping it short and sweet on the blog today — as we are in the throes of Christmas prep, covered in glitter, and pounding egg nog by the quart. I’ve gotten my house in holiday order, amaryllis bulbs are sprouting, I’m stitching fun velvet and linen stockings for the kids that will go in that blank spot up there on the mantel... life is good.

Also, I’m working on a special newsletter highlighting the last several projects created by our designers — they are CAN’T-MISS COOL! Be sure to keep an eye out in your inbox...

Speaking of things you cannot miss... check out the newest cards by the Bloom Brigade:


Tuesday

Creative Confetti: Mad about Plaid!


Hello all and Happy Tuesday! And... happy 8 days before Christmas! I hope you have cookies in the oven and sugar plums dancing in your heads! ;-) Since there is such a hustle and bustle this time of year, I thought I would make this week's Creative Confetti, super dooper easy for you all to play along! Ready to see what I have in store? 


HOW TO PLAY: I don't know about you but I think Buffalo check plaid is about the hottest thing this Christmas season and I have loved seeing it play out in decor! From tree accessories to tree skirts to wrapping paper and ribbon. Heck, some are even decking out their entire tree in the theme! It is everywhere! So, I thought, why not add a little plaid to our cards? Keep in mind, you can use ANY style plaid that you have in your stash, no need to match the buffalo check above! So, let's see what you can whip up and show us all how you are Mad about Plaid!

On to my creation! 

While I didn't have buffalo check plaid, I did have this sparkly plaid that looks a cousin of that check print! I thought it looked super cozy with the image I chose from Power Poppy's Cozy Cupfuls stamp set. I stamped using Tuxedo Black Memento ink and then colored my image up with Copic Markers sticking with vibrant reds (R32, R35, R37) kraft colors (E51, E53, and E55), shades of gold (Y21, Y32, Y35 and Y28) and then touches of green (YG61, YG63, and YG67). I did add some shading with R0000 and R00 on the top (which you can barely see in the photo) and BV00, BV000 on the bottom. Add a strip of kraft paper, some fun ribbon and a little popped up sentiment and... done!

Here's a little close up for you! As always, Christmas cards need a little glitter! ;-)


And that, my friends is it! Let's see you get "Mad About Plaid!" and see what fun you can craft with this bold pattern as a backdrop or accent on your creation! And, as I mentioned, when you're done, just link up your creation below so we can all see AND so you can have a shot at winning a $25 gift code to the Power Poppy Shop!

Thanks so much for stopping by! Hopefully, we'll see you back here real soon! ;-)

~Julie
Creative Confetti Thrower

You are invited to the Inlinkz link party!
Click here to enter

Monday

Inspire Me Monday - Combining Digital Images


Hello! This is Gloria Stengel, one of the NEW Instant Gardeners! I have the privilege of bringing you the Inspire Me Monday project this week! I hope you had fun during our Christmas Remix Hop! I sure had fun coloring the new images! And, congratulations to all the prize winners! 

Now that you have lots of new digital images to play with, I wanted to show you a few ideas for combining them to make "new" stamps! To learn how to work with digital images, please review Julie's amazing post HERE. (I have used Photoshop Elements to create my new images.)


To create this lovely combination stamp you will need three images. I used the wreath from Wreath: Boxwood and CranberryCandy Cane Classic (which is only $1), and a sentiment from Twinkling-Eyed Snowman (any sentiment will do).

Open all three images in Photoshop Elements (or a similar program). Follow the directions HERE to erase the white backgrounds. Save each transparent image as a new file name.


Place the new, transparent wreath onto the work space, then size and crop as desired. 


Drag the new, transparent candy cane image onto the page (or use the FILE, PLACE feature). The candy canes will overlap the wreath as shown. 


Drag the sentiment into place. Save your NEW creation and print!


Color your image and create a card or tag! I printed my image at 5" x 5" and created a simple 6" x 6" card. I colored the image with Copic markers, which made it color up quickly! 

Once you get the hang of working with digital images, you can create lots of new images. Like this one...


To create this wonderful coloring page, I combined the watering can and branches from Country Home Christmas with several other images and a sentiment to create this lovely decorated branch.


Open the image and delete the white background by following the process HERE. Size the image as desired. (Some images are already on a transparent background, but many image files are JPG files with a white background.)


Open the Glittering Glass Santa image, then remove the white background. Use the eraser tool to erase the tree branch.


Place the altered Santa image onto your branch image, size and position as shown above. If your altered Santa image is in the Photo Bin at the bottom of the screen, you can simply drag him into position, then size him accordingly.


Continue to add elements until you are happy with your NEW image! I added the pinecone bauble and the tiny pumpkin bauble from the Forest Finds stamp set. (To see the Forest Finds image colored, check my blog HERE.)

I also added the ornaments from the Acorn Ornaments stamp set to the branches. After I erased the white background, I rotated and resized the ornaments to fit my tree branch.

The final touch was adding the sentiment from the Winter Flora digital stamp set to the bottom of the new image.


I printed the NEW image at slightly smaller than 8 1/2" x 11" to make a full-sized coloring page! It would be tons of fun to pass out coloring pages to all the little ones during Christmas events, or to have a coloring challenge with adults! You could print this in a smaller size to make greeting cards. The sky is the limit!

An easy way to alter digital stamps is to add your own text to the image.


I personalized a stocking image by adding my name to the stocking from the Joyeux Noel Stocking digital stamp set. You simply open the digital stamp with Photoshop Elements, click the text tool and add your text! Text can be sized and rotated. You are only limited by the fonts on your computer!


You can make a cute set of tags with this technique!

Thank you so much for joining me on this digi stamp adventure! If you'd like to see more of my work, please visit my blog, Scraps of Life

Until next time, have a Merry Christmas and a most Blessed New Year!
Gloria Stengel

Friday

It's Friday! Ready for some Good Vibes?


Hello Power Poppy Peeps! It's been a while since we've ushered in a Friday with some Good Vibes but since we are officially 12 days until Christmas, isn't today a grand day to share some heart-warming tidbits?  We think so! So... grab a cuppa joe (or your favorite warm winter beverage), settle in and take a gander at some goodness!


First Up.... The Bloomies and Instant Gardeners have been prolific with their Christmas creations lately! You can almost see the paper fly and those fingers get inky! There were some goodies shared this past week that I thought I'd re-cue, just in case you missed them!

Broni created this delightful snow guy in soft and sweet colors using Power Poppy's Twinkling-Eyed Snowman, a new digital stamp set.


Barb went a little dreamy with these darling chickadees and that super fun backdrop that looks like snow. I just love that! She used Power Poppy's new digital stamp set My Little Chickadee and worked some digital magic to flip the orientation a bit.


And Gloria packed a visual punch with this vibrant coloring using Power Poppy's Forest Finds digital stamp set! 


So, if you still need to make a few cards as Christmas creeps closer, I hope this trio gives you just the right kind of inspiration to get creating!

So, if those are three good vibes, this fourth vibe might just make you squeal! Did you read about the new addition on Marcella's IG or Facebook? Okay, wait for it....

MEET RUDY! The Power Poppy Vice Pup in Chief! 


Can you even stand it? I mean, look at that face? He is so freakin' adorable!Marce inherited this little bundle after one of Doug's uncles couldn't care for the little guy. So, they stepped in and adopted him.

And, we all know you know Mr. Tibbs. Wait until you see the two Power Pups together! Sigh... it's just too much!


With those eyes looking back at me, I honestly have no idea how Marcy gets anything done during the day. I would just want to play with those guys day in and day out! They say looking at pictures of puppies increases your endorphins -- you know, those super hormones that deliver happiness? So.... you're welcome! ;-)

And moving on to our last good vibe for the day! I thought, if you still needed a great recipe for that cookie exchange you still need to bake for, never fear! I just might have one for you! Check out this little bit of delish!


These Spritz Cookies are my go-to! they are kind of like a little shortbread base with cream cheese frosting and a bit of crushed candy canes. They are delish! So, I thought I'd share the recipe!


SPRITZ COOKIES
~makes 42 cookies

1 c. butter
¾ c. sugar
1 egg
2 t. almond extract
2-1/4 c. sifted all-purpose flour
¼ t. salt
½ t. baking powder

DIRECTIONS:
Cream butter until soft. Add sugar gradually, continuing to cream until light and fluffy. Add egg and almond extract; beat. Sift flour, salt, and baking powder together, add gradually in three stages, beating well after each addition. Chill dough 10 minutes. Make into rolled balls, then pat into the desired shape. Bake 8 to 10 minutes in an oven preheated at 400 degrees F. Add cream cheese or sour cream frosting and top with crushed candy canes.

So, with all that sweetness....


It's time to hop on over to these fine ladies to see what they've whipped up for you this week!


On that creative high note, we hope you have an amazing, creative and festive weekend! Be sure to tune back in to the Power Poppy blog on Monday when Gloria Stengel will be in the house sharing some tidbits on how to combine digital images. I saw some snippets of her work in progress and my jaw dropped. I actually said, "Now, why didn't I think of that??" This is one Inspire Me Monday you won't want to miss!

Until then, happy stamping!
~Julie 

Tuesday

Creative Confetti: Nature's Christmas Colors

Happy Tuesday everyone! Are you ready for a new Creative Confetti Challenge? I'm Lisa Johansen and I'm back to get creative with you all again!

I love Christmas and everything it has to offer but I'm pretty traditional and usually use a lot of red and green on my holiday projects. I need to push myself to break out of that mold and try different color combinations and that's how this weeks challenge came about.


HOW TO PLAY: Use the colors in the graphic above -- nautical blue, evergreen, and silvery gray -- to create a Christmas project! Maybe you are inspired to create a snowy night scene with one of the newly released digital images? Perhaps the dark green makes you think of a beautiful Christmas tree? Whatever Christmas adventure these colors take you on, make sure and link up your creation using the linky below and you'll be in the running for a $25 gift code to the Power Poppy Shop! The link is LIVE all month long, meaning, the more you play, the better your chances!

On to my card....


For my card I used the Bough Wow Wow clear set. I just love this set and 2 the different boughs in it. I went with the bough with the ribbon and mittens on it, as that is totally something I'd have hanging on my front door!

Blue and green are actually my favorite colors, I just don't generally use them together for Christmas. For this image I decided to make the mittens blue, the ribbon gray and of course I colored the greenery with my green markers. I did add a small pop of red with the heart but you can see that blue and green are the primary colors. I also used silver Stickles on the fuzzy snow puffs to add some more gray to the mix.

I'm excited to see what everyone does with these colors but most of all, just have fun!


BEFORE I LET YOU GO, HERE'S A QUICK NOTE FROM JULIE!

With all the excitement in last week's Christmas Remix release, I plum forgot to draw a winner for November and put up the new linky! Sheesh! Sorry about that peeps! The new link is below! Please note, since December 31st falls on a Tuesday, I'll open the January link up a day early and announce the winner then! 

Moving on to November's winner! After all the entries were thrown into the virtual hat, Random.org drew.... 

And that means the winner is.....

**** NICOLA GOLD! ****

And check out her beautiful creation based on the sketch challenge we ushered in last month! Her coloring is divine using Power Poppy's Candy Cane Classic!


Nicola, in order to claim your $25 gift code to the Power Poppy Shop, all you need to do is email us at bloom@powerpoppy.com and we will go ahead and get that winning code right to you! 


Thanks so much for playing along everyone! We can't wait to see what you whip up this month! 


You are invited to the Inlinkz link party!
Click here to enter

Monday

You Can Make This Glittery Village Slider Card!


Ho, ho, ho and Merry Christmas! This is Catherine Anderson, one of your new Instant Gardeners.

Are you all stocked up on Power Poppy stamps after our fabulous Christmas Remix? Wow, what a flurry of artistic designs that was! Sales, giveaways and surprises galore highlighted the release of spectacular new images, holiday favorites in digital format, and a glorious clear stamp set!

But there is one thing that is even more thrilling for colorers than buying new stamps...we love using them! So grab your Copic markers, colored pencils and Distress Inks. Today I am going to show you how to make your very own version of my Glittery Village slider card!


You will need:

Glittery Village digital stamp (printed at 165%)
Christmas Corgi digital stamp (printed at 100%)
Grandma's Snowflakes clear stamp set (for the sentiment and embroidery motif)


Hint, hint! These stamps are so adorable that you've probably already bought them, but if not, here's a little secret...Marcella currently has 20% off all holiday designs.

WOOHOO!

Two of the images for this card are digital, so if you shop fast, you can be merrily coloring within the next five minutes!

My finished card is 7 1/4" x 8 1/2"...a bit larger than A7, but with so much detail, you will be very glad to have a little extra room to move.

I used Cryogen Curious Metallic 89# cardstock in white. It is perfect for multimedia projects and has a subtle sparkle that makes holiday cards extra special! 

With a 1 5/8" circle die, cut a moon shape from "X-Press It Mask It" or some other masking film. Then mask the entire village area before applying regular Distress Ink in "Stormy Sky" and "Weathered Wood." Lightly spritz the background with water and pat dry after 20 seconds.

Before removing the mask, spatter the sky with thinned white and metallic gold acrylic paint for a shimmery mix of stars and snow!

Remove the masks.


Would you like to take your artistic coloring to new heights? Combine Copic markers with colored pencils! I learned this from Amy Shulke at Vanilla Arts and it is a match made in Heaven!

Compare the difference for yourself...the first photo is marker only:


 The second photo shows the village enhanced with Prismacolor pencils: 

         
Ah-hh! See the depth and richness that this extra step makes? Totally worth the effort!
kkkkk


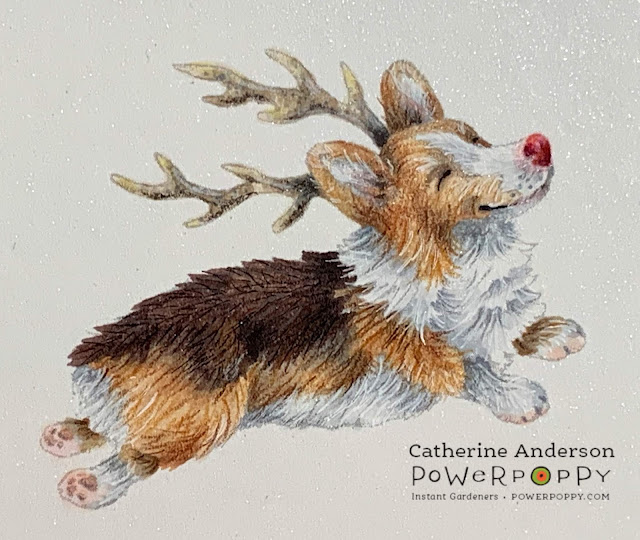
What good is a canine delivery service without dog treats? Draw some simple 3/8" bone shapes on scrap cardstock, color and cut out. Seven was too many; five is enough.

Draw a couple of bones on the ground of the village. Color.


Print another copy of the Christmas Corgi the same size on inexpensive cardstock. Cut inside the line so that the image is slightly smaller than your colored version.

Cut three strips of clear cardstock (1/8" x 2 1/2") to act as invisible supports for the dog treats. Arrange them at various lengths, shortening strips as necessary. Once satisfied with their positioning, glue these strips to the back of your colored corgi.

Give your dog image extra stability by gluing the slightly smaller cardstock template to the back. This is especially important for those delicate antlers!


Cut the Glittery Village image down to 6" x 8 1/2" so it will fit through your die cutting machine.

A clear quilting ruler is your new best friend for getting metal dies lined up perfectly! Attach the die with low-tack washi or painter's tape.

TIP: Always stick the tape on your jeans or sweater a few times to make it less tacky. The last thing you want is for the tape to accidentally tear your beautiful coloring!


Now, this is the scary part! Run your project through the die cutting machine. Ouch! It hurts to cut something that you've just spent so much time on! Keep the end goal in mind...


Putz houses, the inspiration for Power Poppy's Glittery Village stamp, were little cardboard buildings purchased in dime stores during the 1940s. They were covered in glitter, so to keep mine authentic, I added a coat of clear "Wink of Stella."


This is a large card and will need to be very sturdy to support the slider mechanism. I wanted to add a decorative cardstock border to the top and bottom anyway, so cut my pieces large enough to glue the excess behind the image for stability.

By the way, this border cardstock is Cryogen Curious Metallic in "Lustre." Isn't it GORGEOUS? All the colors in that line are off the charts for beauty.

Measurements for the top and bottom borders:
Top: 1 1/4" x 8 1/2"
Bottom: 4 1/2" x 8 1/2"

Glue these to the back of the card front, making sure that you leave 3/4" of the border cardstock showing above the front of the image at the top, and 1" showing below the bottom. 

NOTE: Leave space around the die-cut area in order for the slider to move effortlessly. 


Measurement for the back cover of card and front cover liner:
Cut three pieces of Neenah Solar White cardstock (#110): 7 1/4" x 8 1/2"

Glue two pieces together as the card front is heavy and will bow the back cover if not reinforced.

The third piece of Neenah cardstock will be a liner for the front cover. Place the Glittery Village cover on top of this liner, then trace the opening for the slider. Mark where the moon will be.

Quickly add some Distress Ink for the sky and the same colors you used for the moon. Don't fuss...this is simply to prevent white paper from peeping through the slider hole.

(Front Cover Liner)

Then, glue the strip leftover from die-cutting your village scene to the traced lines on the liner. 


Edge the backside of the cover with THREE layers of 3M foam tape. Make a separate 5" strip of three layers and cut down the length to create three skinny strips. These are what you will use to line the outside of the slider hole.

Glue a 3-layered strip to the back of a penny.

NOTE: Leave enough room for the penny to be able to pass through this slider area without getting stuck.

You could use more foam tape as filler for where you see the black areas below, but it was cheaper to just glue together layers of fun foam instead. That foam may be a different height than three layers of the 3M tape. Make the heights as similar as possible. I used two layers of fun foam glued onto two layers of 110# cardstock.


Remove backing from the foam tape strips and add glue to the fun foam. Carefully line up the bottom of the card with the cover liner. Press the two together. Make sure that the penny stays in place. 

Note: I didn't add extra glue to the foam strips in this step, but doing so would have given me some wiggle room in case I had gotten the cardstock liner a little skewed. Tape alone will grip immediately and then tear the liner if you try to shift it.


Score two lines down the length of the top piece of Lustre cardstock at 1/4" and at 1/2". This card is extra thick because of the foam tape, so this "hinge" will allow it to fold perfectly. Glue your doubled piece of white Neenah cardstock to the back part of the hinge, as shown below.


Trace a mat from turquoise glitter paper that is slightly larger than the sentiment. Then add a piece of fun foam between the two layers to give your greeting extra POP!


Glue the corgi onto the penny. The foam strips already have an adhesive backing, but since this area will take the most stress, an extra dab of glue is a wise precaution. 

Glue small patches of white Prills and iridescent glitter onto the ground. Don't glue any Prills to the snow on the rooftop as this will prevent the slider from moving smoothly.


I added four pom-poms to the front of my card. They add such a cheery candy store vibe to the little Putz village, so I couldn't resist. However, pom-poms make mailing the card a wee bit more problematic. 

If you must send your card by post, be sure to secure the corgi. Move him to one end of the slider, then place a 1" x 16" paper band beneath his paws and tape it together on the back of the card . This will prevent damage from your little dog sliding unnecessarily during transit.

Without Pom-Poms

Ta-da! The finished card!

With Pom-Poms

Thank you so much for joining me on this creative adventure! If you'd like to see more of my artwork, please visit my Carde Diem Studio blog or Instagram.

In the meantime, keep a watchful eye on the sky this Christmas Eve. I heard rumors that Rudolph the red-nosed reindeer has been reassigned to candy cane production and Marcella's corgi, Tibbs is taking over delivering treats. So listen carefully! If you hear, "Meowy Christmas and Yappy New Year" just smile and know that it's Tibbs.

May the Lord bless and keep you!
Catherine


Supplies For This Project:

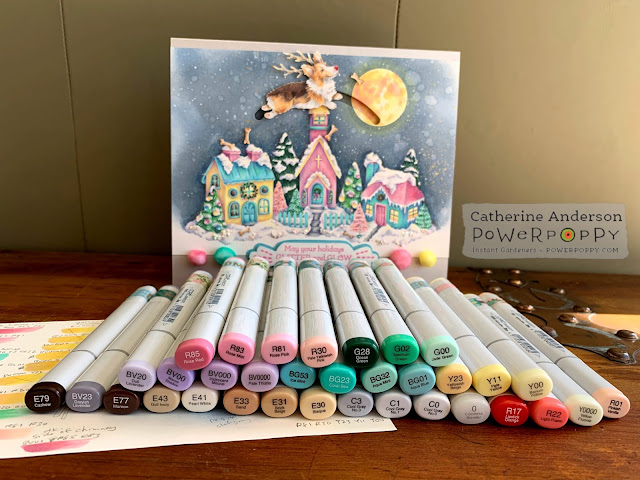
Copic markers in the above colors.
Prismacolor Pencils: 

PC901 Indigo                                       PC1008 Parma Violet                 PC1026 Grayed Lavender
PC1076 90% French Gray                   PC928 Blush Pink                      PC912 Apple Green
PC1088 Muted Turquoise                    PC936 Slate Gray                       PC938 White
PC1011 Deco Yellow                           PC905 Aquamarine                    PC995 Mulberry
PC1072 50% French Gray                   PC931 Dark Purple                     PC122 Permanent Red


Staedtler Triplus Fineliner Pens:

Dark Emerald Green (for stippling bottle brush trees)
Light Pink (for stippling bottle brush trees)
Black (outline for stained glass windows on church)


Distress Inks (regular, not Oxide):

Stormy Sky
Weathered Wood


Acrylic Paints (I used Golden Fluid Acrylics):

Titanium White
Iridescent Bright Gold (Fine)


Cardstock and Masking Film:

Cryogen Curious Metallic 89# cover in White
Cryogen Curious Metallic 92# cover in Lustre
Neenah Classic Crest cover 110# in Solar White (doubled and used as a card base for strength)
X-Press It Mask It...low tack, matte masking film
Clear Cardstock from Heartfelt Creations (invisible braces to hold the dog treats)


Other Miscellaneous Supplies:

"Wink of Stella" brush pen in clear
"Prills" in "Mini Pearl"
Iridescent glitter (I used "Jones Tones Lazer Gems" in "Crystal Ice")
Clear drying glue
Scotch 3M 1/2" foam mounting tape (2 packages)
Sheet of Fun Foam
Craft Knife and Scissors
"Life Changing Blending Brushes" by Picket Fence
1 5/8" circle die (moon shape for mask)
Die cutting machine
4 Pom-poms in colors of choice (mine were approximately 1/2" and 5/8")
A penny
"Slide-On-Over Semi-Circles" die by Lawn Fawn
White water-based paint pen, extra fine point (I used Sharpie, but Posco is a good substitute)