Showing posts with label Photography. Show all posts

Monday

Inspire Me Monday - Photo Editing Part 2


Hello Power Poppy Friends!  It’s Christine with my monthly Inspire Me Monday Tutorial.  Today I’m back with Part Two of my Photography series looking at how to bring your card photos to life for online galleries and blogs.   Part 1 of this Series is found HERE.  Today we’ll be looking at Photo Editing, an important piece in showing off your hard work on-screen that you invested in creating a card.  

I’ll be showing you how I edit my photos in iPhoto because I have Mac computer.  It’s a free photo editing software program that comes with Mac computers.  There are much more sophisticated programs out there (like Lightroom and Photoshop), but I wanted to show you that you can still make helpful edits without using professional software.  If you have a PC there are other free programs you can use like Picasa and Gimp that can get you similar results.  When I had a PC I used Picasa, and I know that our own Ally is great with Gimp.  

So let’s start with a card I created with a combination of Power Poppy goodies;  I’ll show you step by step how I edit my photos to get them blog ready.  

The card was created with our new and amazing Flowering Branches digi (for the sentiment) and then I stamped around the sentiment with various Power Poppy polymer sets:  Daffodils, Dynamic Duos:  Peonies and Tulips, and Lilac Time.  It’s my own spring garden!  


Here is my photo straight out of the camera.  On my first part of this series I talked about how to make the most of your photography so you can check that tutorial for those steps.  I want to show you how I get it from this stage to blog ready with iPhoto.    

You can see by this photo that the background is still a little dark, the photo is slightly crooked, the card needs cropping and the flowers look a little washed out (not how the card looks in person).  My whole goal in editing is to make the photo look as close to how it is in real life  - on screen.  


First step....check the Brightness of your computer screen!  It seems so simple, but you can’t get a realistic representation of your photo if the brightness on your screen is too low.  Check on your computer how you can adjust the brightness.  On mine it’s on my keyboard, top left.  

Next - remember that on most software programs there is always a button to undo or restore your photo back to the original state, so if you make a mistake in editing you can just start again.  No worries.  


A lot of photo editing is also preference.  I wanted to make sure you hear that :).  Not everyone does or prefers things the same way, and you can see different editing styles by going to different blogs.  I’m going to show you some of my personal preferences.

I’ll be honest, one of my personal pet peeves is crooked photos.  It makes me get twitchy :)  So, one of my first steps after loading my photos is to straighten them.  At least one of my edges - either the top edge or the left edge is always straightened to align with the horizontal or vertical plane.


In iPhoto editing software you’ll find three tab menus on the upper right of your screen.  Quick Fixes, Effects, and Adjust.  Each has their own menu of selections in those screens.  

For instance, in Quick Fixes you’ll find a place to rotate your photo, enhance your photo, fix red-eye (people shots), straighten your photos, crop and retouch.  

Select Straighten from the Quick Fixes menu and a set of grid lines will appear in your screen.  Slide the slide to straighten the edges of your photo the way you want it to appear on-screen.  


See to me, the orientation of this photo now is so much better.  I don’t have the twitchies anymore.  :)


Next Step - Cropping.  This is one of those personal preference things - some people prefer wider cropping with a lot of white space around their card.  I prefer a medium crop, about an inch on each side of my photo so that you have white space that is soothing around your card, and your attention can be on the details of the card.  

In the Quick Fixes Menu you can click the Crop button and you can crop your photo either to specific constraints, or by dragging the outside corners in, generally I just pull my corners in to create even space around my card.  


Above is my design with the cropping done.  If I didn’t like how the cropping looked, on the bottom of the screen in the right corner there is an “undo” button that I could use to go back to the pre-cropped picture.  


Next is an important step to me,   Enhancing Your Photo.  There are a couple of ways you can accomplish this in iPhoto.  The first is a quick one, but I’ll be honest - it doesn’t always enhance perfectly, so I’ll also describe another way of doing it.  

In the Quick Fixes Menu you’ll see an Enhance button.  When you click on it, your computer will automatically adjust the exposure, contrast, and saturation of the image.   Generally it does a pretty good job.  I always test it to see how it turns out.  Sometimes however it gets the results WAY off, so then I have to undo and do the adjustments manually.  When it works though - its a great quick fix.  


What you’re looking for is realistic colours on your card, good overall saturation and contrast.  


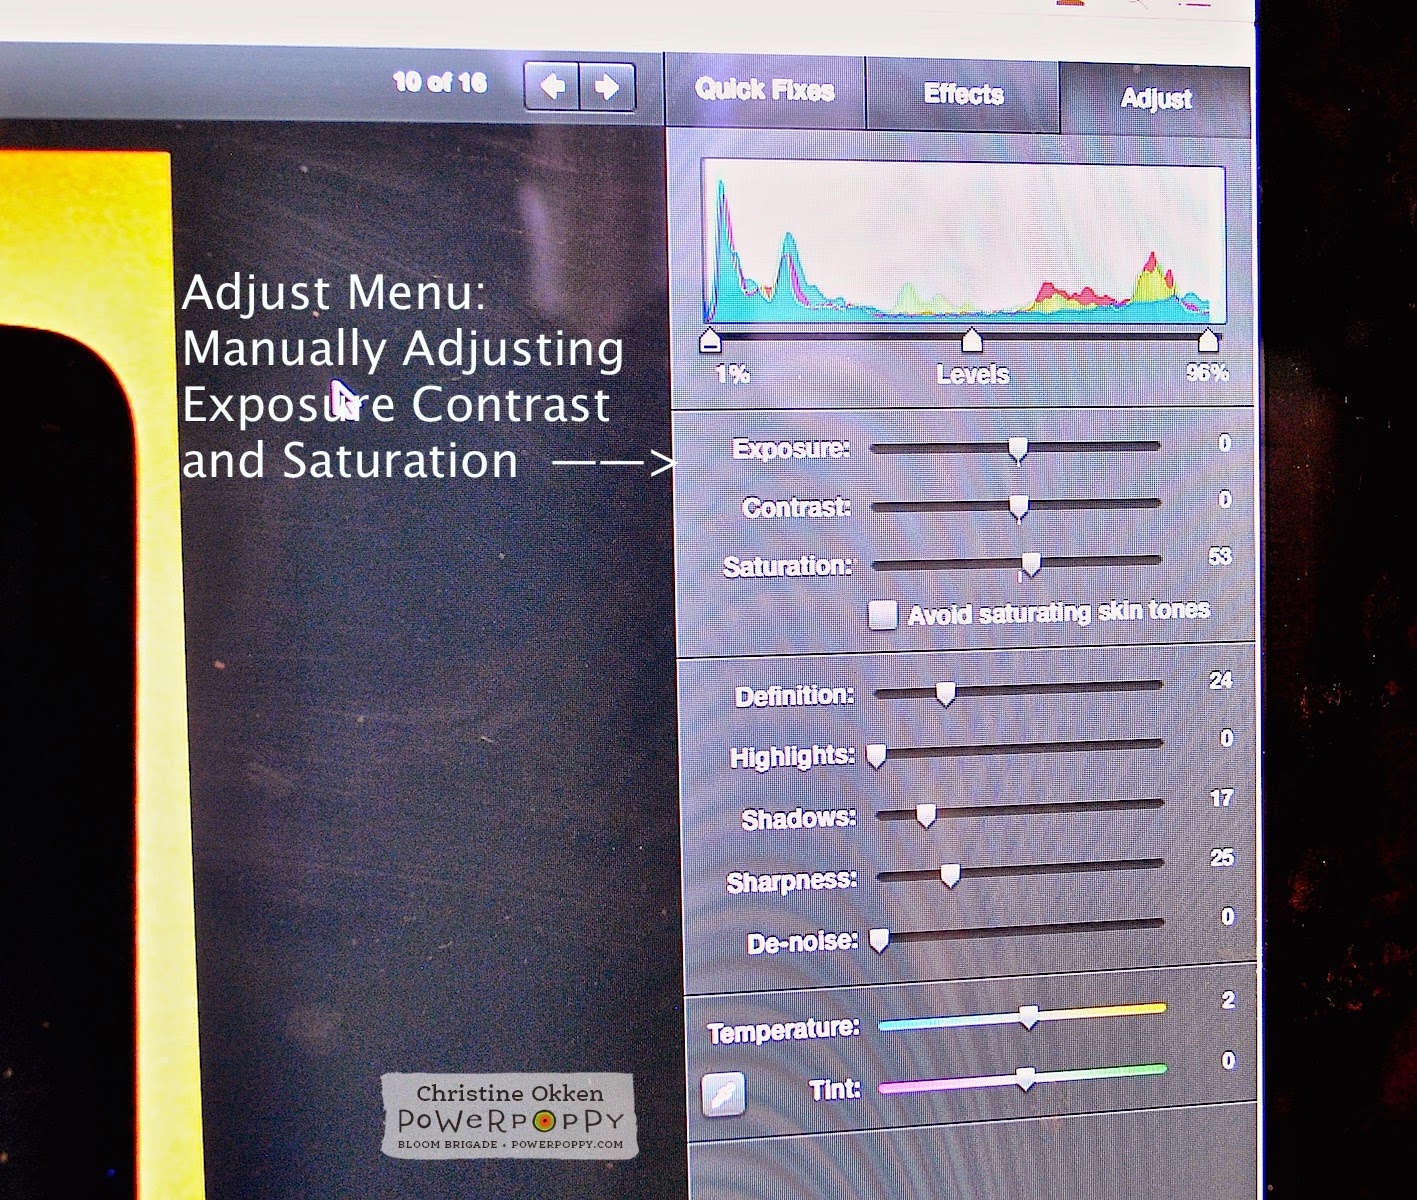
If using the Enhance button doesn’t get the effect that you’re looking for, in iPhoto go to the Adjust Menu and you’ll see a colour bar graph and then 3 slides for Exposure, Contrast and Saturation.  You can adjust the arrows on each side of the colour bar graph and also adjust the slides for Exposure, Contrast and Saturation.  Adjusting all of those slides manually allows you to give your photo the colouring and contrast you’re looking for.  As well, on the bottom area in that same menu you can see Temperature and Tint slides.  If your photo is too blue or yellow, you can make adjustments here.  

And again - if you don’t like how your adjustments turned out - you can just click Undo on the bottom right of your screen, and it will back up to where you were previously.  


Other Adjustments:  As I said in the first photography tutorial, I really like my whites in photos and backgrounds to be true white.  Even after edited, most people will find that their photos appear darker on their blog.  I know there’s some technical reason for that (probably to do with resolution, pixels and some other crazy computer speak), so I usually brighten up my photos a notch or two.  In the Effects Menu I press the Lighten button once or twice to brighten the photo.  This increases the overall brighteness of the card on the screen.  


Next, if my photo still has some shadows in the background I’ll go into the Adjust Menu Screen and slide up the Shadows slide.  This removes some of the background shadows.  


Final Touches:  Now I’ll start making final adjustments.  I like my photos to look crisp on screen, so in the Adjust Menu I’ll slide the sharpness up a little so there’s a crispness to the details.  I don’t adjust this too far because I want the photo to look natural - not overally edited.  


In combination with the Sharpness I’ll also slide the Definition slide up a little too.  


Then finally if there are any imperfections in the background (like if my background has a smudge or is dirty or has some dust that I didn’t notice I’ll use the Retouch button in the Adjust Menu and a little circle will come up with your cursor in the screen  (you can slide the circle to be smaller or larger).  I’ll just click the circle on the area in the background where there was dirt to clean it up.  


So overall,  I like how this looks on the screen.  Next I’ll watermark my card photo and publish it to my blog.  


Here is how the edited photo looks.  I really love how the layer of vellum softens the effect of the colours around the sentiment.  


Here’s a final closeup.  

I hope you have some new ideas of how you can make your photos show off all of your hard creative work!     Thanks for joining me again today!    


Inspire Me Monday - Photography Part 1


Hello Friends!  It’s Christine here for another Inspire Me Monday Tutorial. Today I’m going to be focusing on something entirely different: Photography!  

Has this ever happened to you? You work hard to create something beautiful to be able to enter it into a challenge, post in an online gallery or to your own blog, but it just doesn’t capture your work in real life. It’s frustrating. When I look back at my early photography of my cards, I see how very little I knew, and how very poorly I captured what I was creating.  So over the years I’ve done some learning and practising and I hope to pass on some of my tips to you. 

Photography is a sticking point for many of us in this online element of our crafting. How do you fix it? Do you need a fancy camera, special lights, expensive software?  

Photography is, in essence, the capture of light on film. Yes, it’s the capture of colour and detail as well, but really that’s only derived from the capture of light. These are some areas that I have found helpful to get my best captures.  Keep in mind, I’m no expert by any means!  

Set-up


Here is my set-up friends.  I keep it really simple.  This is looking at my kitchen window and counter between my sink and pantry.  I use foam-core board behind my cards as a white background and a cotton doily underneath my cards to give some texture to the base (and then little bits of the contrast of my counter peek through).  If I’m photographing a really large piece I can take another foam-core board and place it underneath the doily to give me more room to capture my creations.  I have 2 OTT lights (these are just lights that give out true white light).  I find that I use these lights even in the daytime because they give better background light and better detail light for my cards.  The larger light points toward the background and the smaller light I angle where I need it on my card.

This window faces East.  The biggest and most important element of photography is allowing the right amount of light to come into your photo.  Many people use North or South facing windows for their photography, which is probably more ideal but I don’t have a window facing those directions where I can leave a setup like this all the time.  So, because my window faces East, I don’t take morning photographs.  Too much direct light is coming in my window at that time of day.  Direct light sounds like it would be great - but what it ends up doing is washing out details and then creating too many shadows in the background.  Take a look at this next photo.  


This is a morning shot of my card using Power Poppy’s new Dancing with Daffodils image.  Oh this image is just so pretty - but the photo looks washed out along the top of the design and the shadows in the background look terrible.  No matter where I would position it, the direct light is just too much here.  

The same would go for having an image with light coming from behind it (backlit).  So, say, right against a window.  Because your camera captures LIGHT, it will capture the light from outside your window and not your card. Your card will turn out shadowy with a nice view of your outdoors.  Not at all what you want.  

The very best kind of natural light is diffused light.  So, as soon as the sun peeks around the corner of my house, I’m good to go.  Or, if I we have an overcast day where the sun is behind good cloud cover, then I can often take morning shots.  


Here you can see straight on what my set up looks like.  I think if I were facing south or north I might be able to get away without the OTT lights but, I always like it better when I use them.  I bought my lights at Michaels or Staples I think, I waited till they were 1/2 price to make it affordable.  Other styles of lights cast different shadows (yellow or blue), and then it leaves a colour cast on your photographs that’s really hard to work with, so I recommend OTT lights, or just diffused natural light.  With these lights I can also take photos at night.  Some people use filters on their lights (even a piece of tissue paper helps). But I’ve found that my lights aren’t so bright to have to need it.  

No matter what kind of camera you have, giving your photography a better set-up can make all the difference in what kind of pictures you’ll be able to capture.  

Camera

The next big question is always, now what kind of camera do I need?  I spent many years using a point and shoot camera, using it on the macro detail (tiny flower picture) setting, and though it wasn’t perfect photography - I still did alright.  So, if you’re there, that’s perfectly ok! Hopefully the set up tips I just showed will help you.  

But, for those of you wanting something more....a few years ago we invested in a DSLR camera.  Mine is an entry level DSLR - A Nikon D3000, and for my card photography, I actually use the base lens that came with the camera.  It’s an f3.5  18 - 55mm lens.   For a long time I didn’t have a clue how to use the camera because there are so many buttons and settings, so I just used it on the macro detail (tiny flower picture) setting for my cards.  Well, honestly that’s just a glorified point and shoot camera (my photography instructor called all of those “cute” picture settings EVIL :) LOL).  So, over time I started setting my camera on Manual, and learning more all those settings.  I have a LOT of friends who are photographers so I could ask a lot of questions.  But the very BEST thing to do for me was practise.  That’s the great thing about digital film, you could take hundreds of pictures and no one’s the wiser.  This past fall when I took a photography course I learned a lot that made me even more comfortable.  I’m more of a hands on learner than an online learner so it was good to invest that much time with an instructor.  


So, now I’ll try to pass on a few things that I learned in the class that made a difference for me.  


Helpful Settings 

If you have a DSLR camera here are two settings I have found that have improved my card photography.  

1.  The Histogram

No, it’s not some weird allergy monitor, the histogram is a bar-graph on your camera that you can look at to see the real light details your camera is capturing.  

This is one of the very first things our photography instructor had us adjust in the course.  

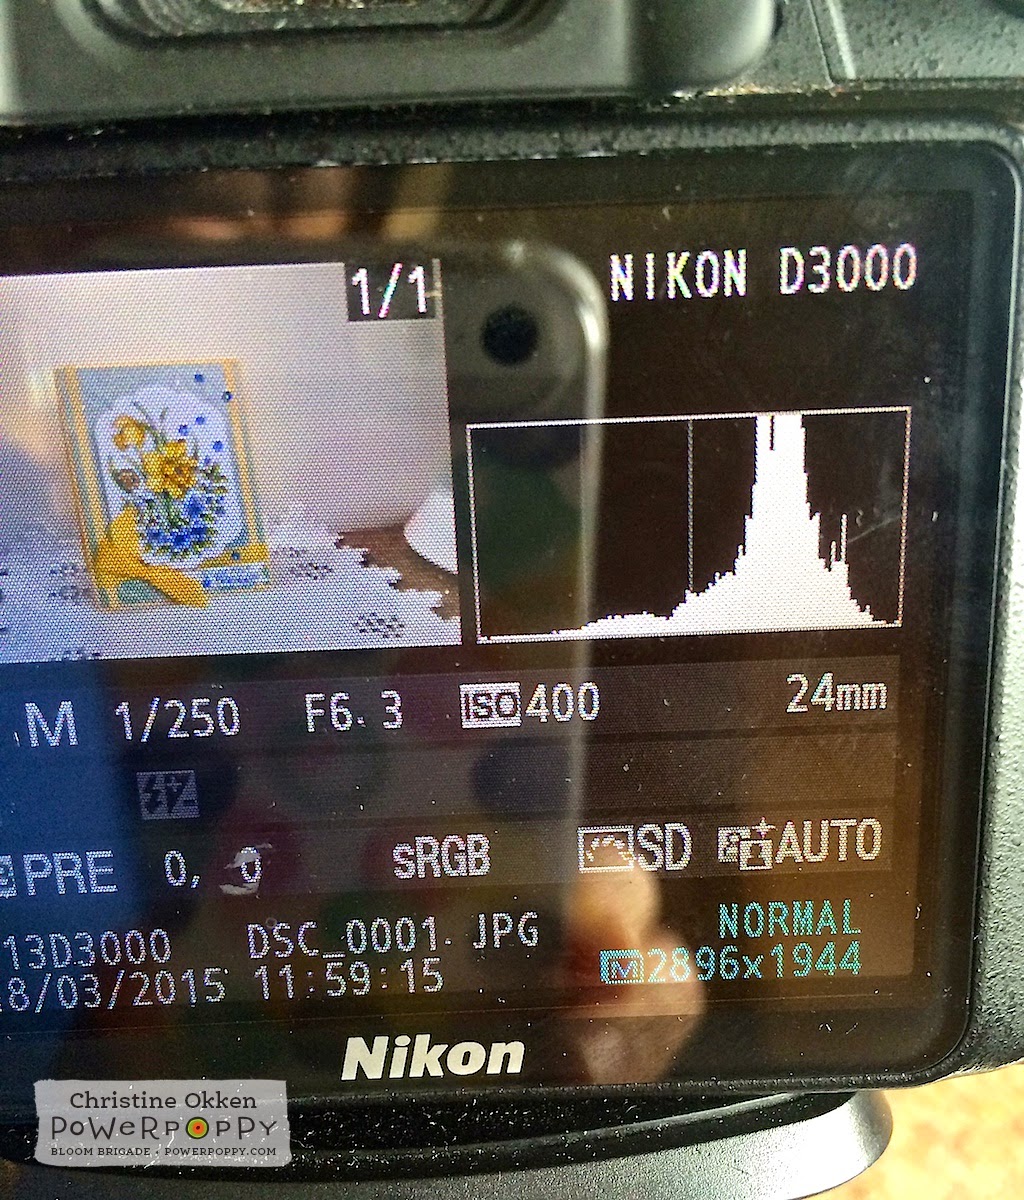
Most of us look at the digital screen on our cameras, think our photo looks good, and then when we get it on our blog wonder why it’s so dark.  The histogram tells you in bar-graph form the amount of dark or shadow details in your image (on the left of the graph),  the mid-tone details (in the center of the graph) and the bright or highlight details in your picture (on the right of the graph - righty-brighty).  Looking at your histogram after you take a picture gives you much better accurate information on how your picture will come out.  You’ll see what I mean as I explain more.  


The first step he had us do was to go into our menu on the screen on the back of our DSLR cameras.  Not all cameras are set up to show the histogram of your photos right off the bat, so you have to turn on a couple of settings.  I’m using a Nikon, so I can’t speak for every camera, but you’ll need to consult your camera’s manual or do some playing.  

I’m in my Playback Menu as you can see by that little blue triangle on the top left.  You’ll have to excuse these photos of my camera.  I’m literally holding the camera with one hand and shooting photos with my iPhone with the other hand :)

Next I choose Display Mode in that menu, that will take you to a screen where you can choose the detailed photo info for all your pictures.  


I select Highlights and RGB histogram and say OK.  

Something I really value is a well-lit photo.  I want my whites to look white, my details to be crisp and my overall photo to be really bright.  The histogram tells me how I’m doing in capturing that.  


So, after I take a picture I press PLAY on the back of my screen.  Then to move around in that screen I use those down or up little arrows around the OK dial on the back of the camera (over on the middle right above the little garbage can).  A screen with a coloured graph might show up, keep pressing your arrow until you see a screen like above.  This will show you the photo you’ve just taken and the bar graph to the right.  You can also see the settings I used to take this shot,  Manual Mode, shutter speed of 1/250 of a second, an f stop of 6.3, and ISO 400, etc.   All of those elements do MEAN something, they are part of the triangle of settings  you’re trying to balance to take a good shot, but for right now, I just want you to look at the bar graph.  

As I told you a histogram measures dark shadows (left on the graph), mid range tones (center of the graph) and highlights (right in the graph).  Because I want to have a nice, brightly lit photo, I want my histograph bars to be primarily RIGHT.  Not touching the far right line because that means it’s overexposed, but nearer to that right side.  I know by looking at this histogram how my photo is coming out.  If I need to make adjustments I go from there.  


If my histogram is too much in the mids or lows of the graph, I’d either adjust my shutter speed to be faster, adjust my f-stop, or increase my ISO, or some combination of those three elements till I get a histogram I like.  That way I’ll be allowing more light into my photo.  Each of these adjustments has implications to the photo, that’s why it’s all about the balance.  

More to know:

For those of you who want to be a little techy and dive in deeper.....here’s a super quick explanation of those three elements.  APERTURE, SHUTTER SPEED and ISO were explained to me like a bucket.  You can’t control the rain (light), but you can control the size of the bucket, how long it is out in the rain and the quantity of rain you want to collect (how much light you’re collecting)

Aperture (or the f-stop number), controls the AREA through which light can enter the camera through your lens (the width of the bucket).  The lower the f-stop number the wider the bucket is open and the smaller the area of focus, the higher the f-stop number the smaller the area is open and the larger the area of focus.  I found this setting the most difficult to understand...but when you get it you can really influence the amount of blur in the background, and the slice of focus your camera captures.    

Shutter Speed (how fast your shutter stays open or the length of time till it closes) controls how long our shutter is open exposing the sensor to light.  So, how long the "bucket is left out in the rain".  The faster the shutter is set, the quicker the bucket is exposed to the rain and “taken in”.  Slower shutter means more time in the rain.  

ISO Speed (like film speed) controls how sensitive your camera’s sensor is to a given amount of light.  The quantity of “rain" we want to collect.  This one was also described like a microphone.  The higher the ISO the more noise your camera will capture.  So, lower ISO settings capture less “noise” and higher ISO’s capture more noise (that’s why some pictures can look grainy).  On a sunny day, outside, I’d have an ISO of 100, inside I’d probably choose 400 or higher.  

Ok... I know that’s a lot to take in if it’s new for you.  Maybe I’ll do a future tutorial explaining this a bit better if you’re interested!  


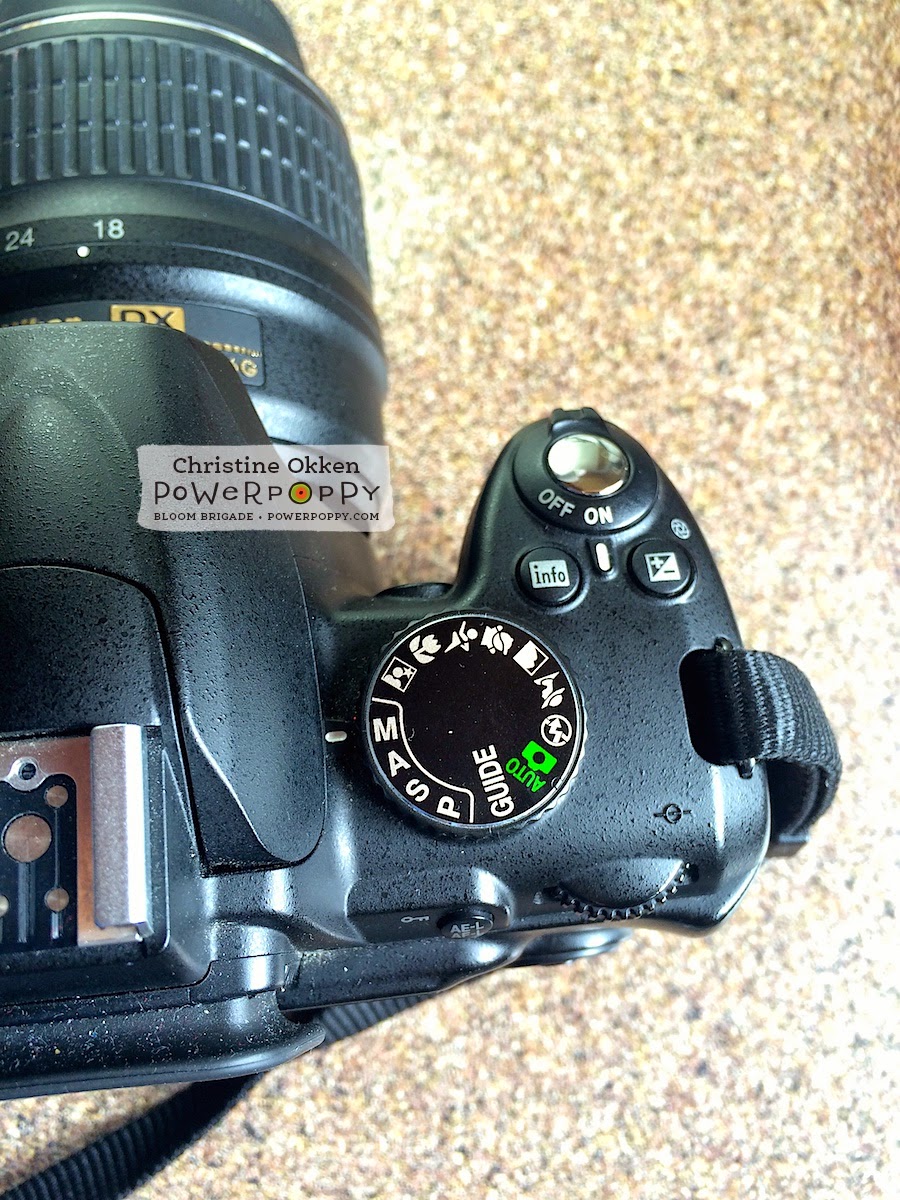
Now before you go saying hey that’s too techy for me, a histogram can even help you when you’re shooting with that little detail shot setting (flower picture on the top dial).  This photo was shot with the detail setting rather than in manual and I can still see how this would turn out.  As you can see it captures more mid tones and lower tones rather than highlights.  I’d have to influence this by adding more light into the picture, so either moving my setting to a different window, or adding in more lights.  


Now, how do you adjust all of these elements in Manual setting?  Each camera is different, but on my camera, I set my ISO on a window screen in the Shooting Menu.   Then there is a dial on the back of my camera where I can adjust the Apeture (or f-stop) and the shutter speed.   (See the dial directly to the right of the Adjustment dial words on the above picture).  

On the display on my camera, I adjust my little meter that you see in the center of screen above to be about two or three little bars above the 0 on the + side.  For my cards and situation, that produces the best pictures.  

My shutter speed varies depending on the light (here it’s at 1/250 of a second, but my apeture or f-stop I usually set between f6.3 and f8.  That way I get a good amount of detail, but still a decently soft background.  Those settings will all depend on your situation where you’re taking pictures.  

Ok...before your head explodes I have one SIMPLE setting that’s really made a difference in the quality of the whites in my photos.  


2.  White Balance

As I said, I’m pretty picky about my whites in my photography.  It’s the one thing that drove me crazy when my photos would come out and the white areas would look gray.  There are a number of things you can do with a DSLR for this but one simple adjustment I learned was about setting a manual white balance.

If you’re always taking your photography in the same area, with the same background (as I am), here’s what you can do.  Note - this will only work if you’re using a white or off-white background.

Set up your photography area as you normally would.  Do everything with your lighting, etc, just don’t put a card in the picture area.


On your camera find the “White Balance" option.  Mine is in the Shooting Menu with the green camera picture on the left.  Select White Balance.  


Next select - Preset Manual


Your next screen will ask you to “Use photo” or to “Measure".  You want to Measure.  Now,  fill your shooting screen entirely with your background (for me this is my white foam core).  Get your focus, and adjust your f-stop and shutter speed to the levels you’d like and then take a picture.  

Now, go back to this menu shown above and then say “Use photo”.  This will set your white balances to your particular background setting and it takes out some of that blue/yellow/or gray cast that makes it hard to get nice crisp whites.  I’ve found this to be the single best improvement in my card photography.  

Alrighty - to close off this rather newsy post, and maybe encourage you to TRY your manual settings a little more on your camera :)


Here is my card picture - straight out of the camera - no editing - shot with the Macro/Detail (flower picture setting) on my dial.


And then, here is the same card shot on Manual setting on my camera.  Exact same light, exact same situation.  No editing, straight out of the camera.  You can already see the significant improvement in the quality of the shot.  

Join me NEXT MONTH where we’ll talk about the next step in photography - photo editing!  That’s where we take it from the camera to be blog ready....and it won’t have to cost you an arm and a leg to do it :)  

Thanks for joining me! 
Christine