Saturday

Bring on the cheer!


Howdy!! This week has worn me out! Days of showcasing eye-poppingly cute cards compliments of the Bloom Brigade design team has left this girl with just a few sparks left in my arsenal. But I’ll use those sparks in the name of the last new set we’re sharing.

Today’s set is kind of special. I mean, they are all special, but this one, THIS ONE... is Primroses. Primroses. Primroses. Primroses!!! Eeeee!!! I’ve had a crush on primroses since I first spotted them in British decorating magazines years ago, and thought, now, those plants are di-VINE! I used to plant bevvies of them along our driveway. I’d tuck them under trees. Nowadays I like to have a few pots of them in the house to usher in a sunshiney feeling as spring approaches. But—I had yet to illustrate the little bright-eyed darlings. UNTIL NOW!

http://powerpoppy.com/products/potted-primroses-stamp-set

Do we really have to herald the virtues of the primrose: the cheerfulness of their very appearance, the rainbow of hues, the mossy terra cotta pots they often live in, the jauntily ruffled, puckered leaves, the lollipop-like standards of the Auricula varieties, the pure unadulterated JOY they imbue—are we all on the same page here?!

Let’s get right to the examples of the my new set, Potted Primroses! Bloom Brigade, show us whatcha got...
 

SPECIAL NOTE: Power Poppy Peeps of the Week took a break for our fabulous release week! We hope y’all will tune in next week when we reveal our winners, and a the recipient of the free stamp set, PLUS (drum roll) a NEW WAY to challenge yourself with bits of Power Poppy goodness!

And... TOMORROW, the entire Storm of Creativity collection is available in the shop. Along with a GIANT BLOG HOP with even more examples of the five sets we’re releasing! So come back, ya hear? I want to see what YOU will do with these sets. I have a lot of faith in you!!

Rock on, my dears...

Friday

Handlettering gone wild


Hello there!

I hope you’ve been having a great time with us during our 5 days of previews for Sunday’s big release day. Today we’ve got a set that stands out from the rest—in a cool kind of way—and I hope you’ll give it a whirl in your craft room!

Do you ever find yourself musing about handlettering, sign painting, typography, font design, and wood type? (It’s OK to say no, I’m an admitted lettering nerd.) There are just so many lettering styles, and so little time! From the script on the window of a beauty shop, to the scrawl on a punk rock show flyer, the world of lettering is endless and inspiring! If I ever take a sabbatical, it might be to learn more about this fascinating topic, and spend more time honing my skillz. (Can you take a sabbatical if you work for yourself? Thinking that’s a no...)

Meanwhile, a hand-crafted lettering style that I’m fond of using involves grabbing a pointy paintbrush, dabbing the brush somewhat gloppily into gouache paint, and pretty much just going at the paper like a wild person.

It’s not a dainty look, but it’s a REAL look. It’s authentic, and it gives a personal touch. It’s kind of bold, and has moxie!

At times I press down hard with the brush, but as I curve around to form the next letter, I may use more delicate pressure. I’ve been working with this rustic look for many years on personal projects and for some client work, too. Here are a few examples just to show ya....

http://kickitvintage.com

In this poster for a monthly motorcycle event that Doug and I put on in St. Louis, I combined my painted lettering with a crisp and snappy, condensed font. I also drew my first motorcycle dude. By the way, If you’re curious about vintage motorcycles at all, check out our Kick-It Vintage website, which features details about our local event, plus all of the posters I’ve designed, and lots more lettering styles. I really get to experiment there, and I love having that freedom.


Had a great time scrapping together this red-white-and-blue treatment for our July bike night, using an old envelope and sticky notes for my canvases. All stuck to my red 1968 Yamaha.


Here’s a logo I designed years ago for Lisa Fontanarosa Collection. Lisa is a lovely and inspiring person who is an artist’s representative working with some of the world’s most talented creators of decorative objects. She selects “true artists the world hasn’t discovered yet,” and seeks out “works that invite the touch” like the hand-cut, appliquéd velvet pillows shown above. We thought that the rough-hewn lettering was ideal to support her brand.


A special banner for Lisa’s blog is a collage with photos of French artist Marie Christophe’s work, along with my handlettering, fonts, and scans of scribbling on notebook paper.

-  -  -  -  -  -  -  -  -  -  -  -  -  -  - 

OK, MARCY, WHAT DOES ANY OF THIS HAVE TO DO WITH STAMPING?
-  -  -  -  -  -  -  -  -  -  -  -  -  -  - 

Well, lookee here at what I made for you to stamp with...

http://powerpoppy.com/products/big-scripts-stamp-set

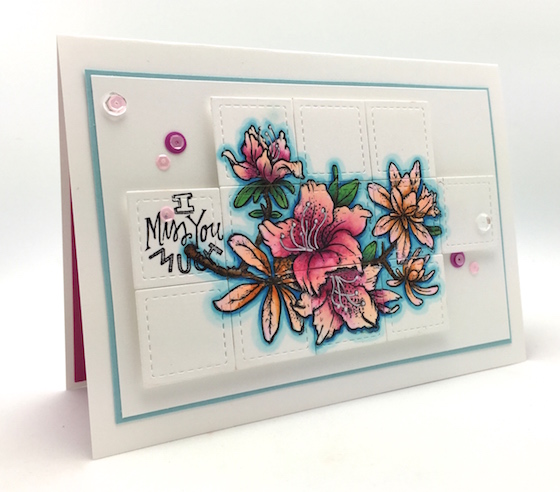
I’ve been wanting to plow outside my typical stamp design zone, and I sure hope you dig it as much as I do. You may find that it works well alongside crisp and snappy sentiments (remember that Vintage Bike Night poster!), and give some bold freshness to our beloved botanicals. Used on their own, these stamps are stylish enough to be the main element.

Big Scripts kicks your cards up a notch in the coolness department!

To help show you what I mean, look at what the Bloom Brigade hath wrought with this set:


I do hope you’ll come back tomorrow for ONE MORE set. And we may have saved the very best—if not the cheeriest!—for last! :)

Have a superfun day!

Thursday

Stacks are Fun!

When I look around the room, I see stacks. Stacks and piles and heaps. The stacks are typically composed of cute things like teacups and dishes, books with interesting spines, pieces of nature, and spools of ribbon. Actually, I find most of my stacks decorative and quite fun to look at. If I may quote one of my mentors:

“I like to have everything out where I can see it.”
Mary Engelbreit


When it’s time to dust, my stacks, piles, and heaps are not nearly as fun. They are kind of a pain. Here’s a small corner of our dining room hutch to help illustrate the point. (I had to blur the picture a little bit so you can’t make out the dust as easily. Thanks, Photoshop!)

So, one of the convenient things about being an artist is that you can design stacks of cute decorative objects and they do not have to be dusted. Not ever! Want to see an example of this fantastic concept? For Day 3 of our release preview, herrrrrre’s Short Stacks!

http://powerpoppy.com/products/short-stacks-stamp-set

I hereby hypothesize that you will find many, many, many uses for Short Stacks. It’s got birthday sentiments, words to give a friendly hello, and some straight-out words to live by (“But First, Coffee.”). And then three stacked-up images that are a hoot to color!

Want to see how much of a hoot? Look what a good time the Bloom Brigade is having with this set — everyone is in on the act. ROLL CALL:


I would just love to see you back here tomorrow, as we have a very cool set to share with you — one that reflects my inner scribbler, inner renegade, and the inner voice that told me to try something a bit different.

xoxo!

Wednesday

Make Love Notes

Valentine box I designed, built, and handlettered for Mary Engelbreit’s Home Companion magazine

Sweet nothings are really something to me. I think they should be shared with the ones you love, like, every hour. Maybe every 20 minutes. Does it ever get tiresome to be told something loving? Not in my world. Get that love flowing... on the phone, in a quick text or email, with a little squeeze or a quick smooch, whispered in their ear or shouted from the rooftops for the whole neighborhood to hear! (Yes, my poor neighbors.)

To be really, really exceptional at sharing those sweet nothings, you will make loving cards and write love notes. Pieces of amorously constructed ephemera with thoughtful images and words are treasured, remembered—and they just keep those sparks alive! Love notes endure.

Not just on Valentine’s Day, my good people.

Get inspired by the idea of sharing your love, sprinkling loving words and quotes into your projects, and you may even find yourself feeling that loving goodness. Put more love out there, and we ALL benefit.

To help you along in this process, I have created a new set with 23 loving phrases (and just a few tiny images) to transform any card into a love note. Introducing my almost all-sentiment set, Good Thinking: Love Notes!

http://powerpoppy.com/collections/clear-stamps/products/good-thinking-love-notes-stamp-set

To help illustrate some of the loving ways to use this set, the Bloom Brigade has made some love notes of their own. Let Love Rule your morning, afternoon, evening ... and check out wonderful projects created by wonderful women using my newest stamp set! It will be available to purchase in the shop on Sunday, February 1.


Thanks so much for stopping by to read about the “good thinking” behind this set. Come back tomorrow to see more sneak peeks from the Storm of Creativity collection!

All my love and sealed with a kiss,

Tuesday

Storm Chaser Update: Reporting from the scene of Power Poppy’s new release

Hello, hello! And thank you for tuning in. We’ll be sharing all of the updates about the storm.

Yes, lately I’ve been drawing up a storm. A whirling, swirling, howling storm I tell you! A storm of brushstrokes, wild scribbling, intense periods of stippling and crosshatching followed by pencil shavings piling up so high, they blocked traffic from the studio to the living room. It could almost be described as a torrent of fresh ideas smashing through weeks of holiday busy-ness and deadlines.

Not to make light of the current storm situation... I’m no weather girl, but I believe there’s another kind of storm whirling and swirling right this moment in the Northeast. One that’s blanketing entire states with fresh pow. From what I can gather, folks have been told to stay inside with their stockpiled supplies, and get underneath their afghans and cozy up with their hot coffee, and get this, the main thing being touted for maximum snowbound entertainment is the Power Poppy blog hop. We’re previewing our fantastic, fun, and fiesty February release—FIVE ALL NEW CLEAR SETS—starting today.

Let’s distract ourselves from the snowy stuff and get tropical! Who’s up for orchids?

http://powerpoppy.com/collections/clear-stamps/products/orchids-rock-stamp-set

For the flower lovers out there, I’m going to go out on a limb and announce that Orchids Rock is going to be a must-have.

I mean it, it just may be one of my favorite sets I’ve drawn—ever!!! The initial Storm of Creativity (which is also the name of this collection), that put this set in motion is about to hit the cardmaking countryside. I can already tell, because I’ve gotten sneaky peeks at what the Bloom Brigade have been making with these images, and every single thing I’ve seen has knocked my socks off. Just check out what Christine made for our Inspire Me Monday tutorial yesterday!

Still skeptical of the fun you can have with Orchids Rock? May I share some really incredible examples to help you see the light? Bloom Brigade, let’s rock!!!

Allison Cope
Christine Okken
Dawn Burnworth
Julie Koerber
Kathy Jones
Katie Sims
Leslie Miller
Stacy Morgan
Tosha Leyendekker

I hope you’ll stop back by tomorrow, because we have FIVE FULL DAYS of this good stuff to share... in the meantime, stay cozy, and above all stay safe. xoxoxo!


Monday

Inspire Me Monday: Gradient Stained Glass


Good morning Power Poppy Fans! It’s Christine greeting you on this Monday morning. I’m so excited to help kick off this week’s New Releases with an Inspire Me Monday Tutorial. It's a SUPER sneak peek of a set that will be releasing this week, called Orchids Rock, and it is amazing.  

Today I’m going to show you a twist on a beaded stained glass window, making use of a gradient theme.  Gradient is the change from light to dark or gradual change of colour in an image.  Using the theme of a stained glass window in this way, is a new twist I thought I’d try.  I love how it turned out, it’s a very elegant way to show off a beautiful design.  


I began by stamping and colouring the image, here I’ve used the beautiful lady slipper orchid stamp.  Then I took out my Standard Circles Spellbinders die and a Copic Multi-liner and traced around the outer edge of the circle and inner edge of the circle.  You just want to be careful to take your time and hold the die firmly.  I mainly wanted to give it a framed feel, like a stained glass border.  From here I took the two main colours of deep burgundy and deep green and coloured out the opposite sides of the border in an Ombre style.  Deepest colors at the bottom and top and then fading out to softer colours at the middle.  You can see a bit of the border colour in the following step.  


Next I grabbed some Sticky Strip.  Though Scor Tape is my go to for most crafting, on this style of card you need a very firm clear adhesive tape, so I’ve found Sticky Strip works best.  

In the middle of my image I placed three strips of tape, butted firmly together, leaving a section of white-space open.  Then I placed two strips of tape together, another white space and then finally one strip of tape toward both the bottom and top of the image.  So, thickest gradient in the middle moving out to thinner gradient strips along the bottom and top.  

You’ll want to be sure that wherever your tape lands is where you want it.  You can’t pull it back up once it’s down or it will tear your image.  After all the tape was secure and smoothed down with my fingers I trimmed off the pieces that were stuck over the edge.  Use a good sharp scissor for cutting off the edges, the sticky strip is really sticky.  


Next, you’ll want to grab some sort of container with sides, I just grabbed a ziplock style leftover container.  Peel off the top layer of your sticky strip and lay it in the bottom of your container, sticky side up.   Then you’ll need some clear micro-beads (if you’re like me, you have some lying around in your craft drawers too).  


Carefully pour your beads onto your sticky image.  You’ll want every bit of the sticky spots covered with micro-beads, so use your fingers to make sure it’s completely covered.  Then turn your image upside down in the dish and gently push on every part of the image to make sure your beads are firmly adhered and evenly burnished onto your image.   You want the beads to be smooth.  


Just look how pretty it is!  The gradiant areas really give that stained glass feel to the design, but I also like how the other areas are also peeking through.  It is such a great effect.  


Here are a couple of pictures of the finished card design.  I placed the image onto a belly-band style card where the scalloped section pulls out.  


The micro-beads give it a light reflective, glittery effect that’s really lovely.  


Here are the Copics I used for colouring the image.  


Tomorrow you’ll see so much more from this beautiful set, and a lot of creativity from the Power Poppy Team all week long!  We can’t wait to show you all of the beautiful things Marcy has created for us to work with!  See you then!

Friday

Givin' a Shout to Our Peeps!


It's Friday, which means a colorful parade of fun here on the Power Poppy Blog! It's a time when WE see the creativity that flowed all the way through your fingertips to make a Power Poppy inspired card or creation! 

HERE’S HOW TO PLAY IN OUR PEEP OF THE WEEK CHALLENGE: All you need to do to get in the running for the Power Poppy Peep of the Week is use the linky below and share a new Power Poppy creation. Just that simple! It can be anything — a card, an altered item, a 3D creation, a set of cards, ANYTHING! We can't tell you how much we love to see what you create!

OFFICIAL RULES:
  • Use Power Poppy Stamps on your creation! 
  • Link up your creation using the Linky below (It helps us to find you! Although it’s not a necessity to win. We scour creations all over the web!). 
  • Could you please mention the Peep of the Week challenge in your blog or gallery post with a link back to this blog post? We would sure love it if you did! 
  • We’ll accept entries up until Thursday @3PM EST and will announce the Power Peeps of the Week next Friday for our Peep of the Week post.
  • Every link counts as one entry in our monthly drawing for a FREE STAMP SET OF CHOICE!
TIME TO MEET OUR PEEPS!


This creation was posted a few weeks back in the blogosphere, but it’s one we just spotted on the web and it was just so fabulous! We just had to show it off here and give Kathy over at The Daily Marker a shout. The way she colored the branch from Power Poppy's Azalea set is truly a show stopper! I also love the window pane effect she created with that super fun die and who doesn't love a splash of sparkle with a sequin or seven! ;-)


OoooOOOoo, the graphic feel of this black, white, and red beauty by Brenda Turner is almost too perfect! She inked up (and colored so fabulously) Power Poppy's stamp set Dynamic Duos: Glads and Gerberas. Gorgeous stuff, Brenda!

The good news is these fabulous creations will make their way onto our customer wall of fame over on the Power Poppy Peep of the Week Board over on Pinterest! How can YOU end up being honored in this way? Simply show us your card making style using Power Poppy Stamps and then link up your creation below! And, if you’re a Peep of the Week Winner and would like our POWER POPPY PEEP OF THE WEEK BLOG BUTTON to “wear” on your blog with pride? Simply email us at bloom@powerpoppy.com and we’ll send that button right to you!

As we make our way to the weekend, pop on over and take a peek at what these BLOOMIES whipped up this week!

Leslie Miller
Stacy Morgan
Tosha Leyendekker

Thanks everyone for stopping by! Make sure to MARK YOUR CALENDAR! Our sneaky peeks for our February Release start next TUESDAY with FIVE, yes FIVE new stamp sets that are simply irresistible! The sneaks start January 27th and wrap with a grand ole Power Poppy Hop on the 1st. It's going to be a fun week "Peeps!" So, stop on by and see what we have in store! 

Also, Fridays are about to get even more fun!! Stay tuned for some fresh ideas that are sure to kick off your weekend with a super fun dose of creative inspiration! 

Monday

Inspire Me with a quick rose painting?


Hey cats and kittens! We’ll have fresh Inspire Me Monday superexcitingwonderous content for you next Monday. For now, perhaps you might be temporarily entertained with what I just colored up for my honey!


Using an inkjet printout of the La Vie en Rose digi on Neenah Vellum cardstock (from a very fancy store, La Depot d’Office), I grabbed my watercolors and gouache and went to town. The scripty part in the center was hand-lettered with a Micron Pigma pen (01) that I shaded with my Winsor Newton #000 sable paintbrush. (Only the tiniest tips will do!)

This is probably a little too cutesy for me to give to Doug in the current pinky-peach state, so maybe I’ll cut it out and decoupage it on a rusty 1970s Yamaha motorcycle tank. I know the way to my man’s heart. I do think he’ll like this sentiment, though. As we both believe it is true! :)

Meanwhile... hope you all have been enjoying the digital release, and had a chance to go visit our Instant Gardener’s blogs and our Bloom Brigade’s blogs, too! So much beauty was created with the rose stamp and various sentiments — ideas that were blowing my mind! 

I’ll be on the blog later week with some sneaky peekies of our upcoming clear stamp release, so I hope you hightail it back here!

MWAH!!

Friday

Livin’ La Vie En Rose!

Oh my goodness! Too much fun going on over here at Power Poppy Home Base! First, there was THIS big announcement. Then, there was THIS Gaaaa-ORE-GEE-ous image that Marcella unveiled yesterday -- the newest addition to Power Poppy's Instant Garden......

http://powerpoppy.com/products/rose

Stay tuned because at the end of this post, we’ll be sharing the Bloom Brigade’s links and you have GOT to see what they all whipped up using this brand new digital stamp. In the words of Marcella.... “YOU ARE GOING TO FREAK OUT!” Love that girl. Really, I do!

Before we get to the eye candy, let's get to our weekly showcase of Power Poppy goodness thanks to.. YOU... our Power Poppy Fans!


HERE’S HOW TO PLAY IN OUR PEEP OF THE WEEK CHALLENGE: All you need to do to get in the running for the Power Poppy Peep of the Week is use the linky below and share a new Power Poppy creation. Just that simple! It can be anything — a card, an altered item, a 3D creation, a set of cards, ANYTHING! We can't tell you how much we love to see what you create!

OFFICIAL RULES:
  • Use Power Poppy Stamps on your creation! 
  • Link up your creation using the Linky below (It helps us to find you! Although it’s not a necessity to win. We scour creations all over the web!).
  • Could you please mention the Peep of the Week challenge in your blog or gallery post with a link back to this blog post? We would sure love it if you did! 
  • We’ll accept entries up until Thursday @3PM EST and will announce the Power Peeps of the Week next Friday for our Peep of the Week post. 
  • Every link counts as one entry in our monthly drawing for a FREE STAMP SET OF CHOICE!

AND NOW, TIME TO MEET OUR PEEP!


Last week, we had a handful of beautiful, beautiful, BEAUTIFUL entries! One, however, turned our heads in a major way for the designer's beautiful coloring and fabulously clean and classy design! This card does indeed sparkle & shine Tracy MacDonald! Tracy used our digital stamp called Countryside Bouquet. You can tell she printed the bouquet it a wee bit larger onto watercolor paper and then painted it up using Distress Inks. My reaction? WOW! Love the little splash of dewy sparkle too thanks to those sequins!

Tracy, we are so excited to add your beautiful creation to our Power Poppy Peep of the Week Board over on Pinterest! How can YOU end up being honored in this way? Simply show us your card making style using Power Poppy Stamps and then link up your creation below! And, if you’re a Peep of the Week Winner and would like our POWER POPPY PEEP OF THE WEEK BLOG BUTTON to “wear” on your blog with pride? Simply email us at bloom@powerpoppy.com and we’ll send that button right to you!

Now, as promised, the link list showcasing our star-studded design team and the brand new digi -- La Vie En Rose! Take it away gals!


Thanks so much for stopping by and be sure to link up any of the Power Poppy creations you make this week. We’d love to see! ;-) 

~Julie

Thursday

The Instant Garden: New Digital Release TODAY!

Well, hello there!

It’s Marcella here, and I hope this New Year is treating you wonderfully so far! I’m verrrry excited to share this news, so I’m just going to cut to the chase. We have a new release today, it’s a digital stamp set, and it’s available in the Power Poppy Shop right now!

La Vie en Rose Digital Stamp Set

La Vie en Rose is the first stamp set from our new monthly program of botanical-based digital releases. We’ll be bringing you a fresh picked digi stamp set every single month — in addition to our clear stamp releases!! Learn all about it in Julie’s post — CLICK HERE!

We call our new program the Instant Garden. Those of you who have been following Power Poppy for a while know that every so often I would introduce digital sets, and really, ya’ll wanted a more predictable schedule for finding them in the shop, and you wanted MORE OF ’EM. Then, our clear stamp fans wanted to know that they, too, would still get their polymer fix. Ohhhh girls, we have you ALL COVERED, we’re doing the whole kit and kaboodle. Digis, clear stamps, and lots and lots of beauty, creativity, and all-around positivity from your Power Poppy HQ, the Bloom Brigade, and now joining us for the ride....


Our new rockstar digital release Design Team, the Instant Gardeners, will be sharing the digital sets for the first time every 15th of the month. For today, we have a spectacular showing from these highly talented creative Special Ops forces!! Come check out their blogs, won’t you.....

Jennifer Dove
Rhea Weigand
(Rhea will be posting with us starting in February!) 


Thank you for stopping by! We’ll be back TOMORROW with the fabulous Bloom Brigade’s take on this new digital stamp set. But... La Vie en Rose is available to purchase and start coloring — right now!

Au revoir, and mwah, mwah, mwah!!!


Wednesday

Gettin' Ready to BLOOM & GROW

Hello Power Poppy fans! Did you know something beautiful is about to sprout at the Power Poppy Shop? It’s something that’s sure to bring out the nature-lover in each of us and help us cultivate our creativity — INSTANTLY! What on earth are we talking about?! Well, here’s the dirt!

On the 15th of EVERY MONTH, we’ll share a
new plant for your Instant Garden! 

What is an Instant Garden? It’s the new digital stamp collection from Power Poppy by Marcella Hawley. You can buy, download, print, and color the digi images with reckless abandon — in an instant! Digital stamps are nothing new to Power Poppy, but goodness gracious, since we introduced them in the summer of last year, you haven’t stopped asking Marcella for MORE! We listened! And now, we are dreaming up new images, planting them, watering with love and waiting for them to sprout each month!

Join us TOMORROW to see what will be blossoming for January’s Instant Garden offering...

With every garden, you need special people to nurture it and help it to grow. That’s why we'd love to introduce you to an amazingly talented team of Instant Gardeners a.k.a. our digital stamp design team. These women honestly need no introduction. They are household names and their talent and creativity are beyond description! We’re so excited to introduce:

• • • THE INSTANT GARDENERS • • •


It is Jennifer Dove here to tell you a little about myself. I am 44 years old, married, and mom of two boys 18 and 20, and a wee little one — a girl born September 18th, 2014. When I am not being a full time mom, I am being a creative color artist. I am a heavy equipment operator by trade. I moved to Arizona from Alaska where I have kept myself very busy teaching classes. I have been published in numerous magazines and Copic books as well as have two fun learning videos on coloring with Copic markers through Annies Attic Publishing company. I’ve recently been hired as a Fine Arts Instructor for Copic. I love being apart of this team, as there are such amazing images and a wonderful group of talented ladies. I know you will fall in love with them too, if you haven't already. You can keep an eye on my coloring and tutorials at: just4funcrafts.blogspot.com


Hello, it’s Broni Holcombe, I’m a mother to 2 lovely daughters, and a Nana to 3 handsome grandsons and an adorable granddaughter. I live in beautiful South Carolina, where I’m an accountant by day for a major beverage distributor. I spend as much of my non-working time as possible in the papercrafting world…either creating, or sharing and learning online. I started stamping in 2005 and was honored with being chosen as a member of the Splitcoaststampers Dirty Dozen design team 2 years later. Coloring is my passion, and Copic markers are my preferred medium, but I still enjoy my first love of watercolor quite often as well. When I’m not crafting or online, you can find me playing with the grandchildren, kayaking, swimming, or planning my next trip to the beach! For more of my designs, visit me at: bronih.typepad.com/splashesofwatercolor


Hello, Cheryl Scrivens here! My wonderful husband Walt and I have lived in South Florida for nearly 27 years, and we have three sons, two daughters-in-law, and two grandsons. I have been a crafter since I was a child – from sewing to stained glass and lots more in between. Now my craft room is now totally dominated by stamping. My favorite images are floral, which is why I love ALL of Marcella’s artwork dating back to Flourishes and now to Power Poppy. Whenever I feel stressed, I put on beautiful music, and color away! I also have a love for anything to do with technology, and I totally love digital images, being able to resize, easily mask, and finding all sorts of wonderful ways to use them. I especially love that they are delivered instantly! In April 2014, I was honored to be a Dirty Girl on Splitcoaststampers. It is such an honor to join this amazing group of “Instant Gardeners,” and I look forward to sharing with you in the months ahead as Marcella delights us with her beautiful artistry! You can find my blog at: cherylquilts.blogspot.com


Hello! I’m Rhea Weigand, I am a stay-at-home wife to my best friend, Jeff, and a color artist, designer, and instructor. We recently moved from Phoenix to Central New York so “Hubs” could enjoy a position as an Ad Director. We are enjoying small town living and the country life. I have to say, the Finger Lakes region is a beautiful place to live. As for creating, I consider it a blessing as I get to play every day! I've always been creative - from wood working and painting and crocheting to paper arts. I try not having a particular “style” although a few of my students will call it “fussy” due to all the details. I’m self-taught on all of my crafts - researching, reading and watching videos to understand. Then, I put my own spin on the technique. I hope I can bring you lots of inspiration! Visit me at: passionatepapercreations.blogspot.com


Hi from Danielle Kennedy! Taking care of two boys, ages 11 and 9, can sometimes seem a challenge...they definitely keep me on my toes! We are always running around to various sporting activities and school functions. As the weather warms up I love to walk, run, ride my bike, and hike with my family. My husband and I have always hiked with the boys, even before they could walk on their own, and instilled a love of nature and the outdoors. One of my favorite getaways is to take weekend excursions with my fellow photographers and head north to the Adirondacks. My favorite photography is nature; landscapes, wildlife, and macro. Landscapes don't talk back. Or move. Great subjects! So, when I am not going in 10 different directions or at 100 miles per hour, sipping a glass of wine and enjoying a quiet evening at home with my husband, dog, cat, various small animals and reptiles, oh, and maybe the kids, is one of my most favorite things to do! It's a crazy, fun, full of love (and animal hair) kind of household and I wouldn't trade it for the world. For more on my designs, visit me at: wilddragonflydesigns.blogspot.com


Hello there from Debbie Olson! You could call me a designer with a passion for teaching. While my background is in graphic design and education, teaching paper crafting has proven to be a natural outlet for me to fulfill the creative urge on a time-budget. I have been privileged to work with many industry leaders, including several stamp companies, plus paper and accessory companies. I also travel all over the country as one of the design and education team members for Copic products. During my non-paper crafting free time, I play piano, work with stained glass, and I enjoy spending time with my husband and my teenage son in the beautiful Upper Peninsula of Michigan. For a look at my designs, you can visit me at debbiedesigns.typepad.com

So, there you have it — our amazingly talented 
team of digital green thumbs! 

Join us back here tomorrow to see our first Instant Garden image and see what our “Special Ops” team of Instant Gardeners did to make it blossom and shine! Then on Friday, our beautiful Bloom Brigade will show you their take on our new digi release. See you back here soon!

Monday

Camellias: A Paper Tole Tutorial

Hello fellow Power Poppy fans! I'm Ally and I'm here to today to teach you the technique of paper tole and digital stamps.

Here is the card I'm going to make today. It's a super simple design but with lots of hidden dimension...

Power Poppy: Paper Tole Tutorial by Allison Cope

For the PAPER TOLE technique you will need the following tools:
  • 3-4 printed (or stamped) images: I used the fabulous digital Camellias stamp set for my main image and the clear Geraniums Take Two stamp set for my sentiment.
  • scissors and tweezers
  • a stylus and firm foam mat
  • a dark marker for edging: like a Copic W4 or W5
  • 3 dimensional glue like OLBA glue
And to make it even easier, I created a video for all my Power Poppy fans on how this technique is done.  So grab a cup of something warm because it's been cold out there and enjoy!


And here's a side view of all the dimension created by the paper tole technique...

Power Poppy: Paper Tole Tutorial by Allison Cope

Why not PIN this tutorial for future reference...

Power Poppy: Paper Tole Tutorial by Allison Cope

Thanks for joining me today! We have lots of exciting stuff coming towards the end of the week so stay tuned for more Power Poppy goodness to come your way.

~ Ally ~


Supplies:
stampsCamellias, Geraniums Take Two
cardstock:  X-Press It cardstock, Bazzill
patterned papers:  Bo Bunny (Crazy Love)
dies:  Spellbinders (Labels 4), Lawn Fawn (Stitched Rectangles)
inks:  Memento (Rich Cocoa), Copic Markers (G20, G21, G24, G28, R59, R81, R83, R85, R89, W4, YG63, YG67, YG91, Y08)
adhesive:  OLBA glue, Scotch ATG.

Friday

Drum Roll Please......


Hello all and Happy Friday! It's that time of the week when we not only share the latest bit of eye candy from the oh-so-fabulous Bloom Brigade, but we put customers like YOU at center stage  with our Power Poppy Peep of the Week Showcase! Woot-Woot!

HERE’S HOW TO PLAY IN OUR PEEP OF THE WEEK CHALLENGE: All you need to do to get in the running for the Power Poppy Peep of the Week is use the linky below and share a new Power Poppy creation. Just that simple! It can be anything — a card, an altered item, a 3D creation, a set of cards, ANYTHING! We can't tell you how much we love to see what you create!

OFFICIAL RULES:
  • Use Power Poppy Stamps on your creation! 
  • Link up your creation using the Linky below (It helps us to find you! Although it’s not a necessity to win. We scour creations all over the web!).
  • Could you please mention the Peep of the Week challenge in your blog or gallery post with a link back to this blog post? We would sure love it if you did! 
  • We’ll accept entries up until Thursday @3PM EST and will announce the Power Peeps of the Week next Friday for our Peep of the Week post.

TIME TO MEET OUR PEEPS FOR THIS WEEK!


http://swimbikerunandstamp.blogspot.com/2015/01/power-poppy-azaleas.html

This first beauty was crafted using Power Poppy’s Azalea set by one sweet lady who has been a Power Poppy fan since the very beginning -- Maria Rodriguez! She just started a blog and we couldn't be more excited! Mary, you're going to love having a blog and we are going to relish getting to see your work in living color! I love this pretty-in-peach creation and the romantic sheer ribbon treatment off to the side!  


We have to say that Patti Willey has been on a roll and this card using Geraniums Take Two just proves it. Look at that soft watercoloring and that FABULOUS layout! Don't you just love that little punched heart and the mini clothes pin? I sure do!

Ladies, we are so excited to add your beautiful creation to our Power Poppy Peep of the Week Board over on Pinterest! How can YOU end up being honored in this way? Simply show us your card making style using Power Poppy Stamps and then link up your creation below! And, if you’re a Peep of the Week Winner and would like our POWER POPPY PEEP OF THE WEEK BLOG BUTTON to “wear” on your blog with pride? Simply email us at bloom@powerpoppy.com and we’ll send that button right to you!

As we make our way to the weekend, I am sure you'd love a little creative inspiration? Well, these "Bloomies" below have a special treat! Hop on over and see.....


Thanks so much for stopping by! Oh, before I go! Mark your calendar for next Wednesday, January 14th. WE HAVE SOME EXCITING NEWS THAT WE CAN'T WAIT TO SHARE!!! Come back and see the fun that we have up our sleeves! ;-)

~Julie